Drawing the face is not an easy task. There are so many different elements behind the face, like structure, muscles, anatomy, perspective, etc., that explaining them in a single article would be impossible. Luckily, we have another article on how to draw independent parts of the face where we don’t only go over the aesthetic aspect. Still, we also learn about structure and anatomy.
However, in this tutorial, what we’re going to learn is how to draw a face using proportions and easy shading techniques. We do recommend you check our other articles and sign up for our mailing list to get notified for each tutorial we post!
What you’ll learn in this tutorial:
- Proportions of the face
- Basic shapes of facial features
- Basic shading of the face
- How to draw a face step by step
These are the materials we are going to use:
- A 2H pencil
- A 4B pencil
- A soft blending tool
- A kneadable eraser
- A white gel pen
- A ruler
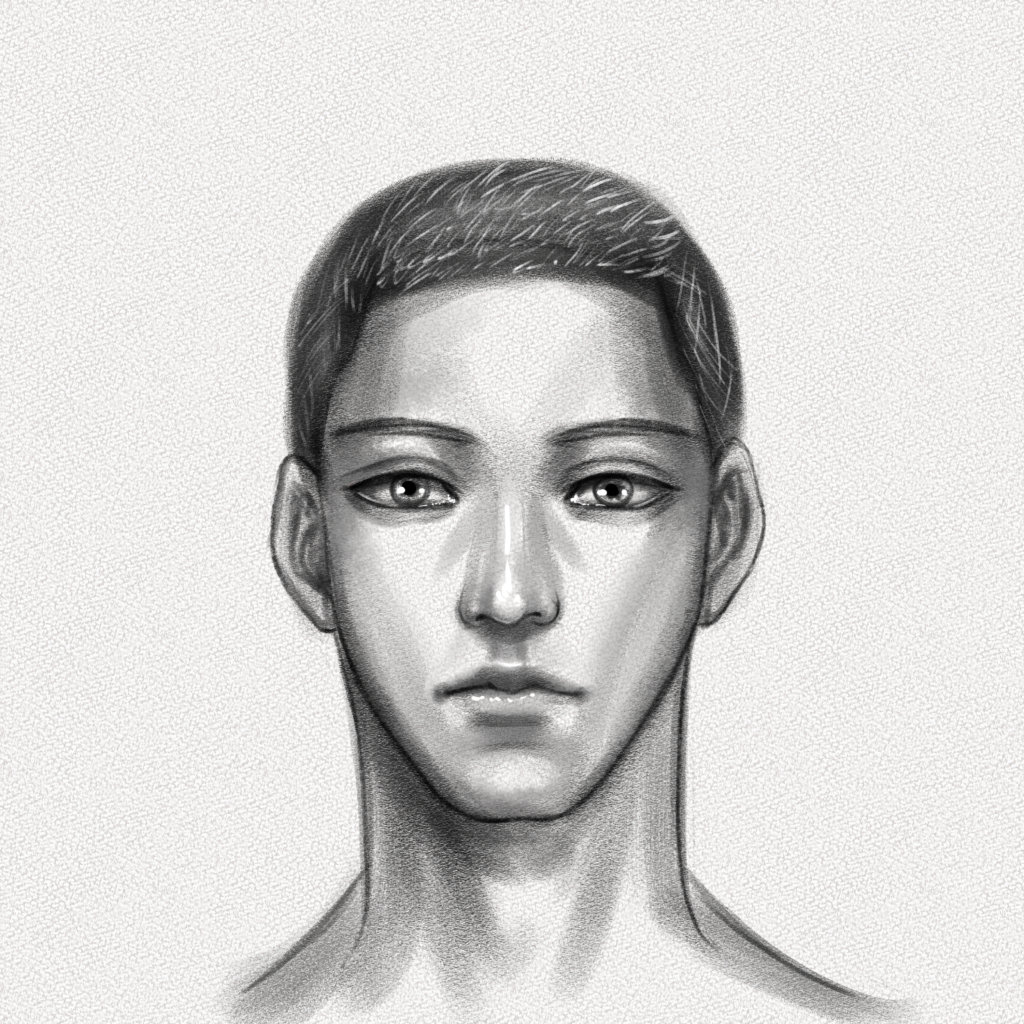
This is the face you’re going to draw
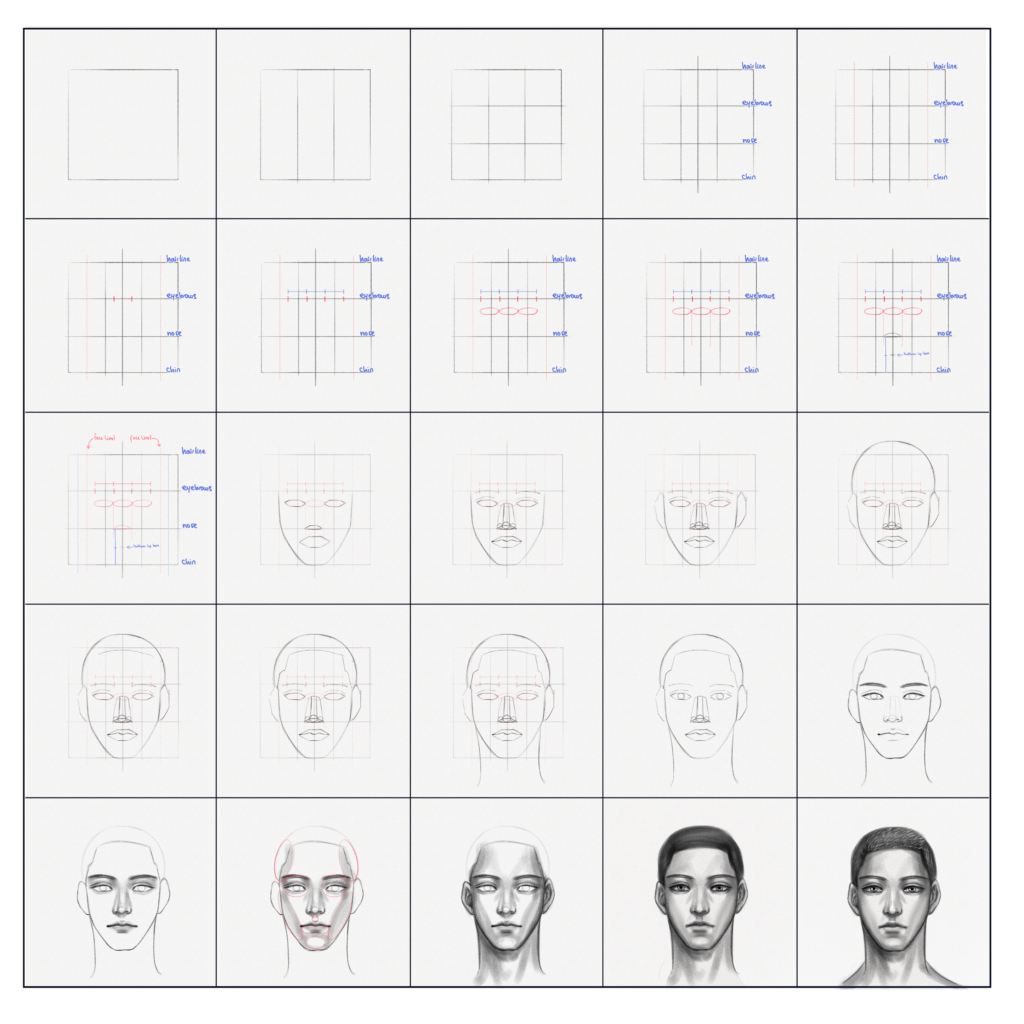
And these are all the steps we’ll walk you through:
Section 1.- Proportions of the Face
Some of you have probably seen face drawing tutorials where a circle or sphere is used as a base. However, the head is not a sphere. Besides, explaining the proportions of the face from different perspectives and angles is really hard if we use a circle or sphere as our base, so in this tutorial, we’re going to use a square.
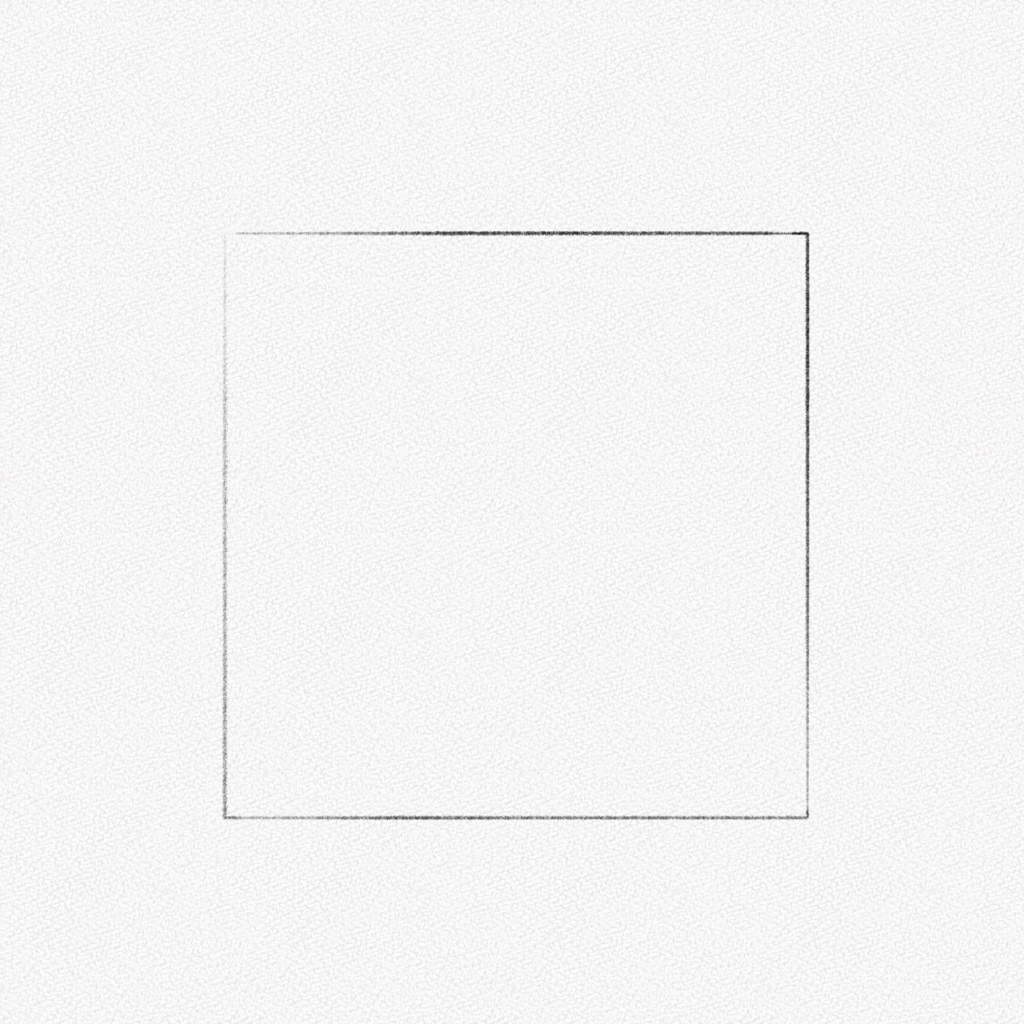
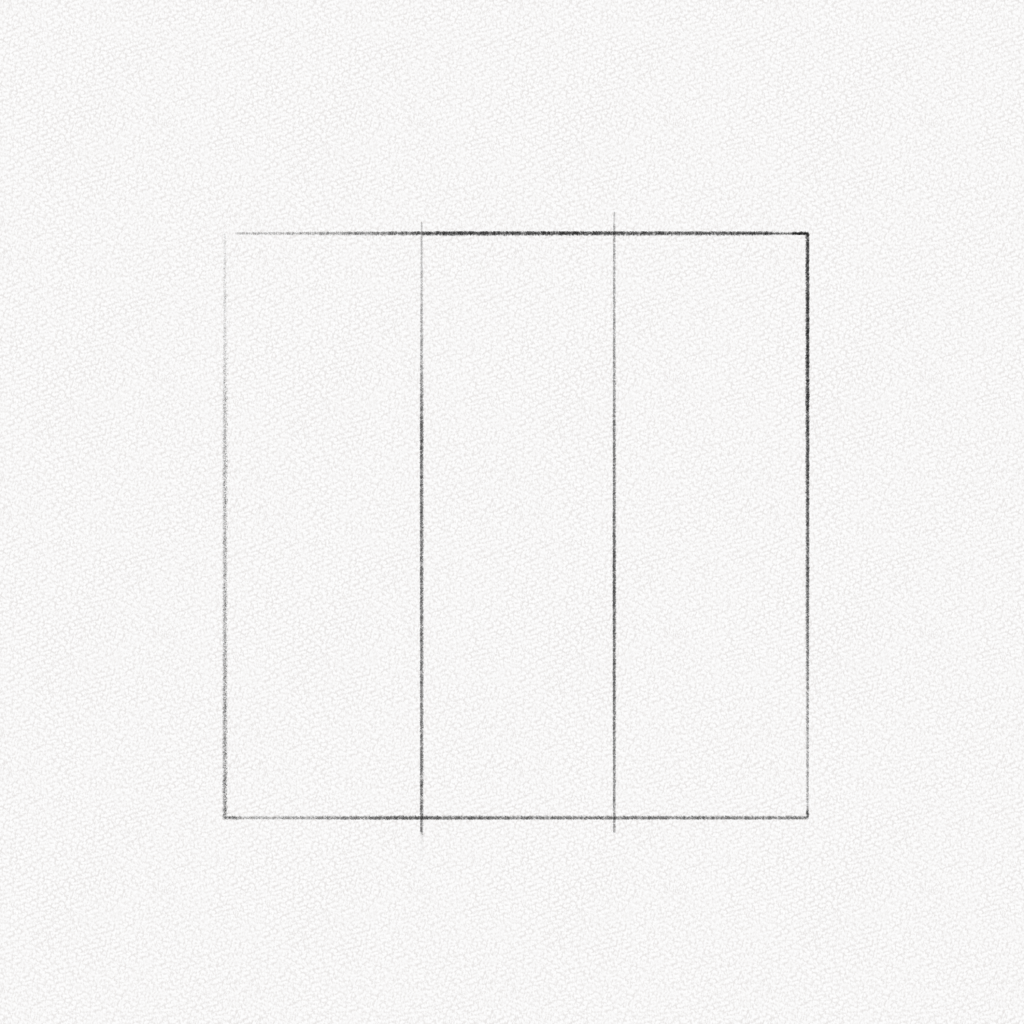
Step 1: Draw a Square
With your ruler, draw a square in the middle of your canvas, leaving enough space for the hair and for the neck.
Step 2: Split your square
Measure and draw two lines, vertically splitting your square into three equal parts.
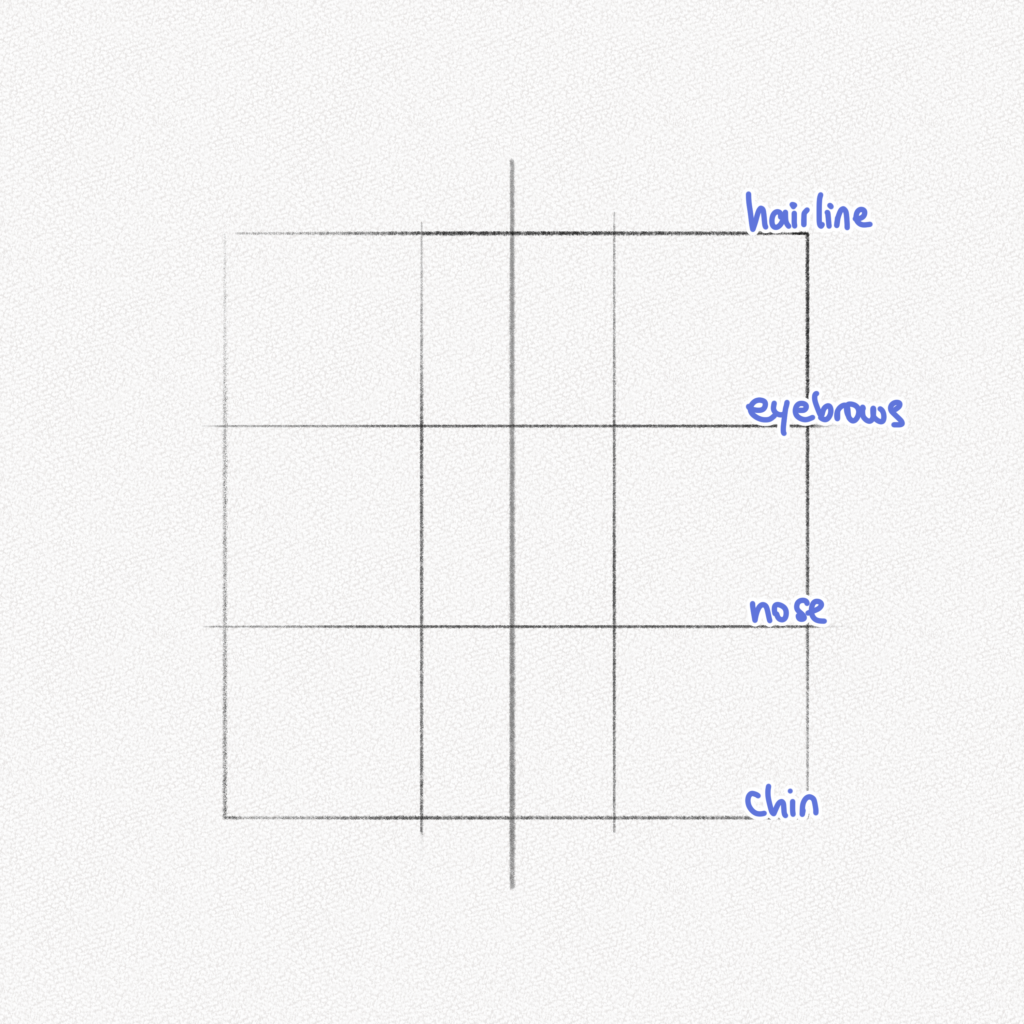
Step 3: Repeat
Measure and draw another two lines, splitting your square into three equal parts horizontally.

Step 4: Draw a line
Draw a line right in the middle of your square. That will be the middle part of the face we’re going to draw. The lines you drew horizontally are the eyebrows, nose, and chin guidelines.
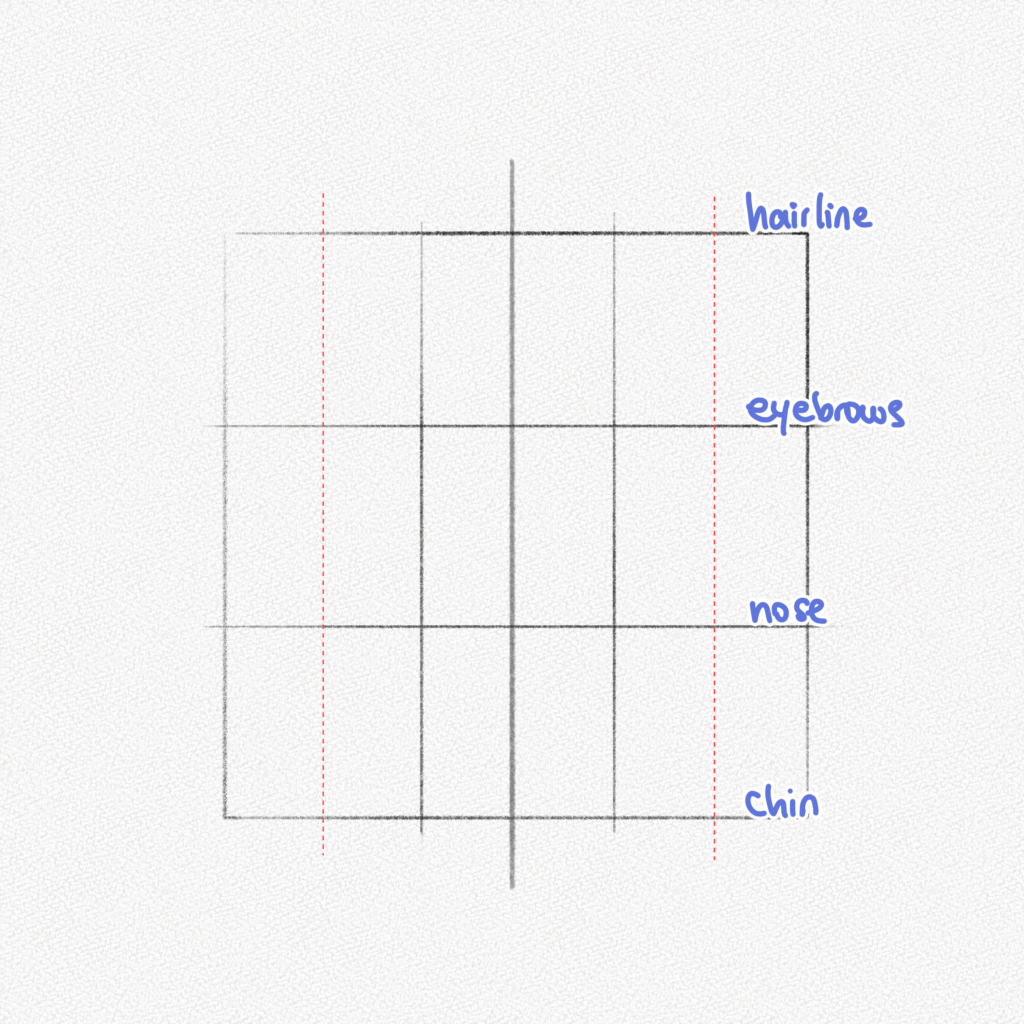
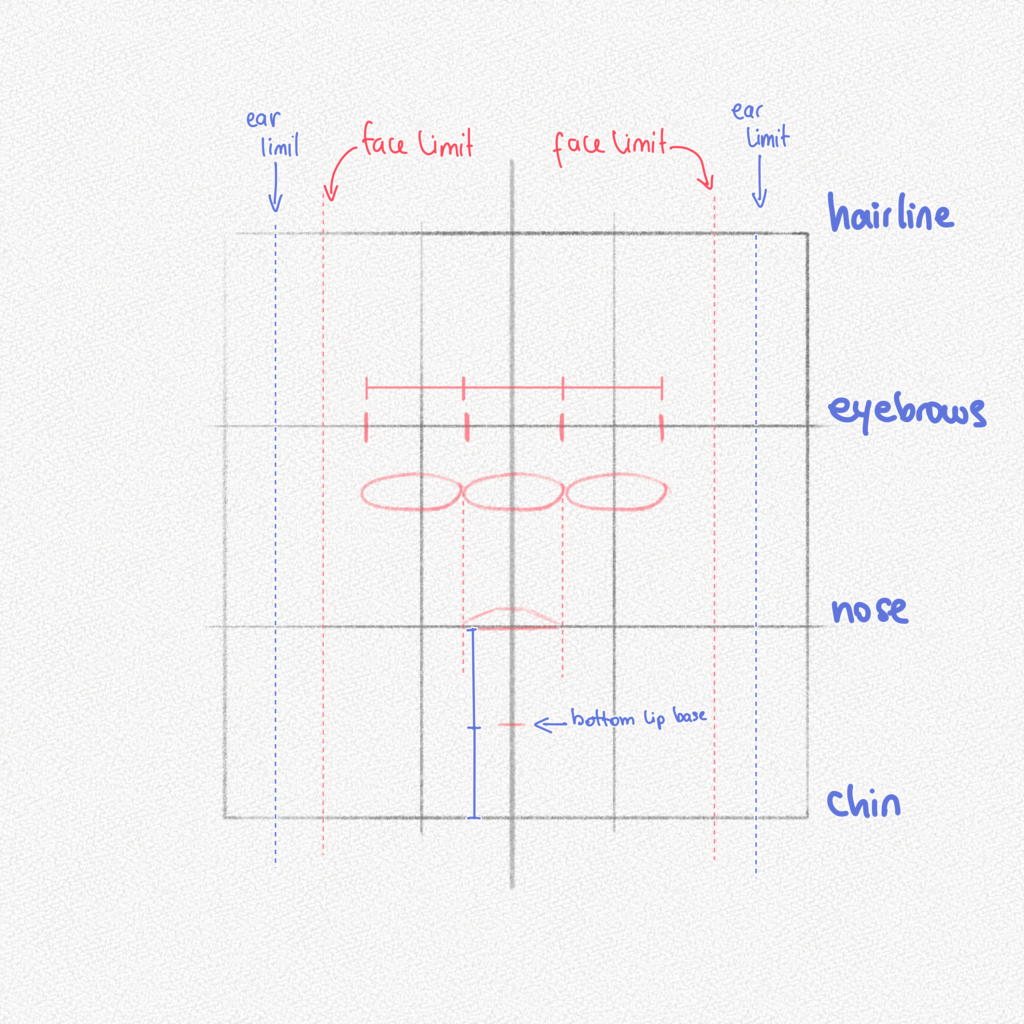
Step 5: Mark the proportion lines
With your 2H pencil, draw a line through the middle of the two side rectangles. These lines will be the limits of the face. You can move them around to make longer or wider faces.
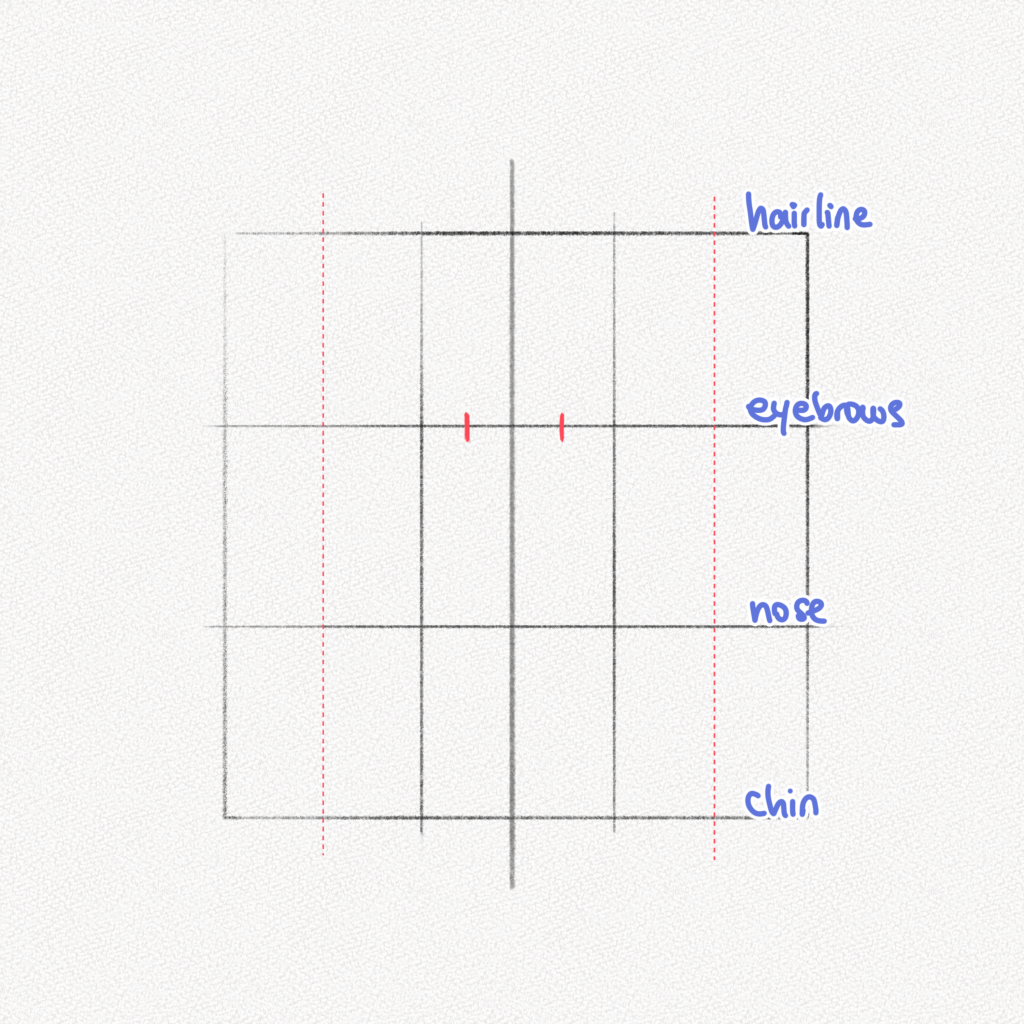
Step 6: Mark the nose position
For the nose, we are going to measure and draw two lines at the same distance from the middle of the face, as shown in the diagram. Those lines will define the nose and the corners of the eyes’ position.
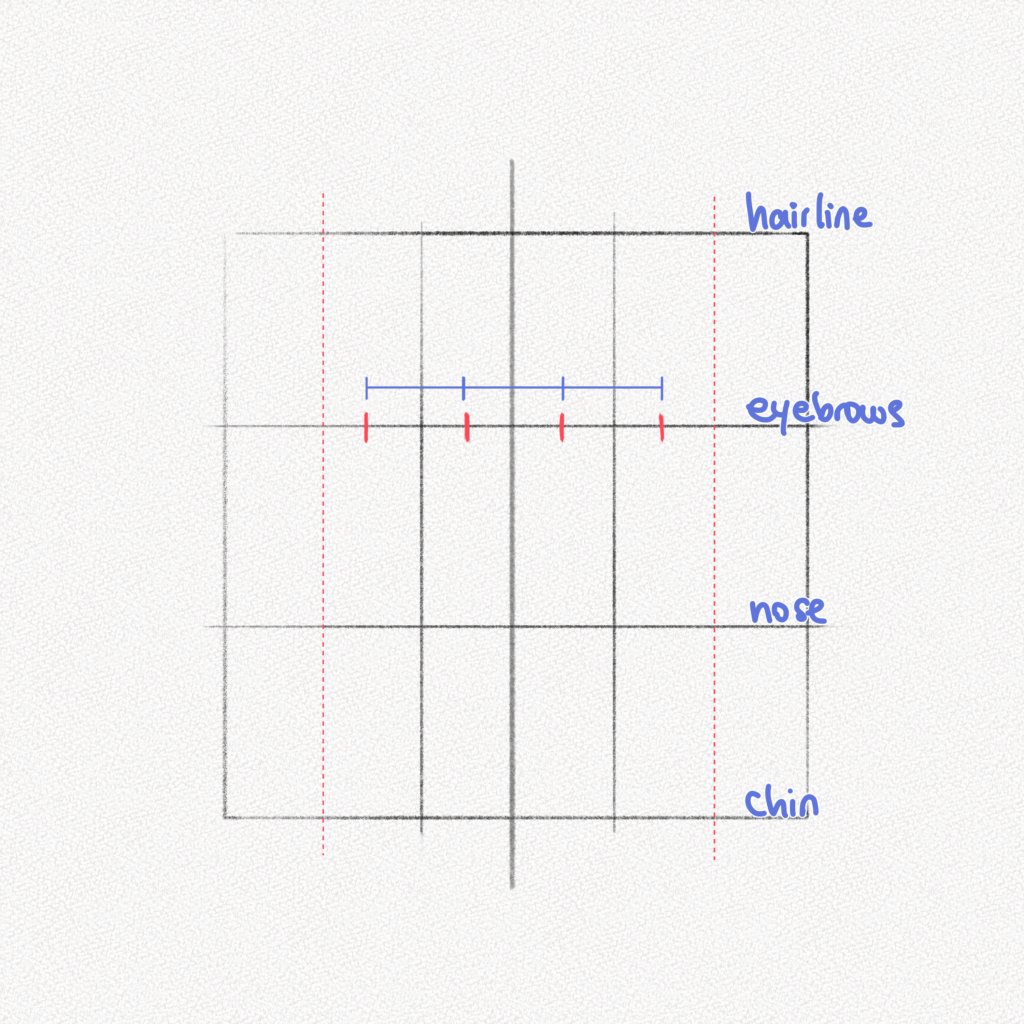
Step 7: Mark the eyes’ position
Now mark that same distance on the sides. Those lines will set the position of the eyes.
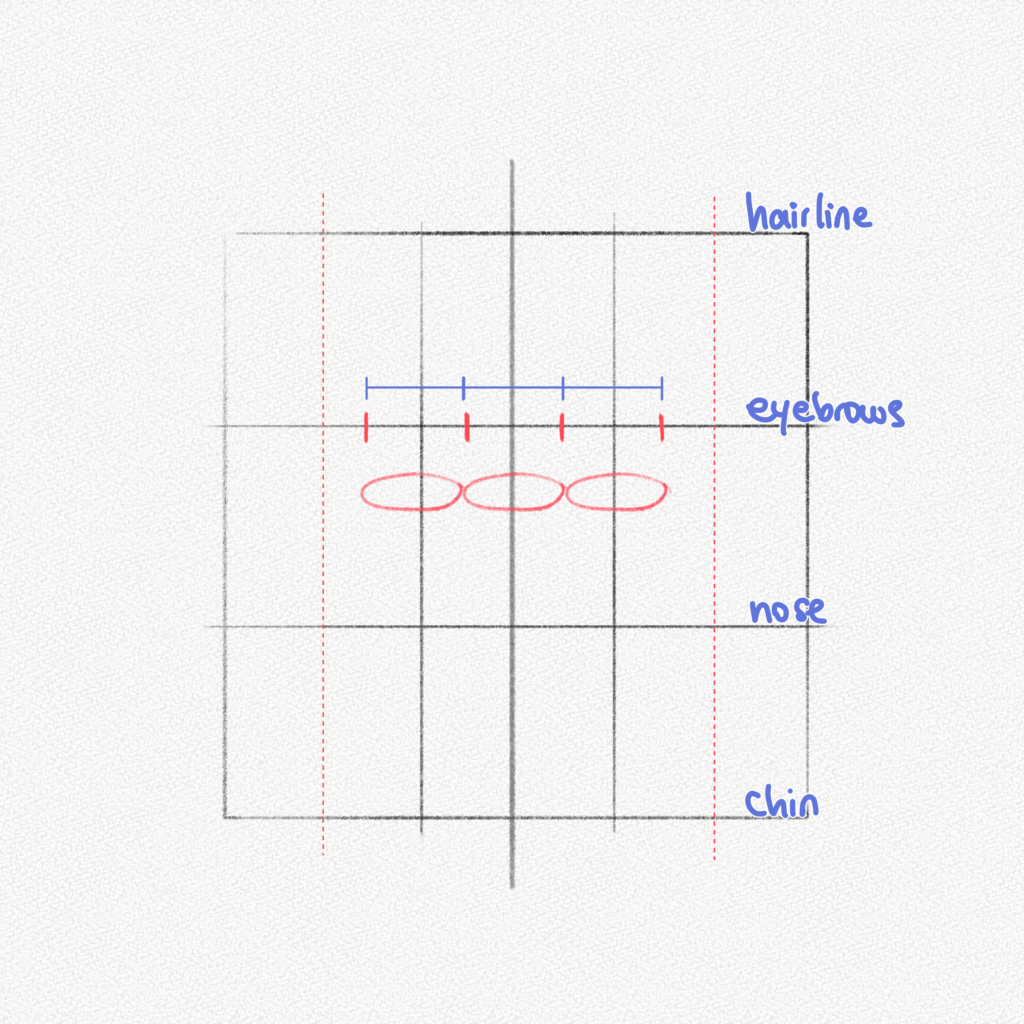
Step 8: Draw three ellipses
Using the lines we marked as a reference, we’re going to draw three ellipses.
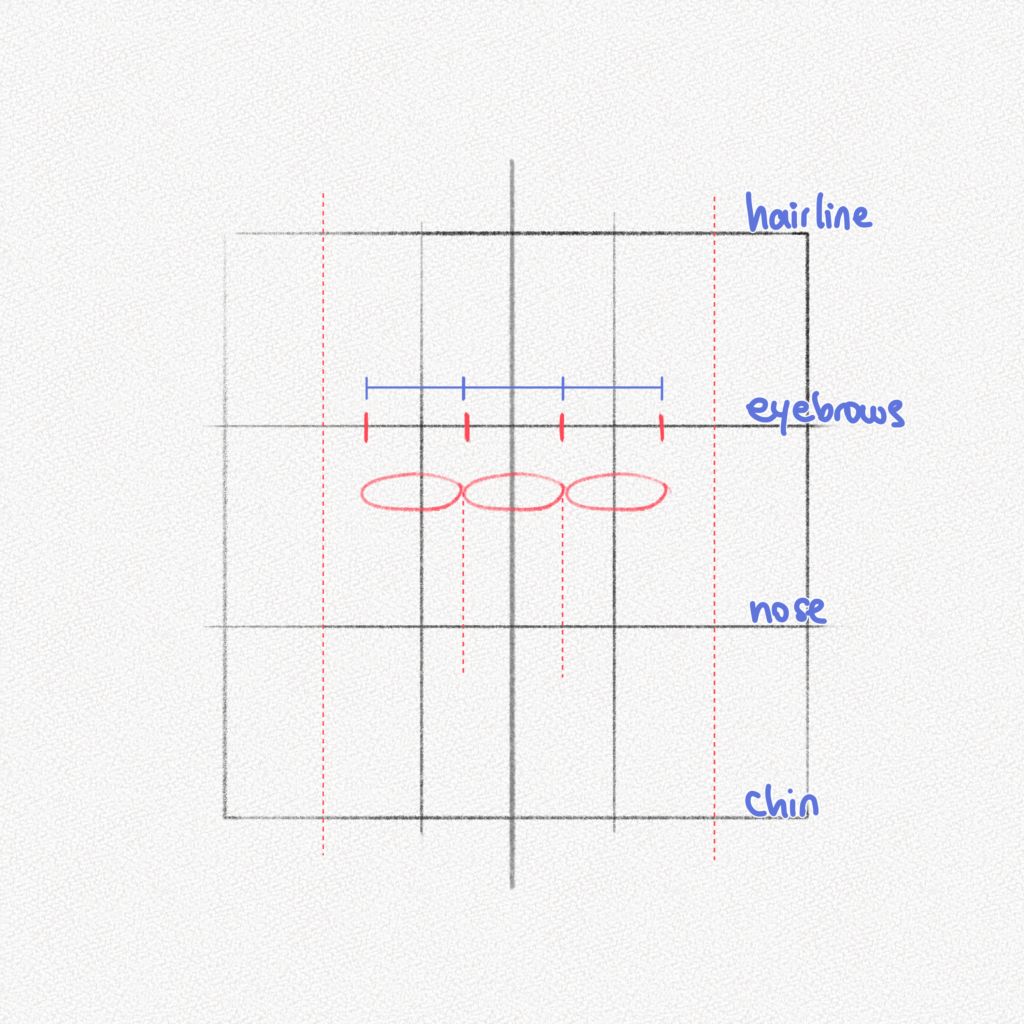
Step 9: Mark the nose position
Now, visualize two vertical lines that go to the nose guideline. These lines will mark the nose position.
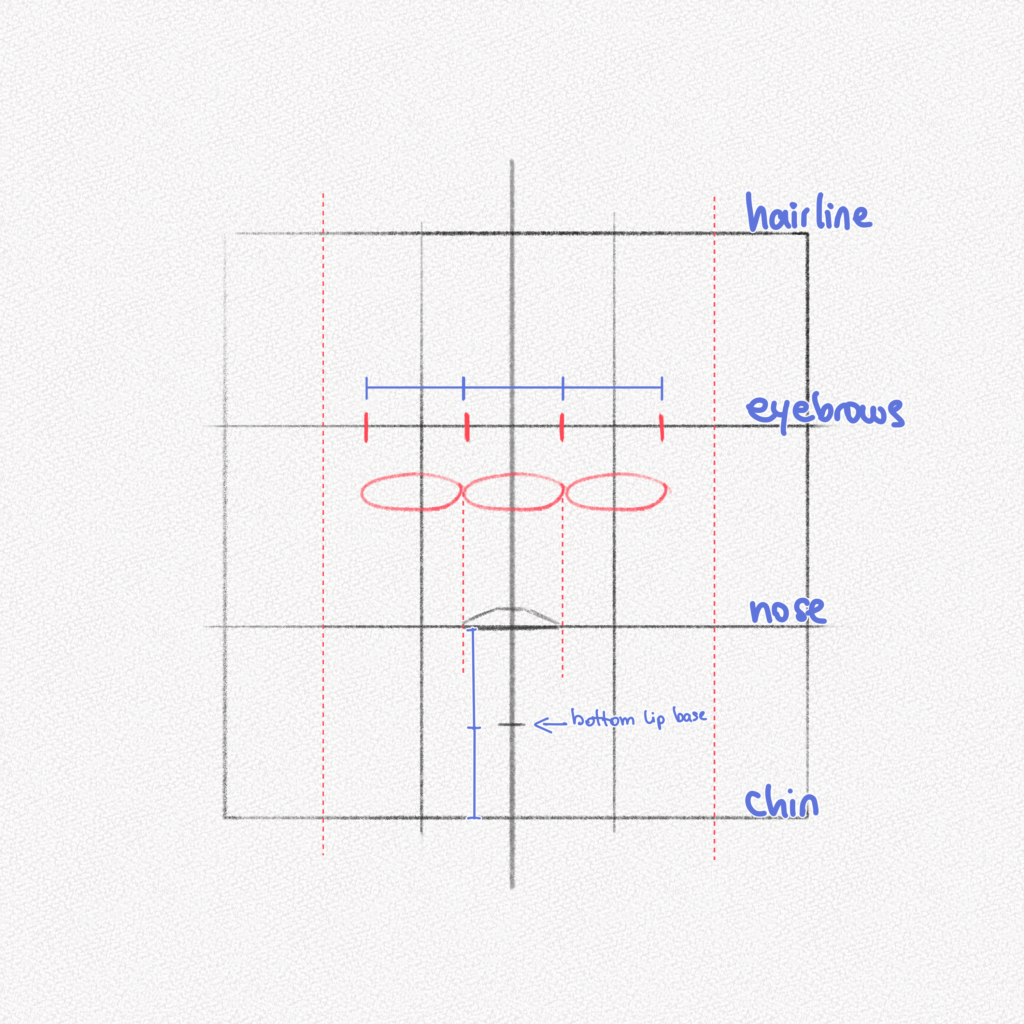
Step 10: Sketch the base of the nose and lips
Using a triangle-like shape, mark the base of the nose. This shape can be as broad or narrow as you want the nose to be. Draw a small line between the nose and chin in the middle of the section. That will be the bottom of our lips.
Step 11: Mark the ear limits
As I mentioned, these are just guidelines, these lines can be changed to your liking, but the proportions should remain constant. The limit should be around the lines marked in blue for the ears. Notice how those lines set the second half of the side of the square.
Section 2.- Basic shapes of facial features
For this section of the tutorial, I advise you to check our other tutorials first:
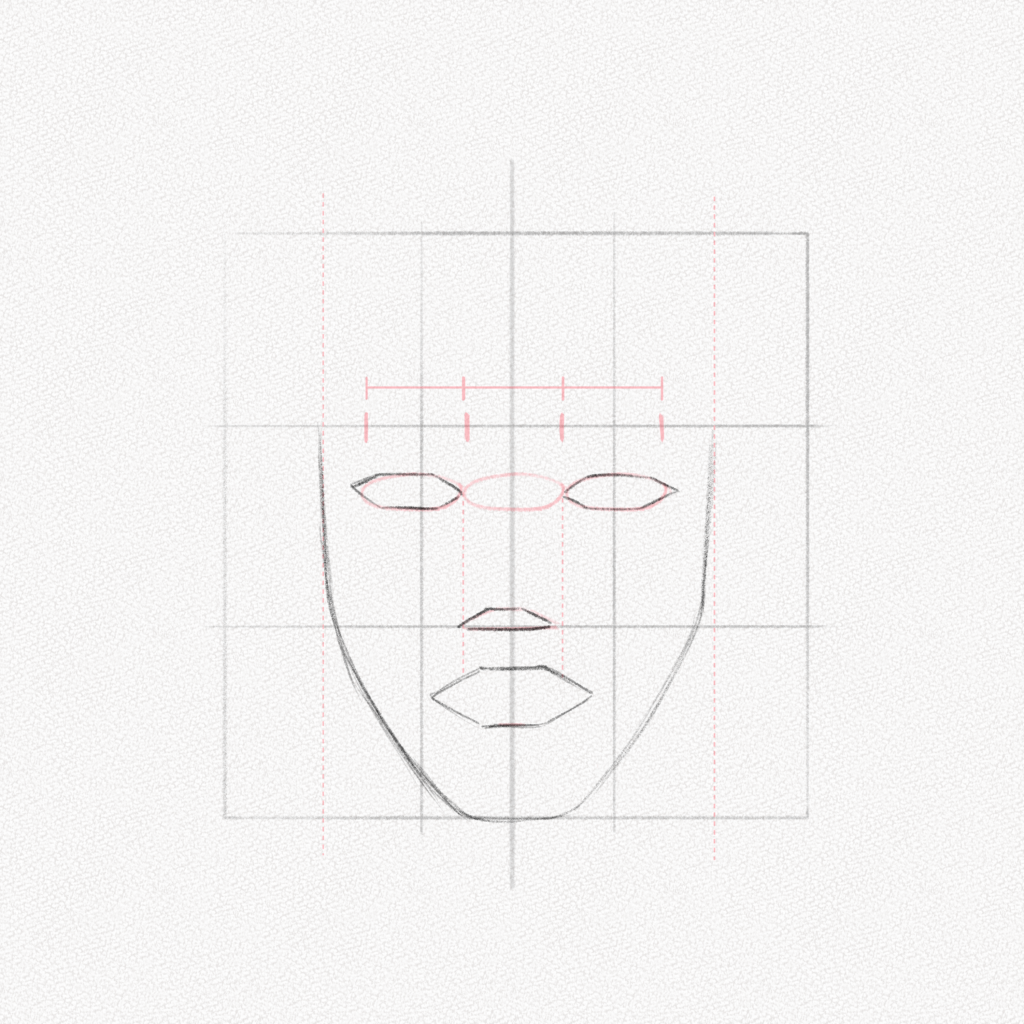
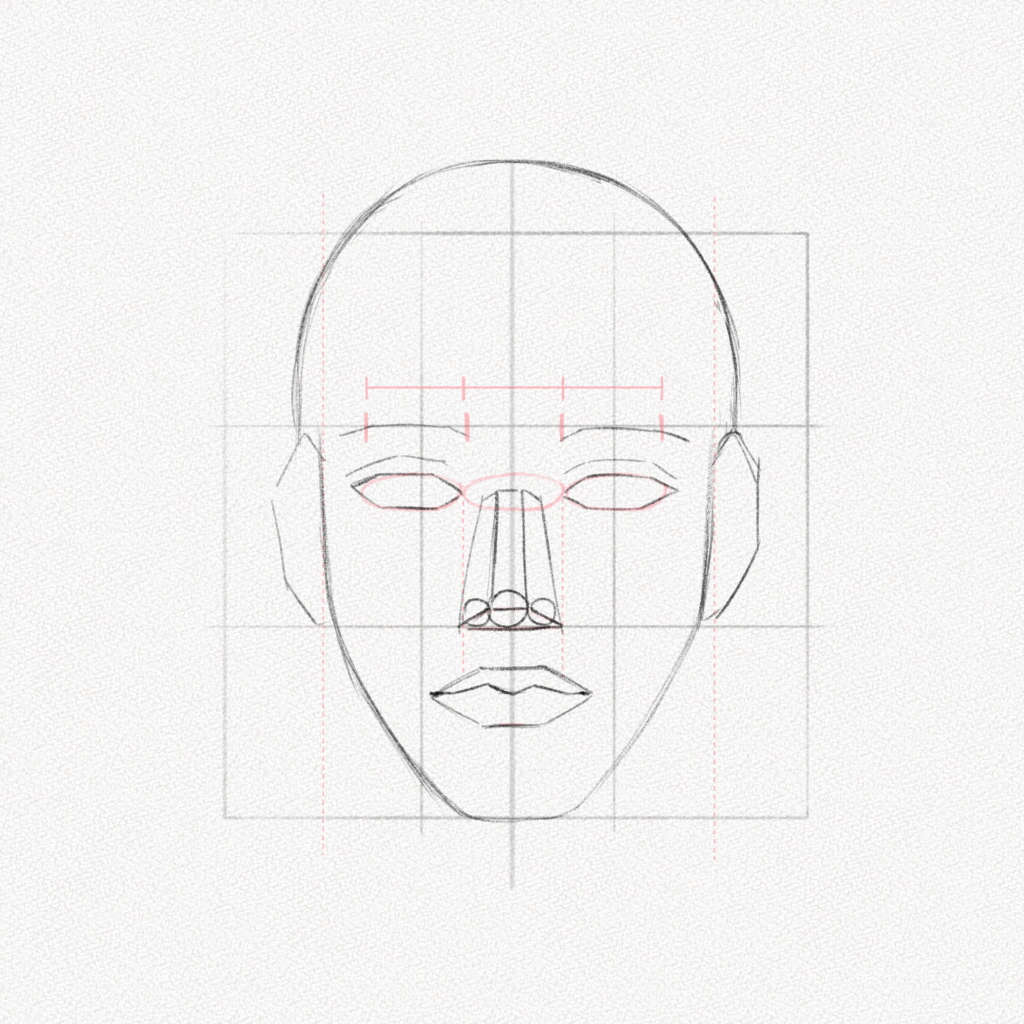
Step 12: Mark the facial features’ basic shapes
For this step, we are going to erase our guidelines and draw the face’s basic shapes. For the eyes, two hexagon-like shapes for the nose, a triangle-like shape, and another hexagon-like shape for the mouth.
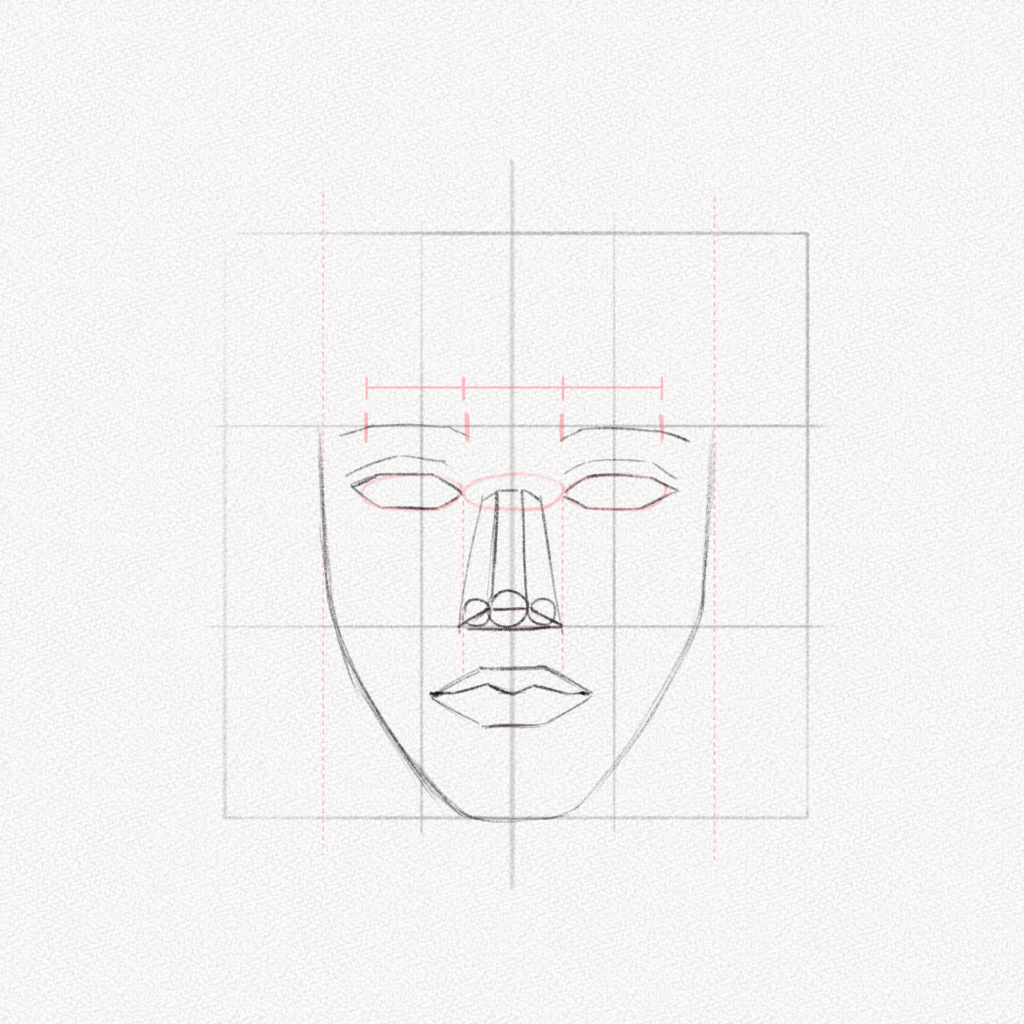
Step 13: Add definition to the facial features
In this step, we are going to add the guidelines for the eyebrows, nose, and lips, as shown below.
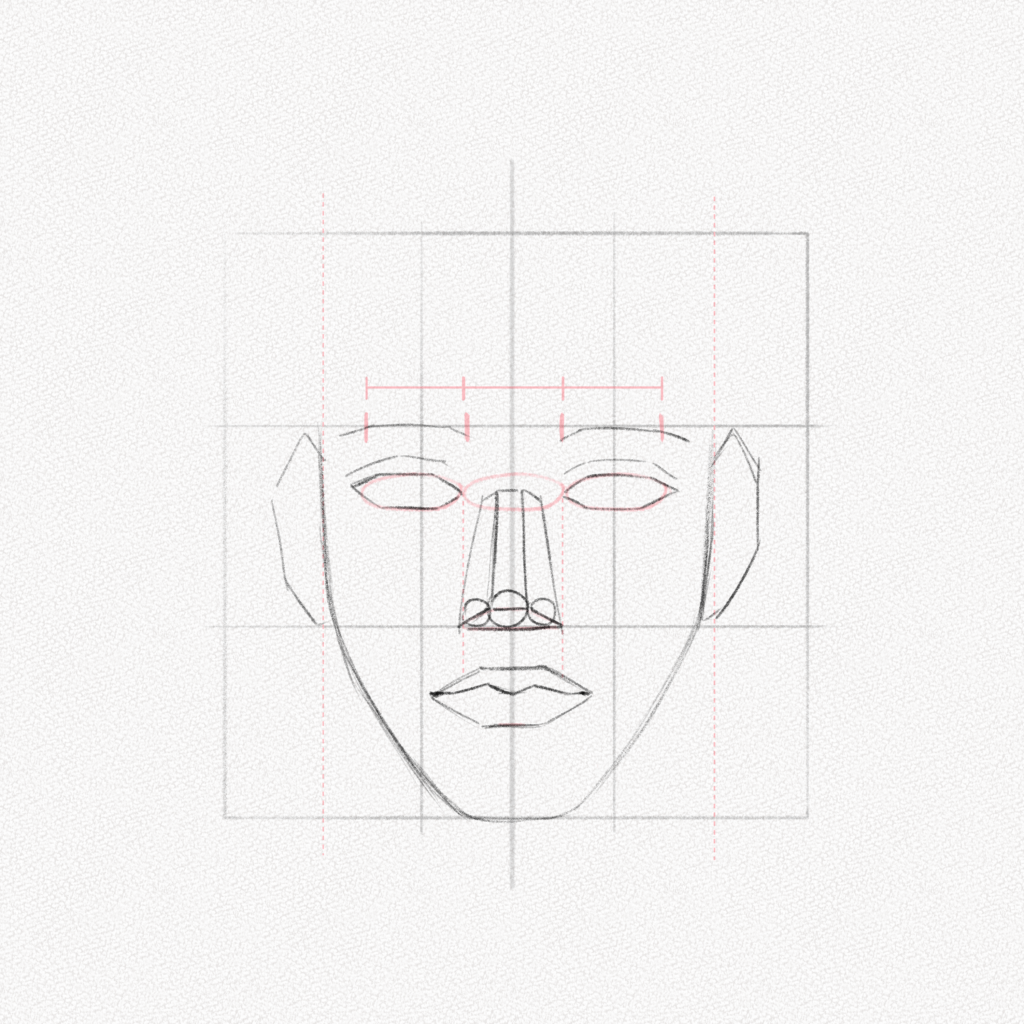
Step 14: Add the ears
The ears are between the eyebrows and the mouth. We can hint at the eyes’ shape using hexagon-like shapes.
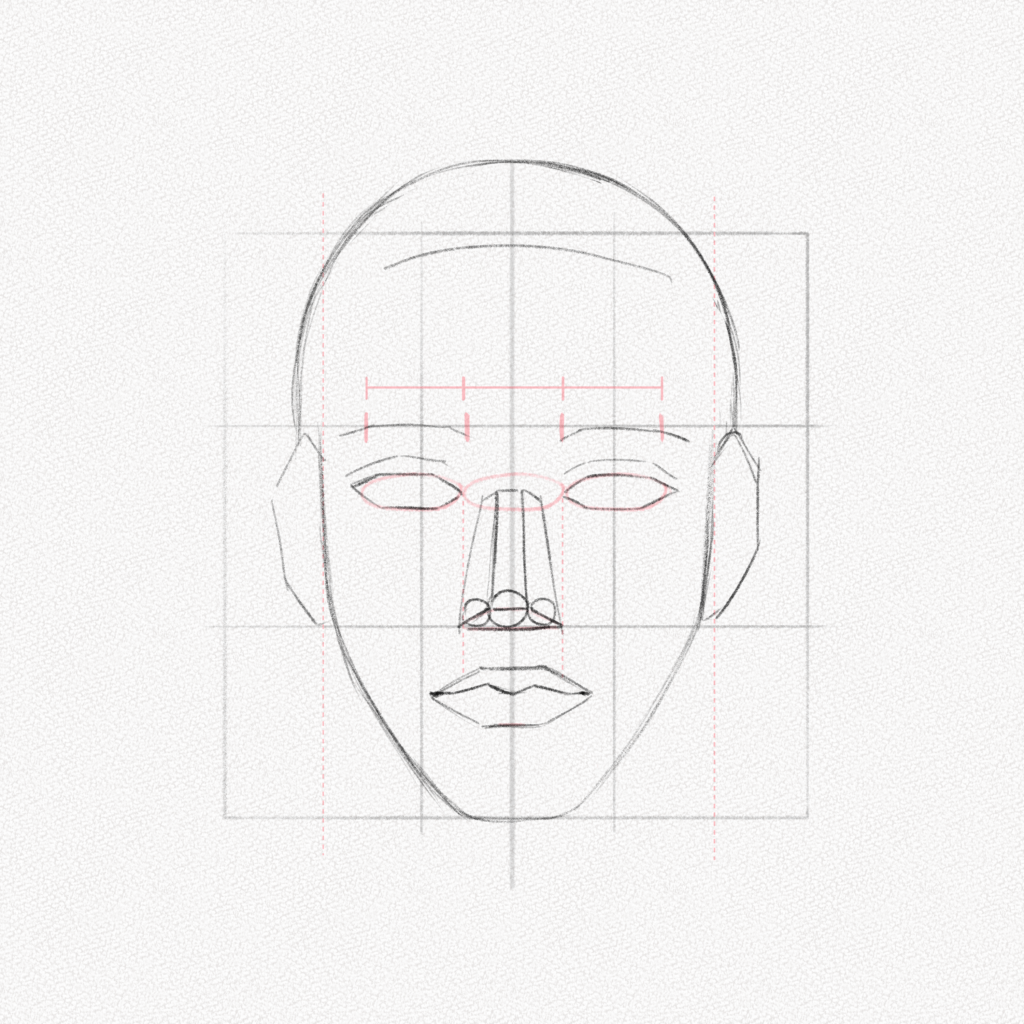
Step 15: Add the top of the head
Parting from the middle of the ears, we are going to add a curve going slightly above the top of our square. The head is wider at the back and narrower at the front, so the face will always be slightly bigger.
Step 16: Mark the hairline
With a long curved line, we will mark the hairline just below the top side of our square.
Step 17: Mark the hairline sides
There are many kinds of hairlines. However, we all share those small “steps” on the sides. Follow the diagram if you’re not sure how to do it.
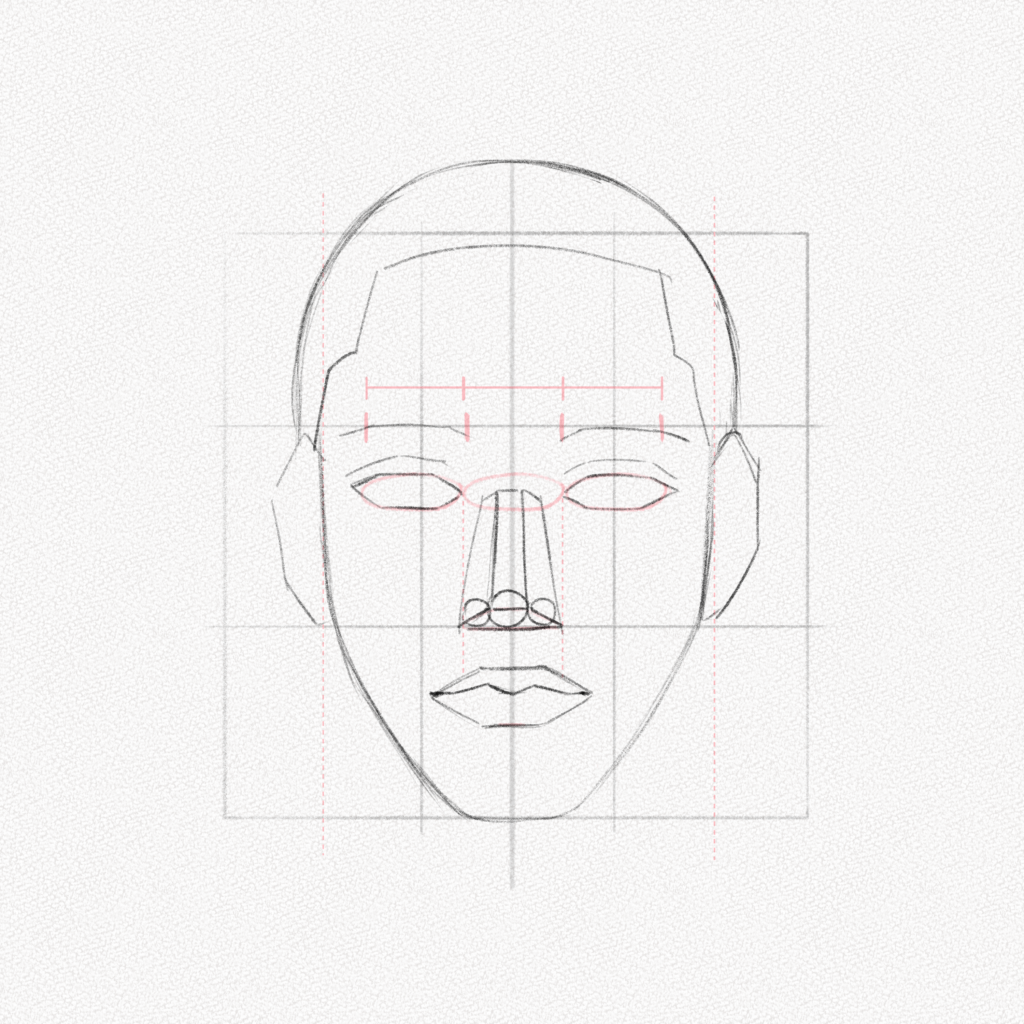
Step 18: Add the neck
Draw the neck with two straight lines that cube at the base.

Step 19: Add the irises
Now, erase the rest of the guidelines and add the irises by drawing two circles right in the middle of the eyes.
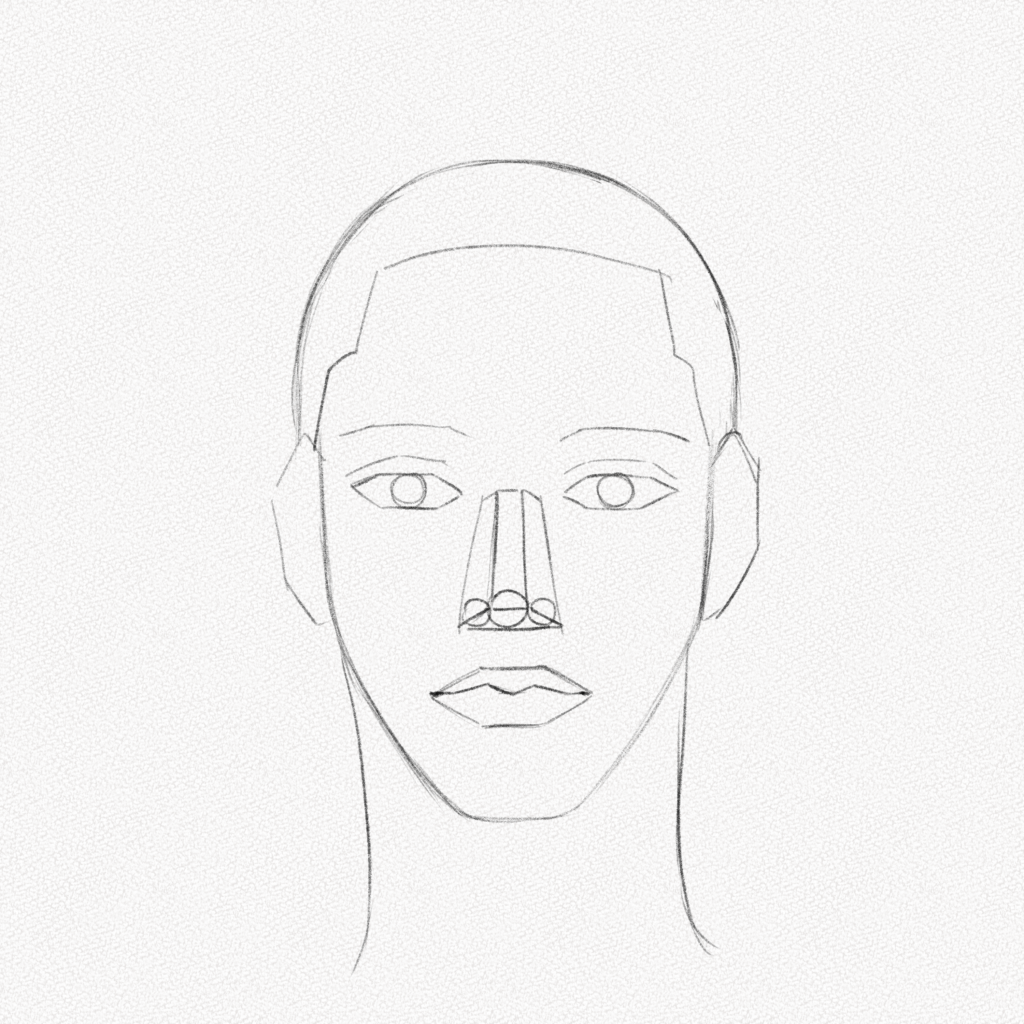
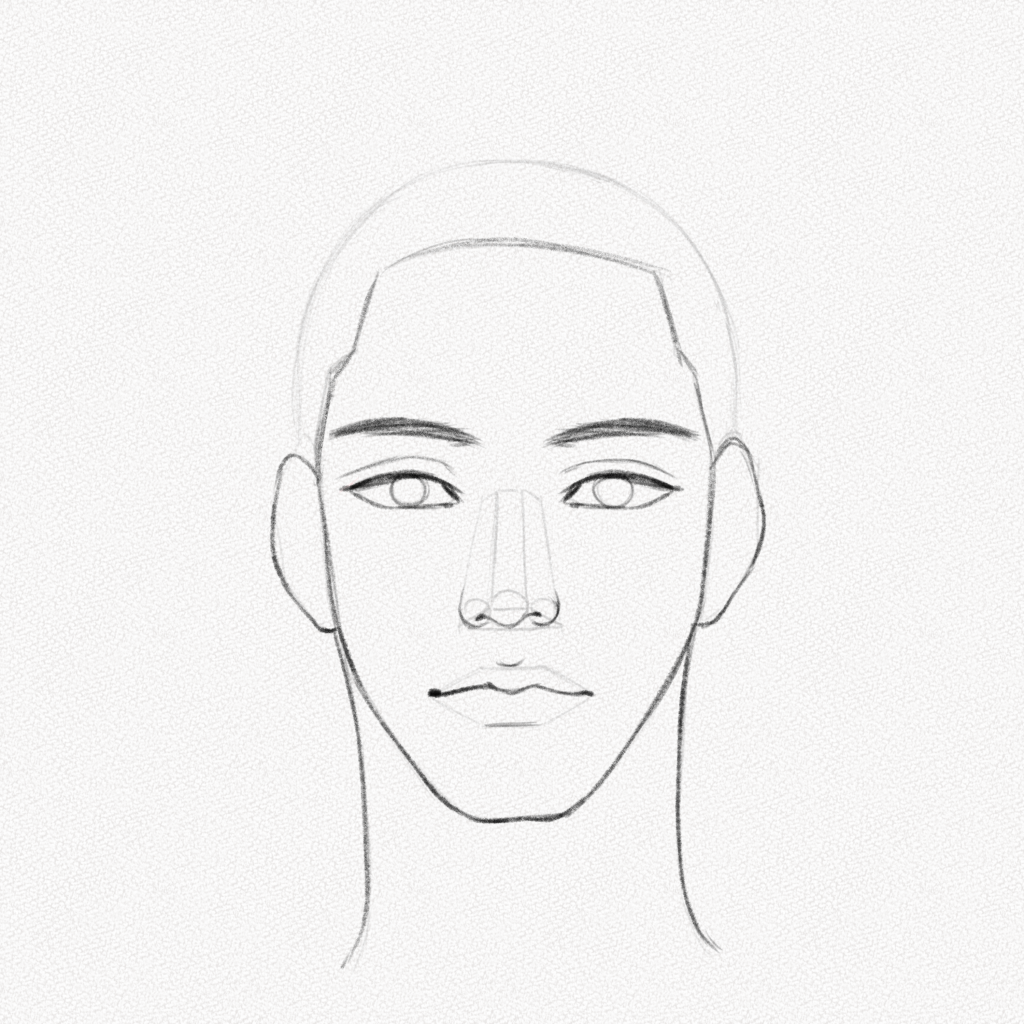
Step 20: Draw the facial features
Using our 4B pencil, we are going to list the most notorious aspects of facial features. Again, we recommend checking our other tutorials for a more detailed explanation of each one.
Section 3.- Basic Shading of the Face
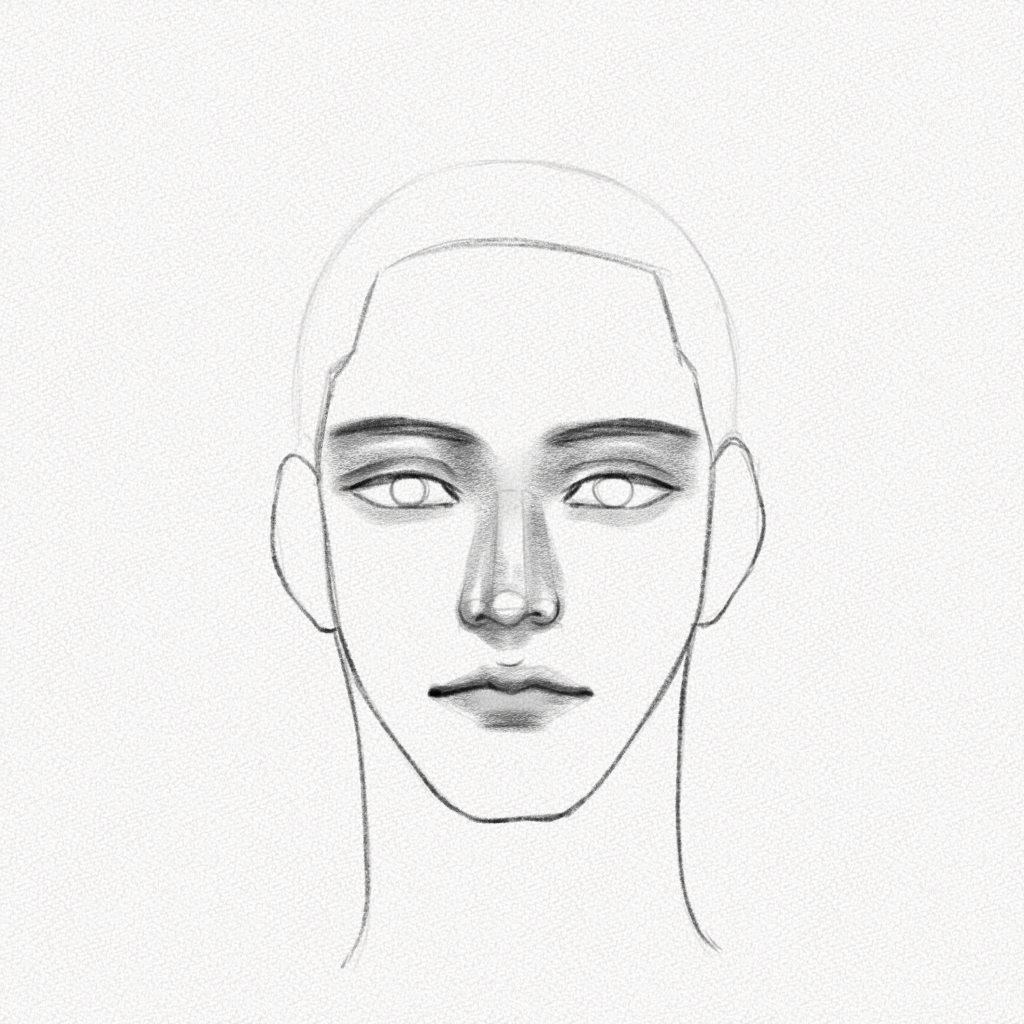
Step 21: Shade the mouth, eyes, and nose
With your 4B pencil, softly shade around the eyes, mouth, and nose to define the most important facial features.
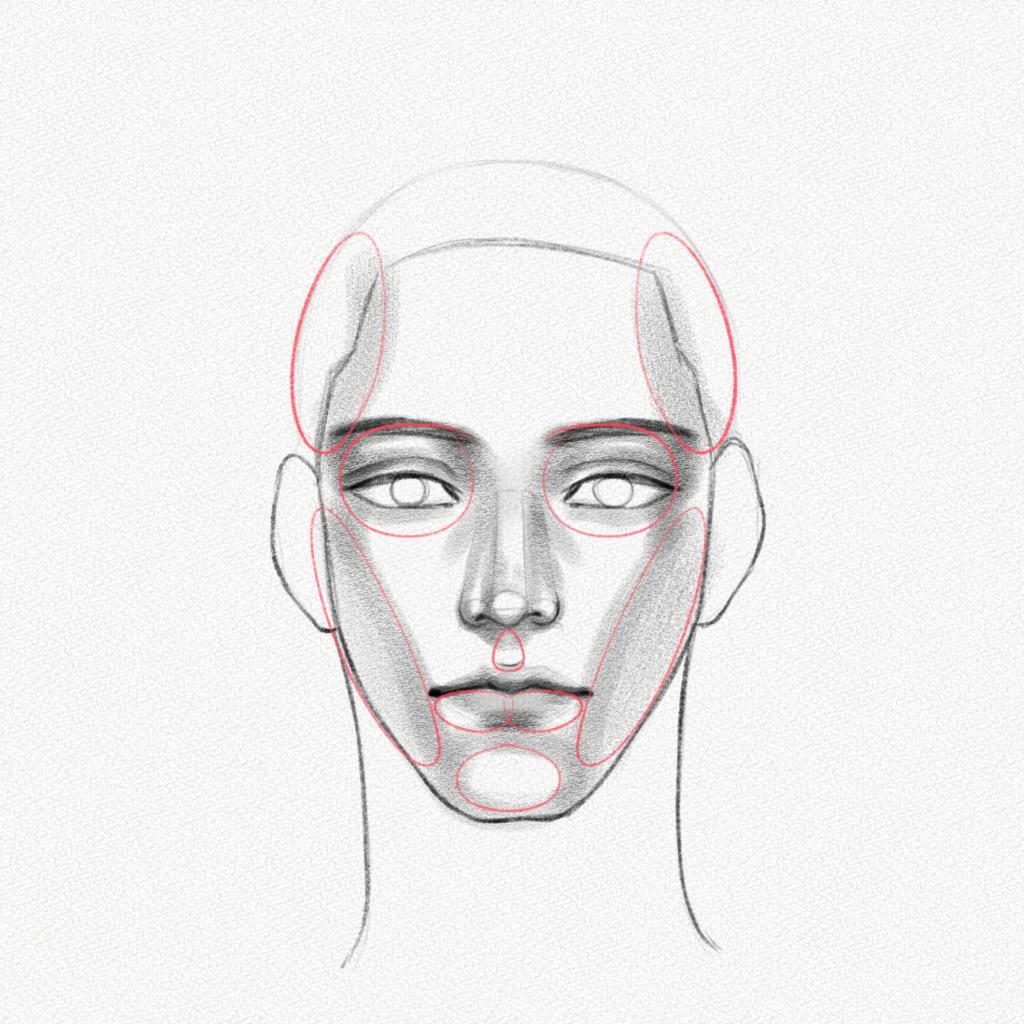
Step 22: Shade the rest of the face
The face has many muscles, volumes, and textures, but we can break the main sections by using elliptical shapes, as shown below, putting more graphite layers on the borders and darker parts.
Step 23: Shade the neck and ears
Shade the neck and ears, as shown below. For the channel, build more graphite layers around the face. This will be the shadow cast by the head. For the ears, use two “C” and shade using more graphite for the inside of each ear.

Step 24: Blend, add the irises and hair
With our soft blending tool, blend the graphite of the face and neck, adding more contrast where needed. Add the pupils and shade the eyes as well.
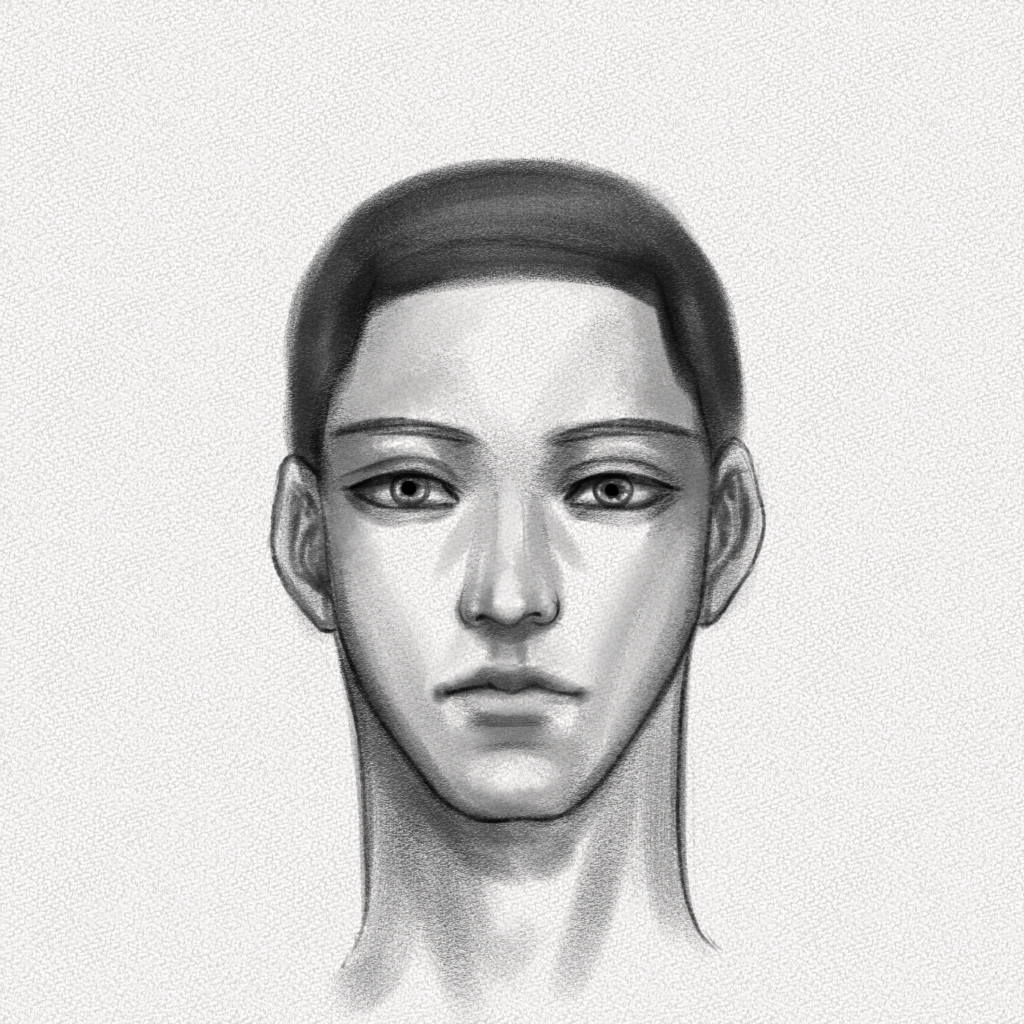
Step 25: Add highlights
With our kneadable eraser, mark the highlights on the eyes, nose, and mouth, and with our gel pen, we are going to add more highlights to the smaller areas, especially to the eyes and lips.
Now let’s take our kneadable eraser and shape it into a fine tip to take away some graphite from the hair to add a bit more dimension.
And that’s it. You’re done.
Thank you for following this tutorial. You did great!
I hope you learned something new today and that you now have a clearer notion of the proportions of the face and how to draw and shade a face.
Until next time!