 One of the many perks of owning a cutting machine is having the ability to turn plain, boring clothes into something special. You can add fabulous designs from the internet or even your own designs and text to your clothes. It’s like having a custom clothing workshop right at your fingertips.
Whether you want to jazz up some t-shirts with cool graphics, make a custom tote bag, or embellish a dress with delicate details, a cutting machine is your best secret weapon. The possibilities are endless, and the process is quite simple to do! In this article, we’ll tell you all you need to know about making shirts using your Cricut cutting machine, how to use the software for shirt-making, we’ll recommend you the best Cricut machines for cutting and heat transferring that you might need as well as accessories and tools that will make the process much easier, and which fabric is the best for each technique and material.
But wait, there’s more!
A cutting machine isn’t just for personal use. If you have a creative side and an entrepreneurial spirit, it can be a gateway to starting your own clothing line or offering customized clothing services. The possibilities are endless, and you can turn your passion into a business venture.
How to Find the Best Cricut Machine for Shirts
Type Of Machine
When it comes to shirt-making or customizing clothes, there are two main machines that play a crucial role: a cutting machine and a heat press.
Mastering the use of these machines involves understanding various techniques, such as temperature settings for different materials, as well as the compatibility of materials with cutting force and depth. This knowledge will help determine whether an entry-level machine will suffice or if a more professional one is needed.
Cricut Cutting Machines
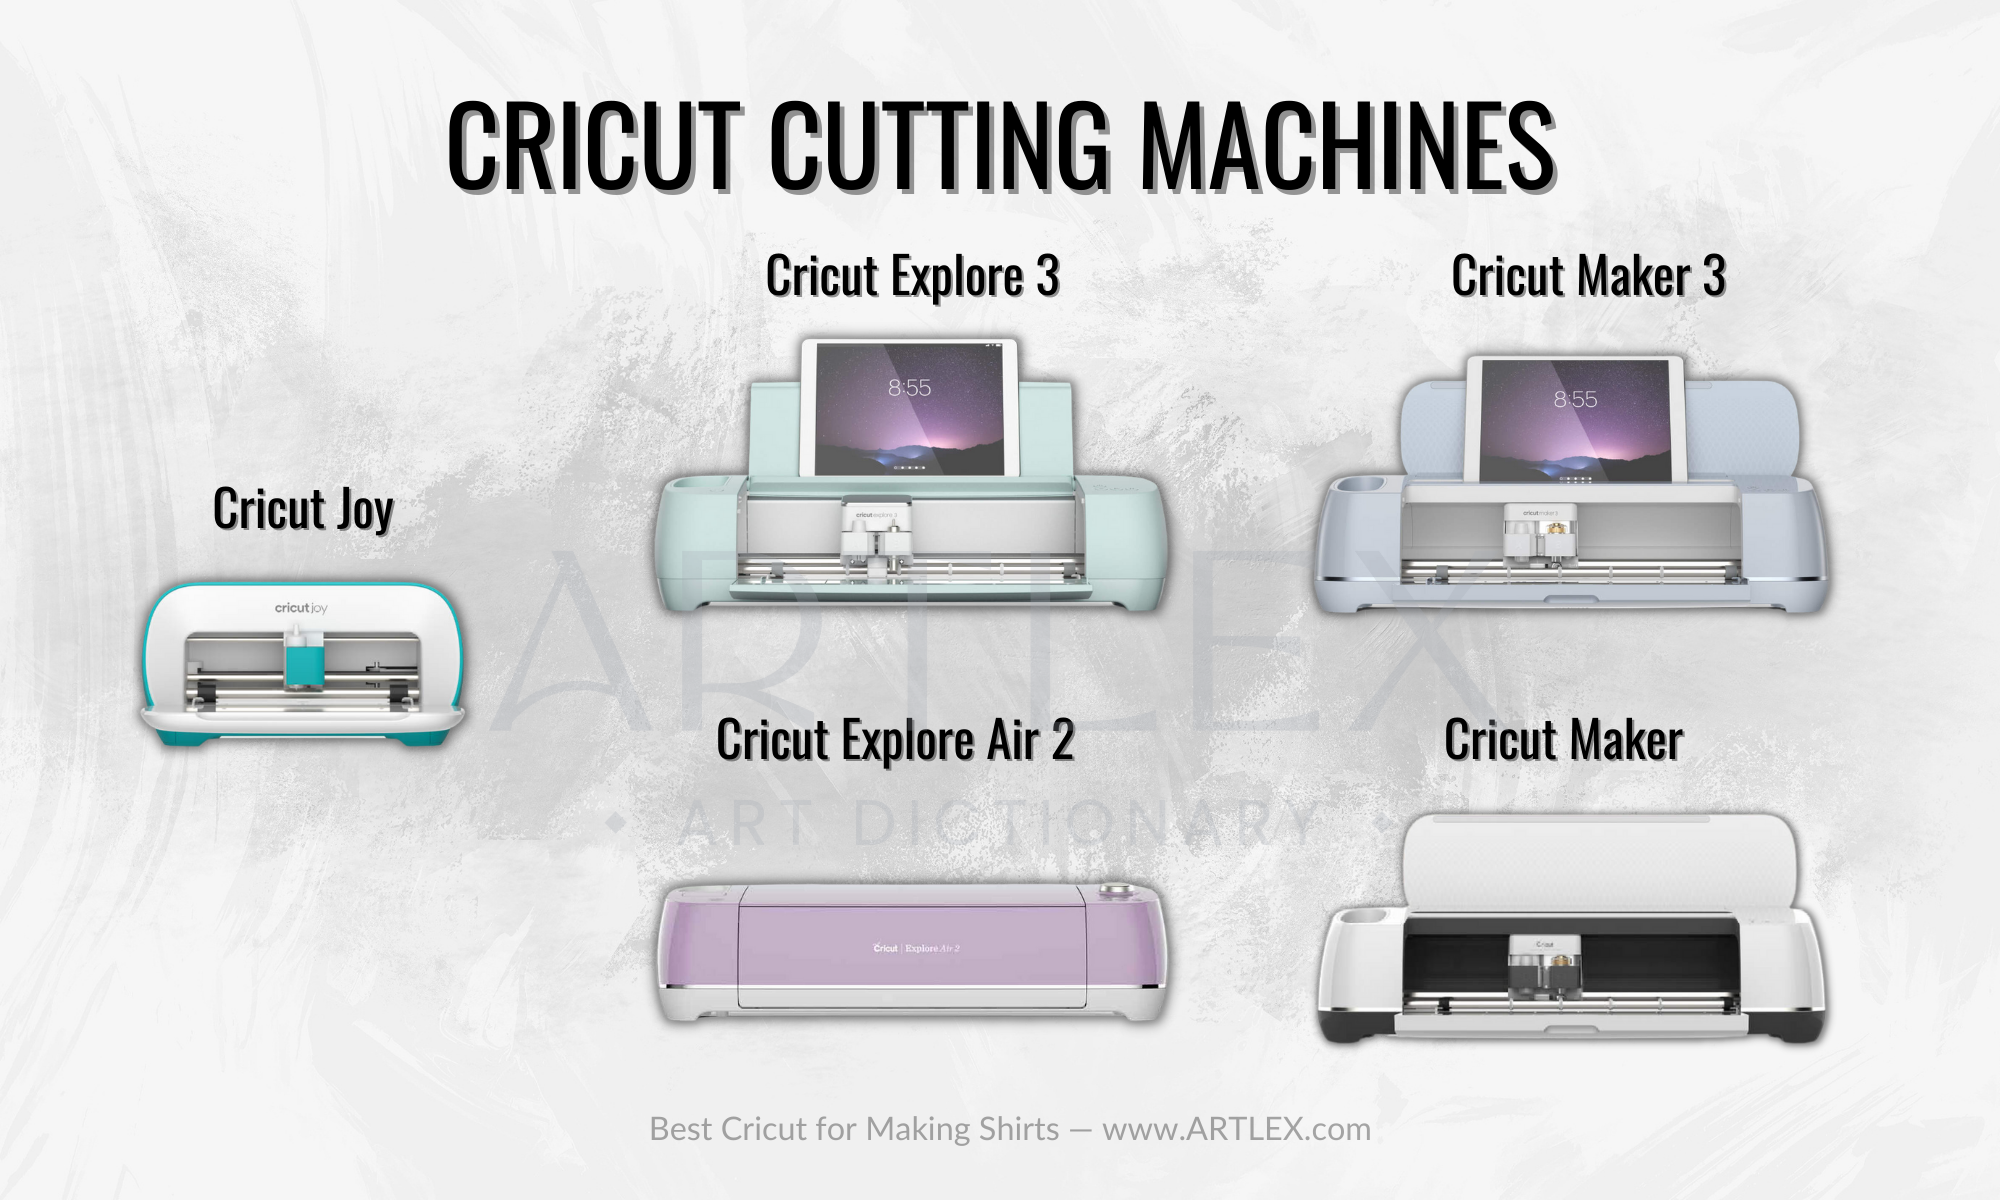
Within the realm of cutting machines, there are several options available, such as the Cricut Joy, Cricut Explore Air 2, Cricut Explore 3, Cricut Maker, and Cricut Maker 3. Each machine offers its own unique features and capabilities.
The Cricut Joy is the smaller model of the Cricut family, perfect for beginners yet very powerful. This small machine is capable of cutting without using a cutting mat and can easily cut vinyl, Infusible Ink material, and HTV.
The Cricut Explore machines are larger and a tad more powerful than the joy, the latest model the Explore 3 can also cut matless and up to 100 different materials.
The Cricut Maker machines are much more powerful, capable of cutting up to 300 materials including fabric, leather, chipboard, and wood.
Cricut Heat Press Machines
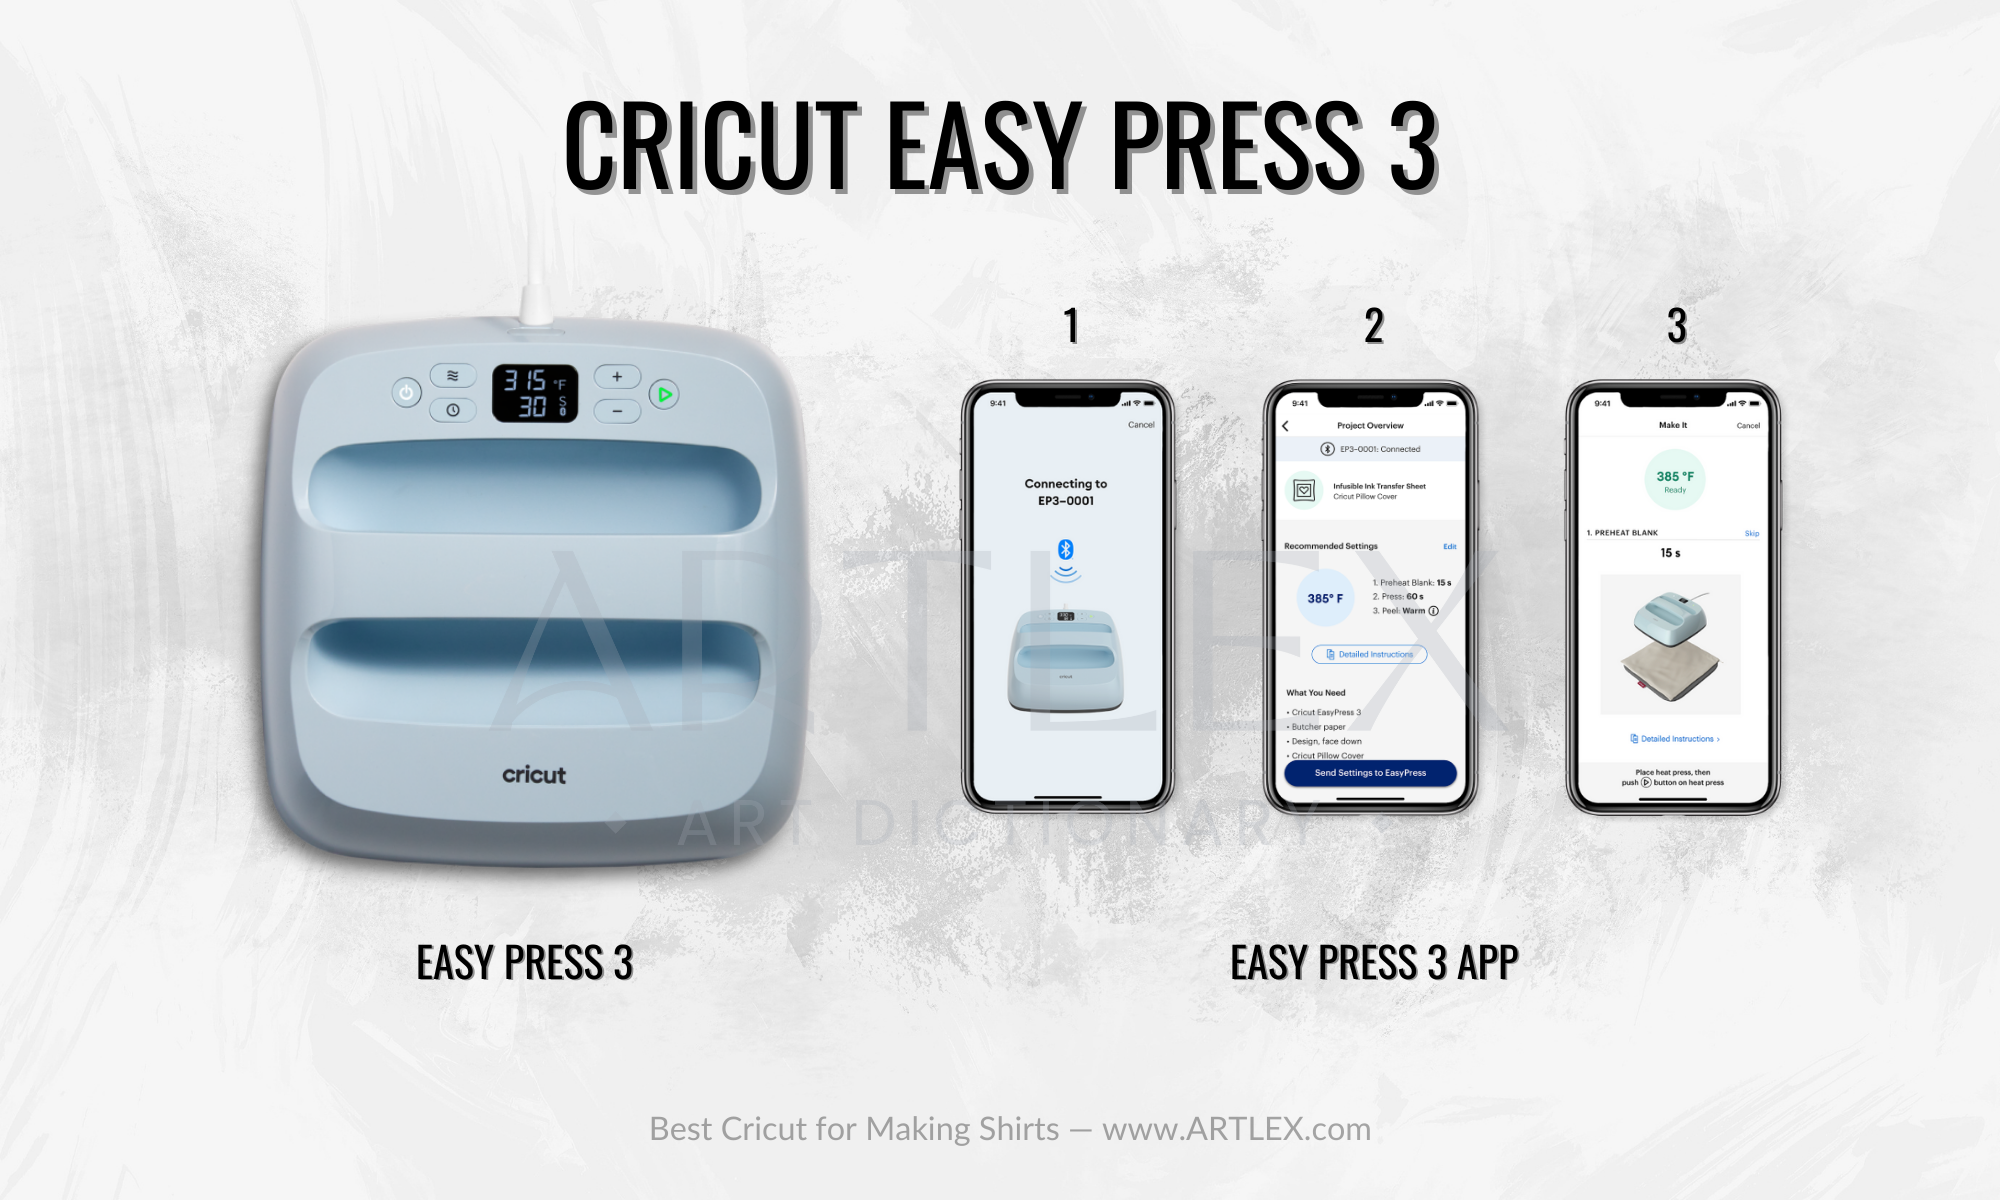
Similarly, in the world of heat presses, we have a range of options to choose from. These include the EasyPress, EasyPress 3, EasyPress Mini, and AutoPress. Each heat press model caters to different needs and preferences.
Although these machines serve the same purpose, they are designed to be used in different ways. For example, the EasyPress 2 and EasyPress 3 are meant to be operated manually by applying pressure ourselves. The EasyPress 2 requires users to manually control the time and temperature settings according to the material being used, whereas the EasyPress 3 utilizes an app to select the material, automatically determining the appropriate temperature and time settings.
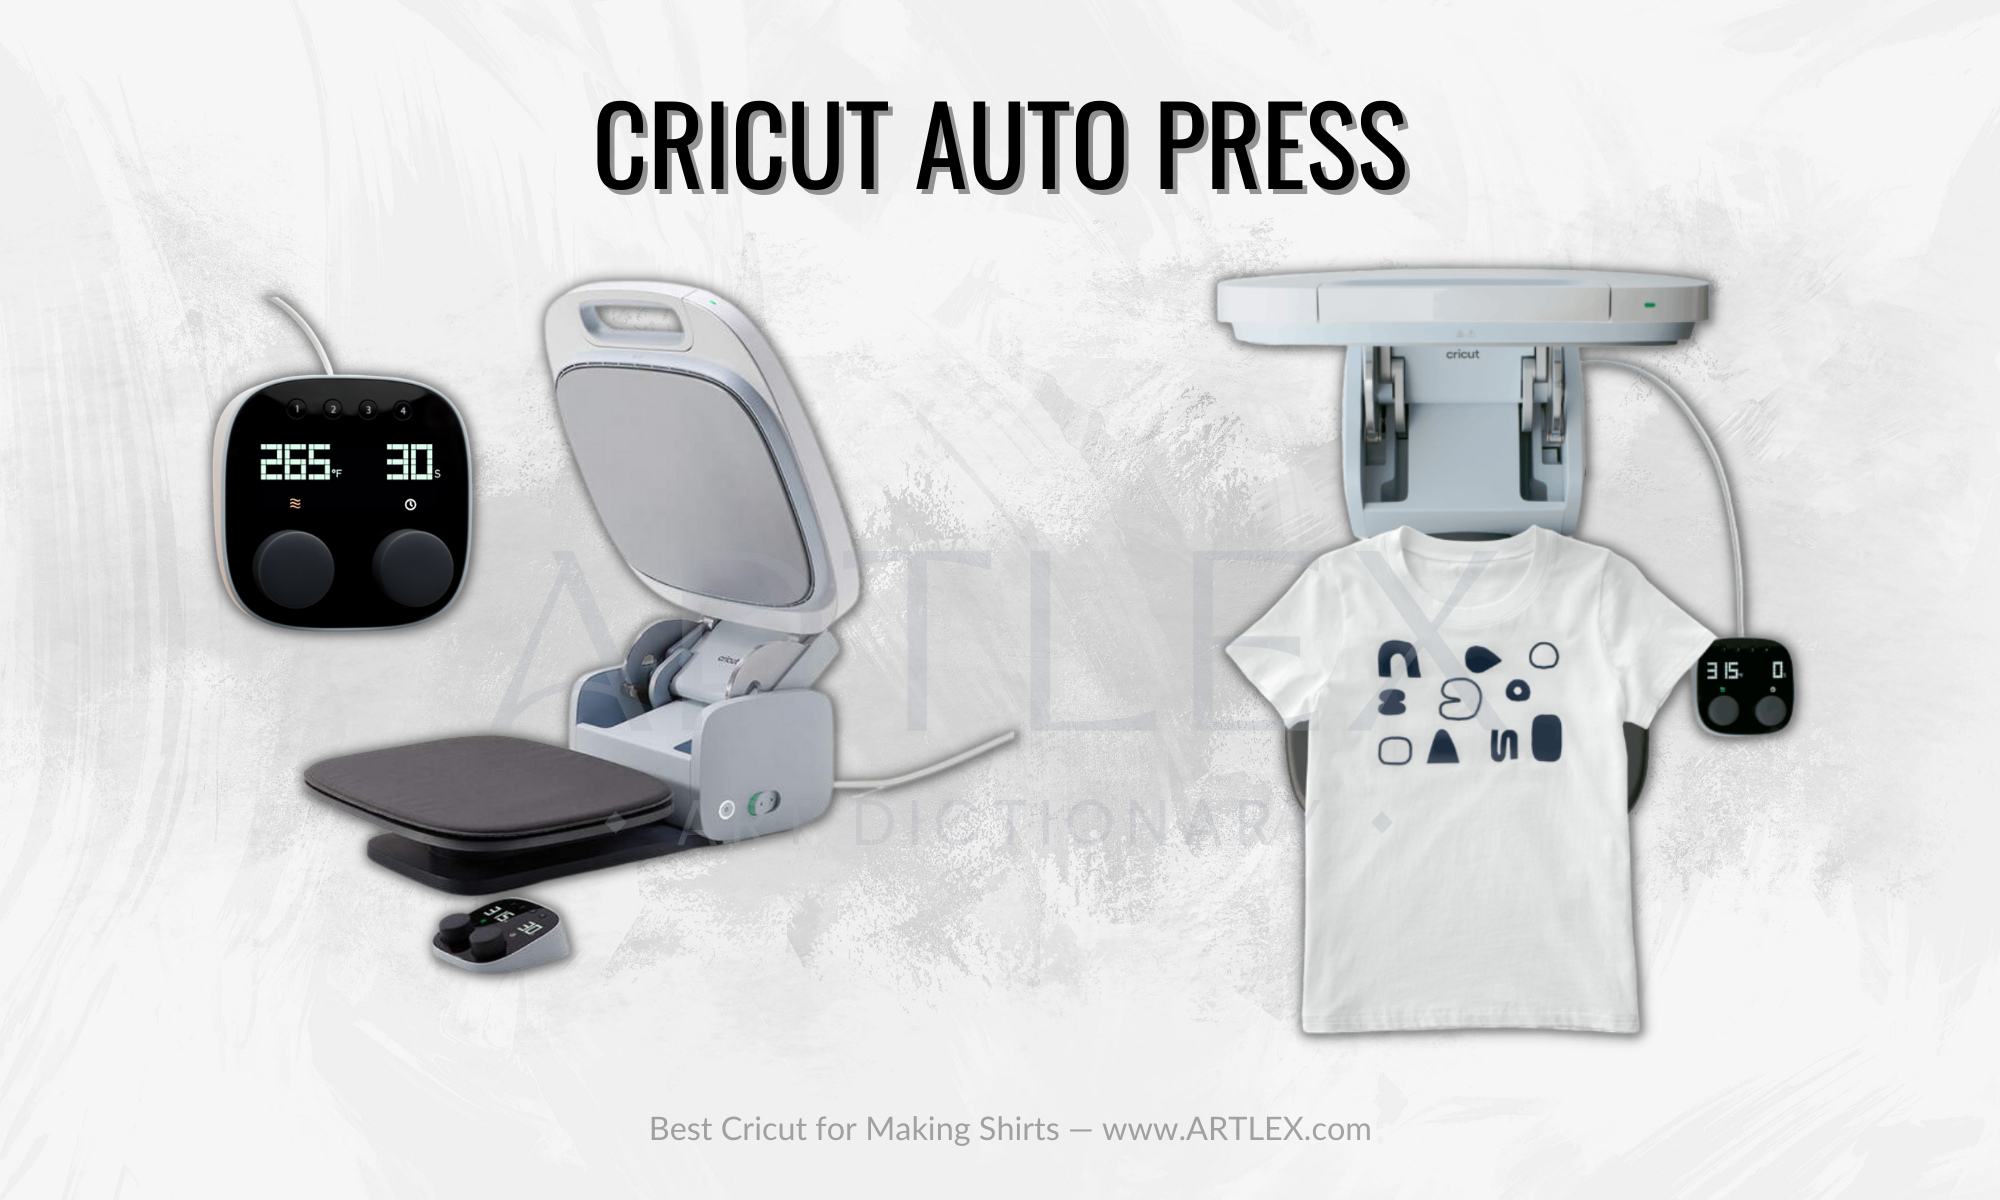
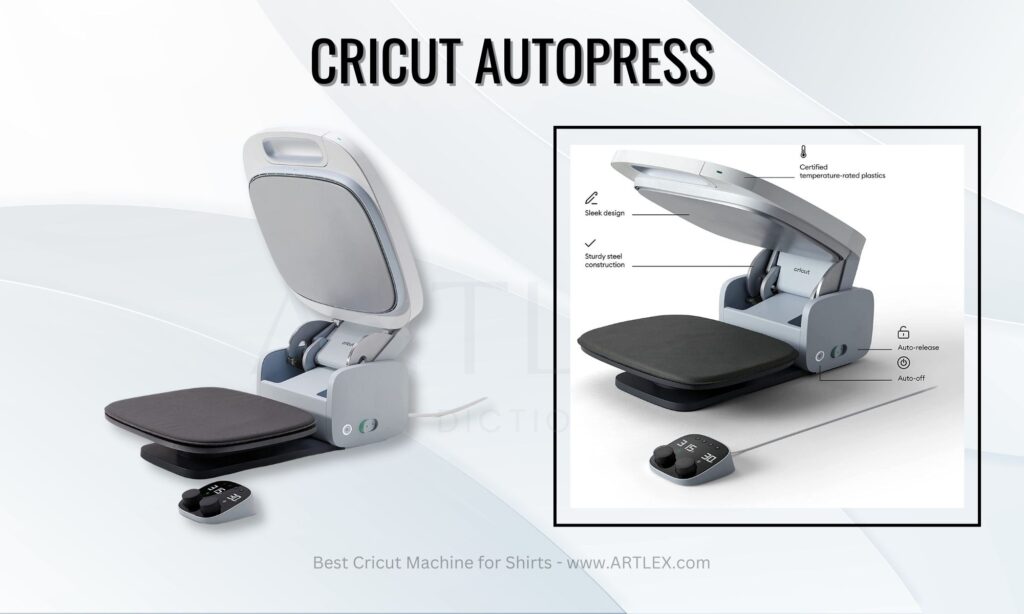
On the other hand, the Cricut AutoPress is considerably more expensive than the other two machines and, as the name suggests, it is fully automatic. By using the app, you can select the material, and the machine takes care of the rest, automatically shutting off when the process is completed.
This machine is specifically designed for efficient work and mass production, making it an excellent choice for small businesses. Its automatic functionality eliminates the need for manual pressure or forceful closing, which is particularly beneficial for individuals with mobility problems or arthritis.
As for the Cricut MiniPress, it is the only Cricut machine designed to access hard-to-reach areas that larger machines can’t press correctly. This small yet powerful heat press machine is equipped with a special tip that helps reach those challenging spots. Its compact size makes it suitable for both medium and small designs on garments, especially smaller ones. While it can also be used for larger designs, it is generally not recommended for such purposes.
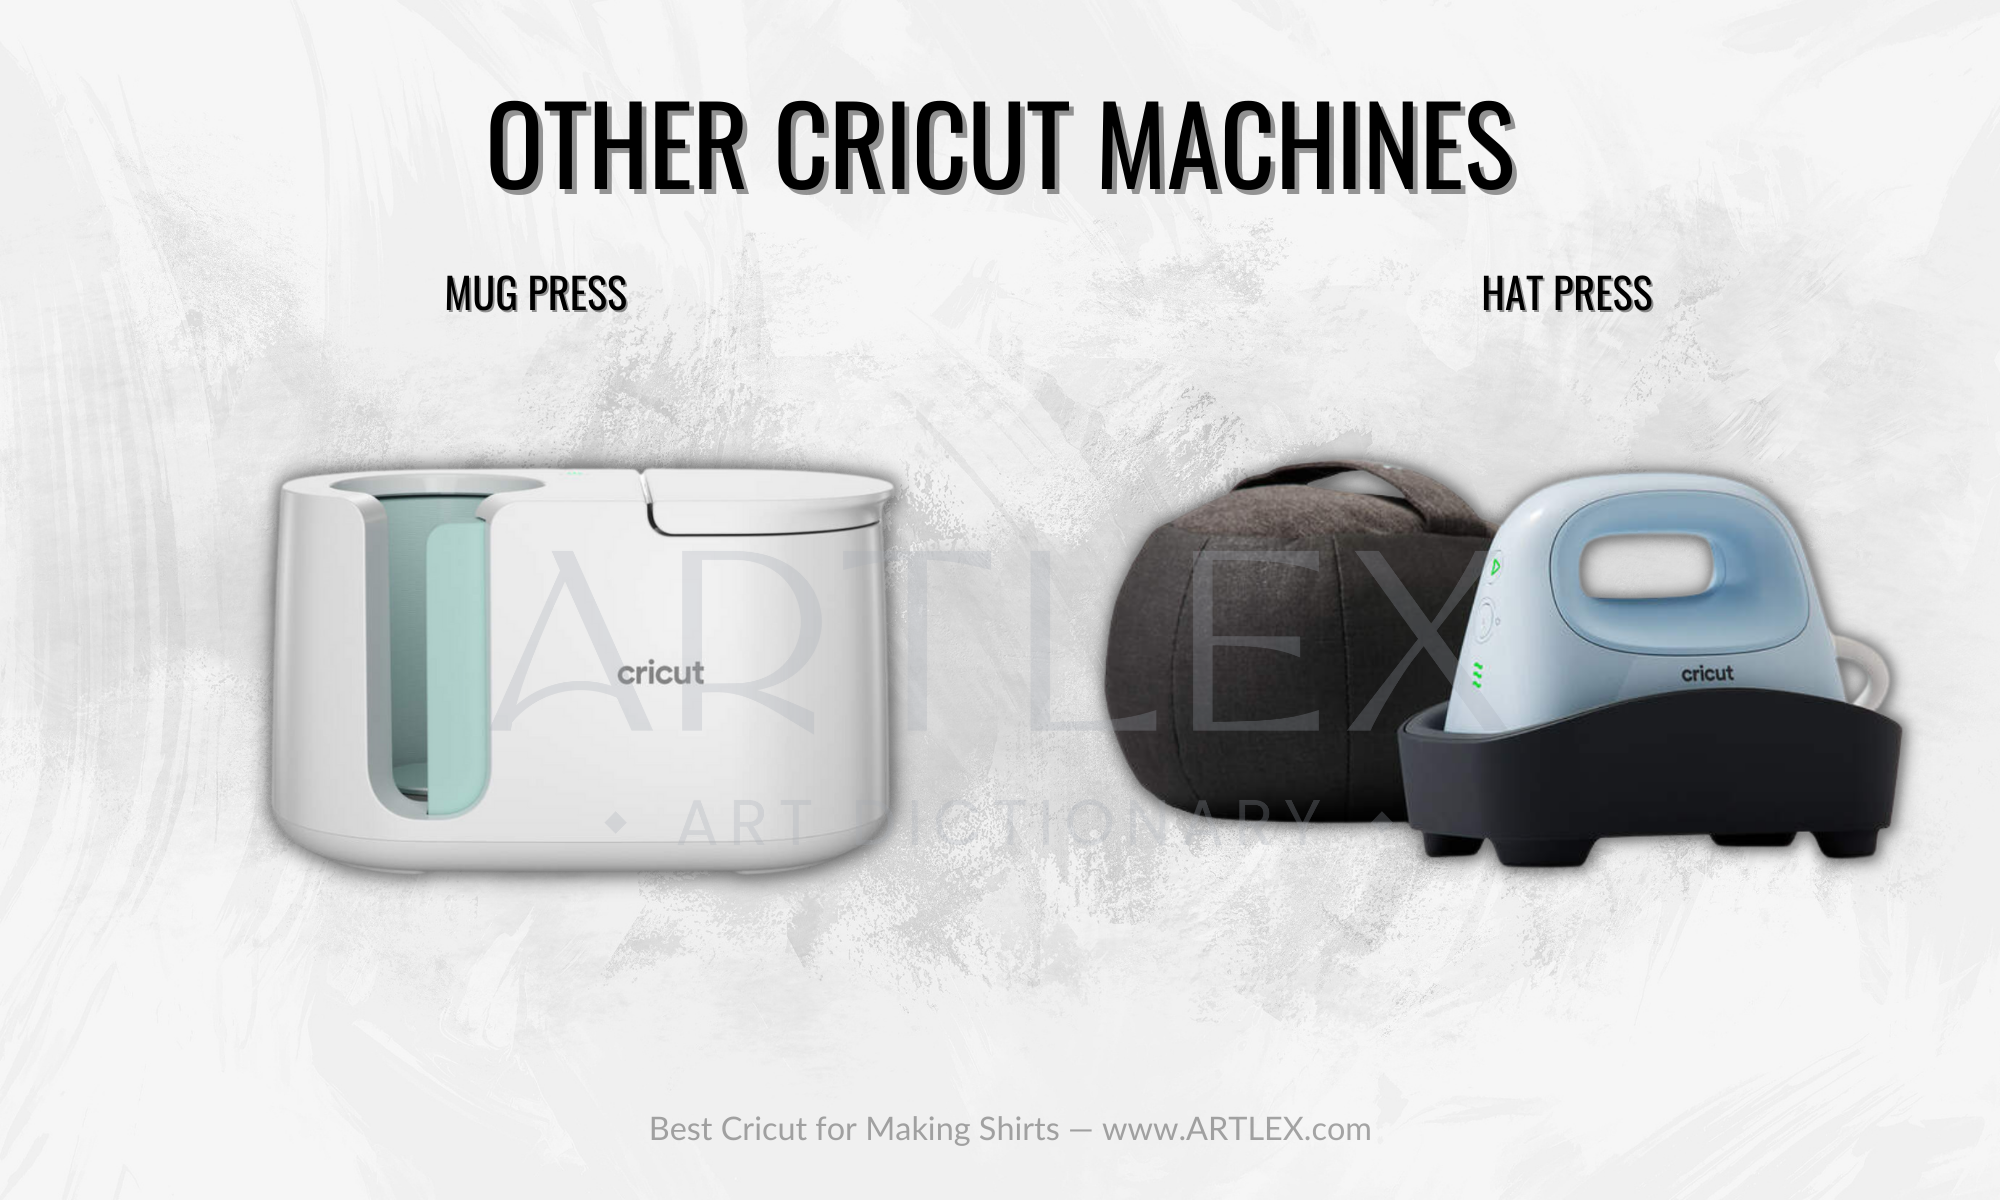
There are other Cricut machines, like the specialized hat Heat Press, which is similar in size to the MiniPress but has a curved base. Additionally, there is the Mug Heat Press, which is made to press on mugs but may have limitations in terms of compatibility with other product sizes.
Working Area
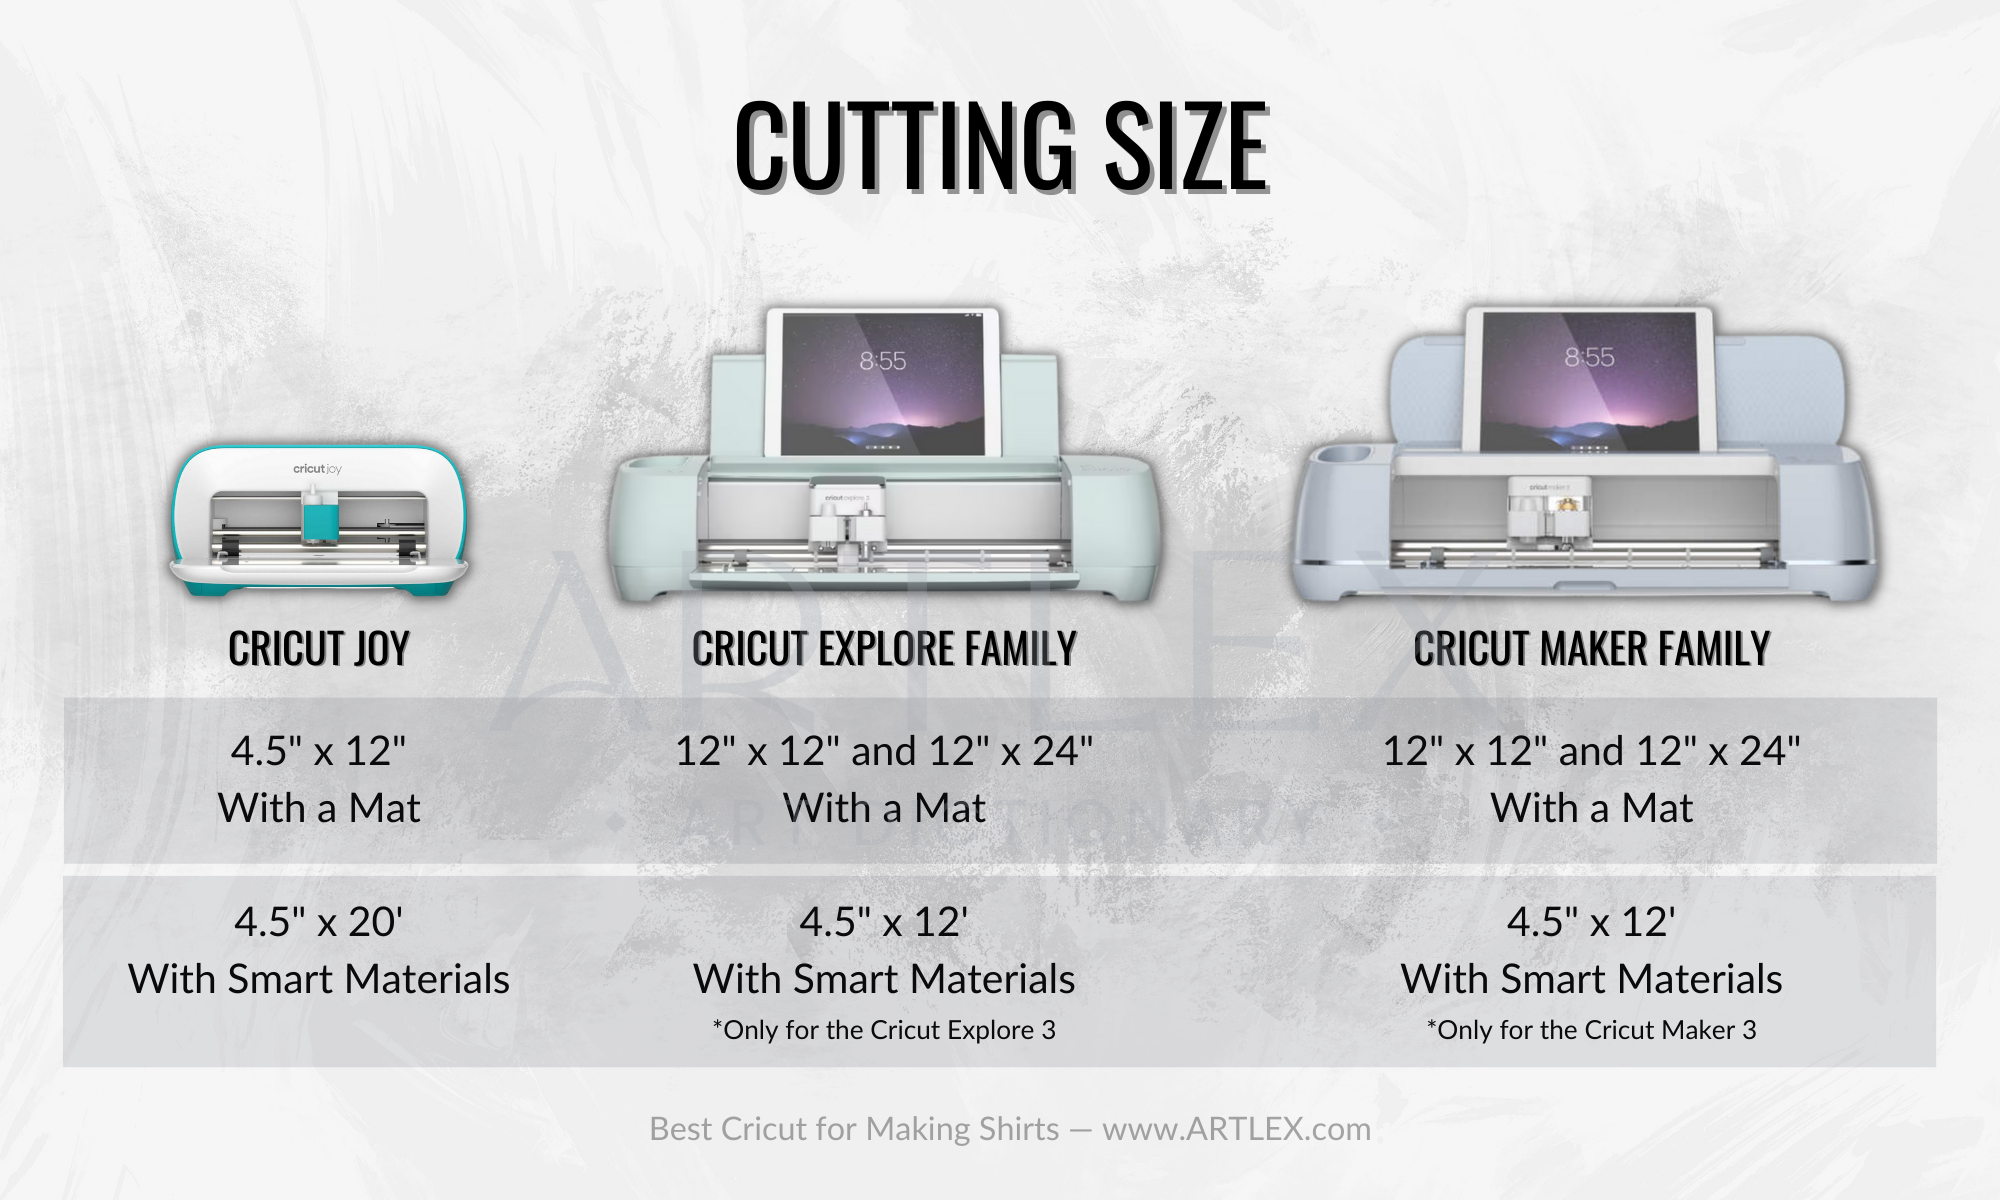
The size of the working area is an important factor to consider when making a purchase that suits your needs. In Cricut cutting machines, the standard work area is usually 12 inches by 24 inches, while machines compatible with smart materials offer a larger work area of 12 inches by 10 feet.
For smaller machines like the Cricut Joy, the cutting area is 4.5 inches by 11.75 inches. Despite its smaller size, the Cricut Joy is capable of cutting without a cutting plate and is compatible with Smart Materials, significantly expanding its cutting capabilities.
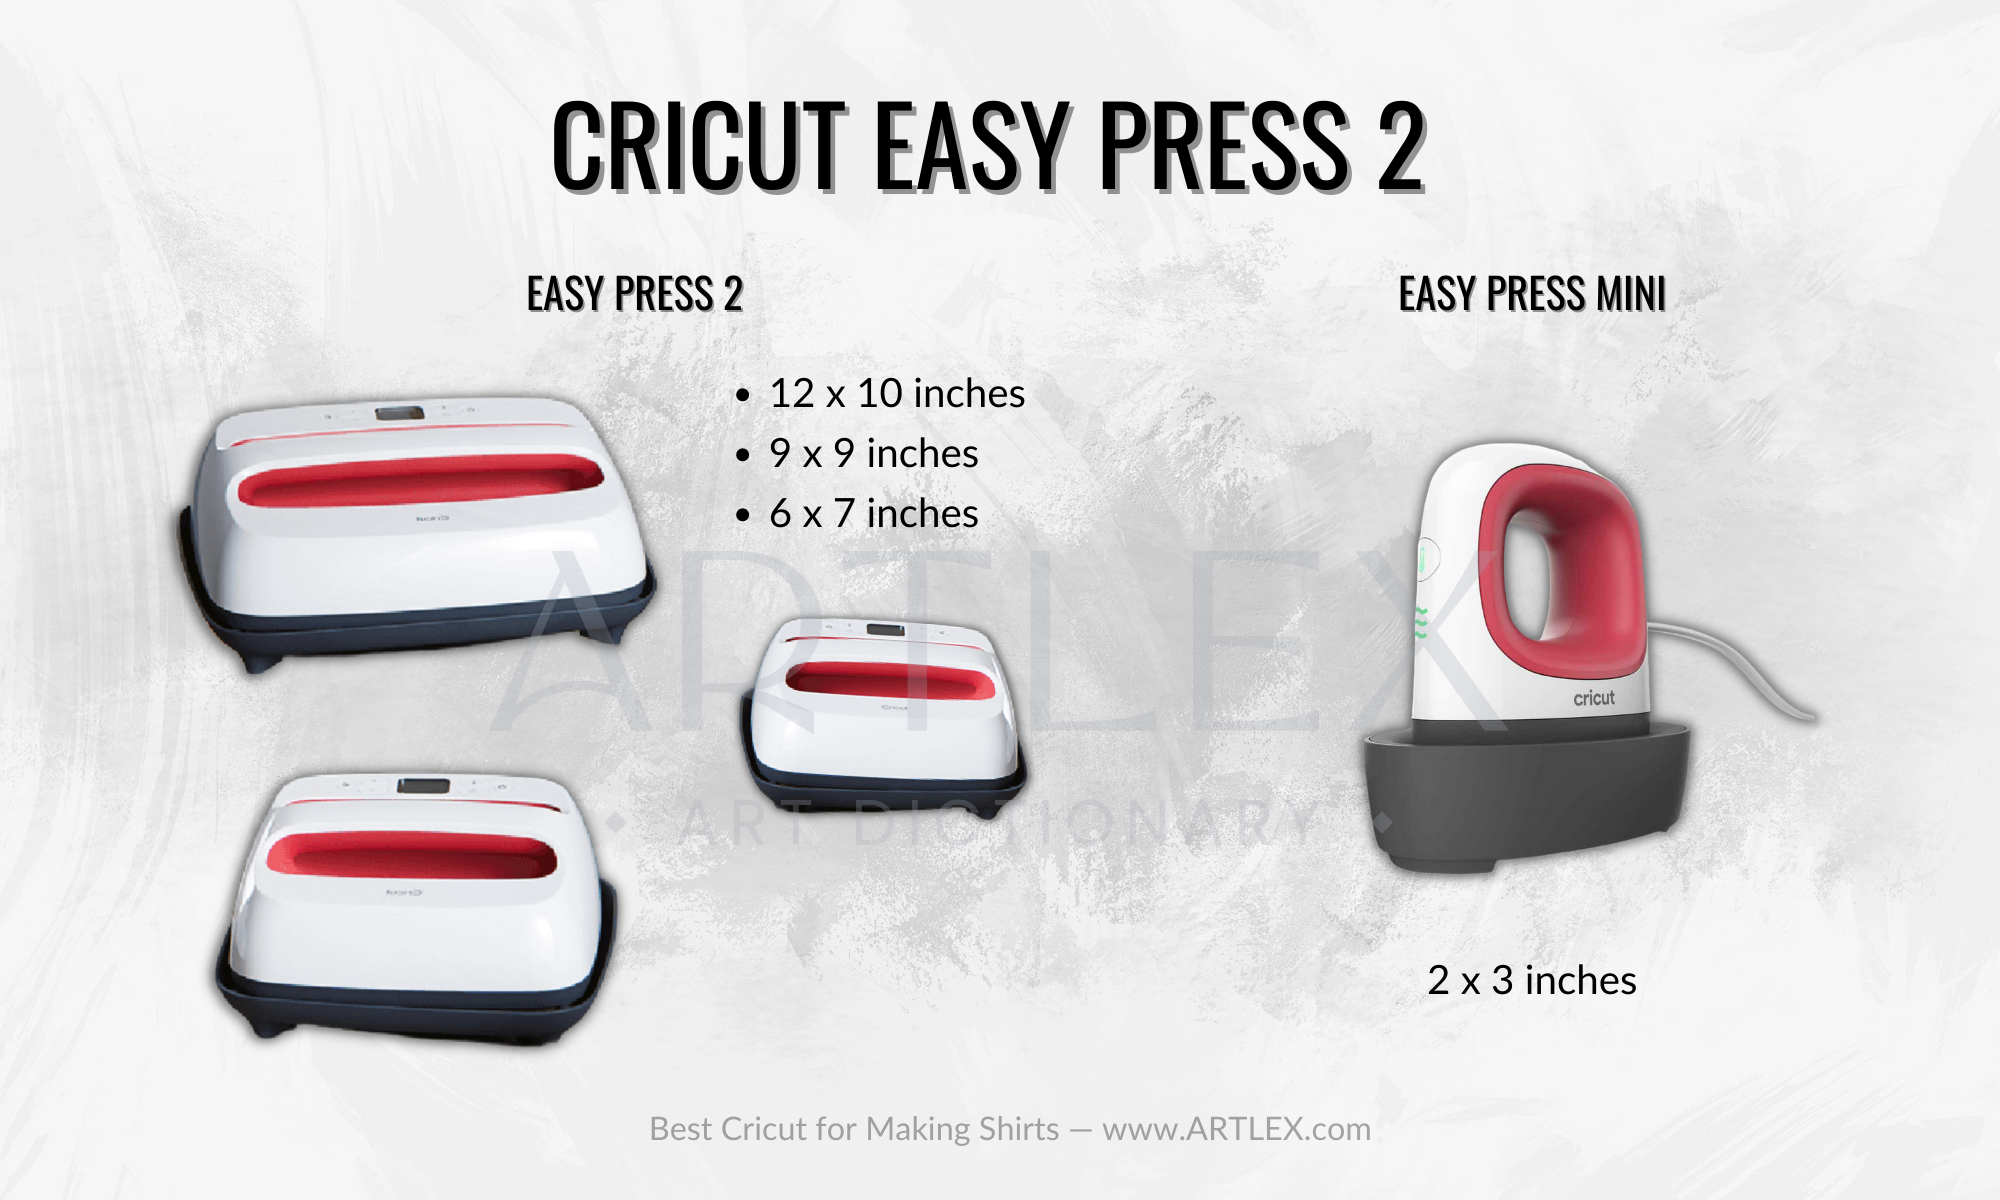
When it comes to Cricut heat presses, the work area varies depending on the type of machine you choose. The EasyPress is available in three different sizes: 12 by 10 inches, 9 by 9 inches, and 6 by 7 inches.
The Cricut EasyPress Mini, on the other hand, comes in a single size of 2 by 3 inches, ideal for smaller projects. The AutoPress offers a work area of 15 by 12 inches, providing a larger surface for your heat-pressing needs.
Accessories and Supplies
For heat press machines you will need a heat-resistant surface to support your shirts or clothing items you want to work on, which is better known as the Cricut EasyPress Mat. You will also need parchment paper or heat-resistant paper and transfer tape to keep your designs in place.

As for the cutting machines, the accessories that you will need to make your designs will be cutting mats, weeding tools, and special blades such as the rotary blade or the knife blade in case you decide to go the route of creating stencils to make prints on fabric.
Among the additional accessories that you may need are lint rollers which will help you remove lint and fuzz from the surface of your shirt so that you can apply the design smoothly. You will also need an alignment guide for different sizes of shirts, as well as materials like heat transfer vinyl (HTV) and infusible ink materials.
Compatible Materials
Another important factor to consider is the compatibility of materials with your cutting machine. When customizing items like shirts or tote bags, two commonly used materials are heat transfer vinyl and Cricut Infusible Inks.
However, there is another method for personalizing your items, which involves creating stencils with your cutting machine. These stencils are made from a special material that is tougher to cut than vinyl, so you will need a specific blade, such as the knife blade or the deep-cutting blade, as well as a different cutting mat.
When it comes to materials compatible with item personalization, there are various types of heat transfer vinyl, and Smart Materials like Iron-on Vinyl and Infusible ink available. Depending on the textures and types of vinyl you use, it is important to consider acquiring blades and cutting surfaces that are specifically compatible with these materials, and in case you want to use smart materials then make sure to buy a cutting machine compatible with them.
This will help avoid wasting material due to failed cuts. Additionally, you should also take into account the cutting force of your machine to ensure that it can effectively cut through these materials without any issues arising later on.
Price
Cricut machines come in different models and have different prices depending on their size and features. If you’re mainly focused on making shirts, a second or third-generation Cricut Explore will do the job. If you’re on a tight budget, the Cricut Joy is a great alternative. However, if you plan on using your Cricut machine for other crafts and projects, we highly recommend the Cricut Maker 3. It has more cutting force and is compatible with a wide range of materials, making it perfect for larger and more complex projects, and is also great for mass production.
As for the heat presses, prices can vary based on the machine’s model and size. We always suggest going for the EasyPress 2, as it offers similar functionality to the EasyPress 3, the only difference being the use of the app, which is not essential for most projects. If you’re on a tight budget, you can consider the MiniPress, but keep in mind that it has a smaller pressing surface, which can make it more labor-intensive to use and it’s not recommended to be used on projects larger than twice its size.
However, if you’re starting a business and need to mass produce multiple products like shirts and hoodies, we highly recommend the AutoPress. It’s designed specifically for mass production, although it does come at a higher price compared to other Cricut heat press machines.
You can explore other options in the market if you prefer, but considering the user-friendly nature of Cricut machines, especially for beginners or those unfamiliar with heat press machines, Cricut is generally the best choice.
The Best Cricut Machine for Shirts in the Market
- Best Cricut Cutting Machine for Shirts Overall – Cricut Maker 3
- Best Cricut Heat Press Machine Overall – Cricut EasyPress 2 (10 x 12 inches)
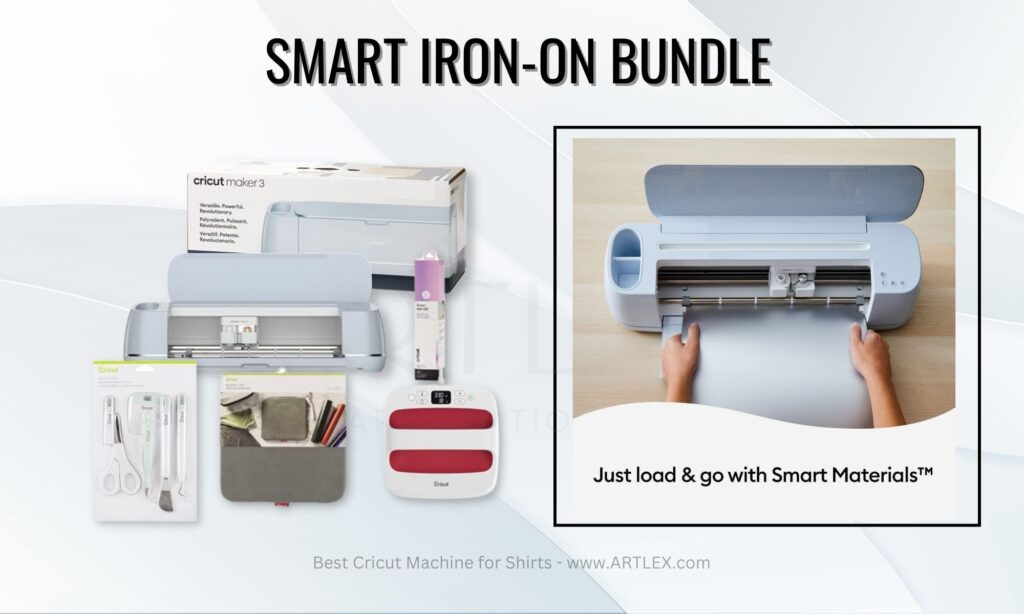
- Best Cricut Bundle for Making Shirts – Smart Iron-on Bundle
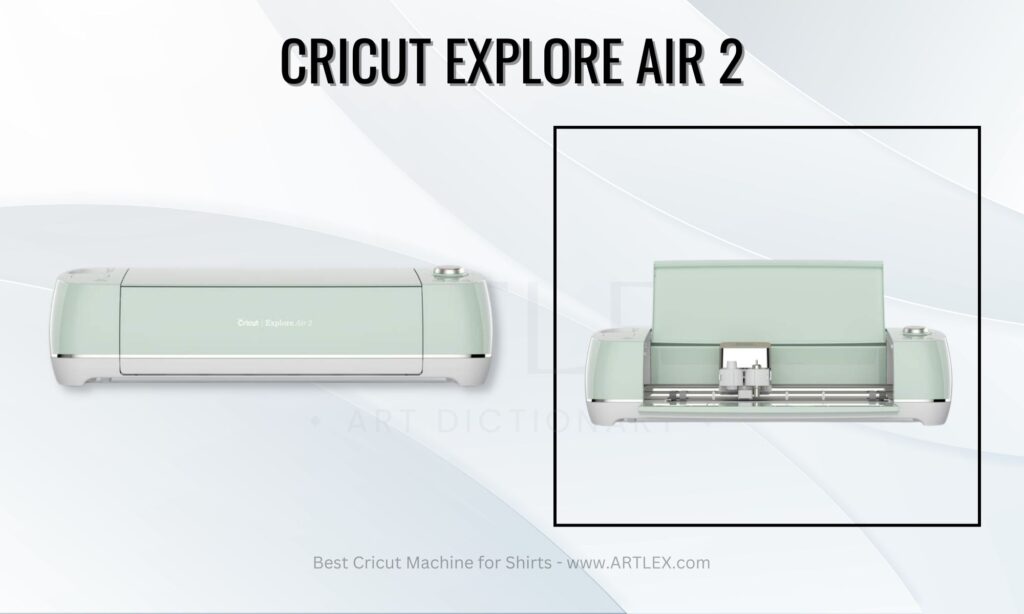
- Best Budget Cricut Cutting Machine for Shirts – Cricut Explore Air 2
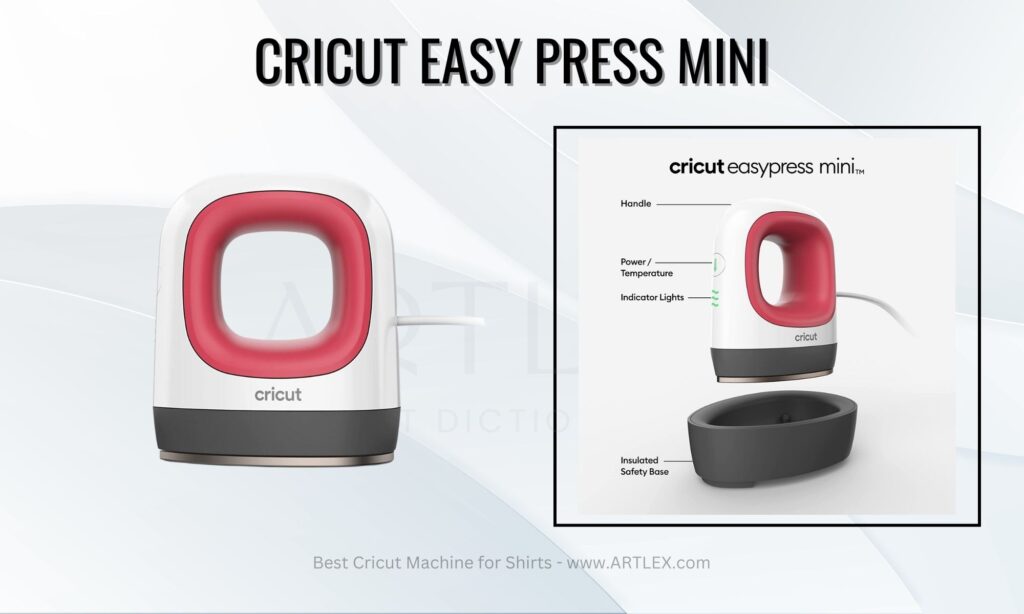
- Best Budget Heat Press Machine for Shirts – Cricut Easy Press Mini
- Best Cricut Heat Press for Business – Cricut AutoPress
Best Cricut Cutting Machine for Shirts Overall – Cricut Maker 3

Selection Criteria:
- Type of Machine: Cutting Machine
- Our score: 10/10
- Working Area: 12 inches by 24 inches (with mat) and 12 feet (with Smart Materials)
- Our score: 9/10
- Tools and Accessories (for Shirt Making): Fine-Point Blade, Deep-Point Blade, Cutting Mat
- Our score: 8/10
- Price: $429.00
- Our score: 10/10
About the Cricut Maker 3
The Cricut Maker 3 is the ultimate cutting machine, hence the best Cricut cutting machine for shirt making since it allows you to use all the techniques explained below, from vinyl cutting to HTV and cutting acetate for stencil making for direct printing or screen printing.
This cutting machine is compatible with more than 300 different materials, increasing the possibilities for crafting and customization of not only shirts but multiple items. The Maker 3 also makes it possible to cut without a mat on smart materials, taking away the hassle of changing cutting mats constantly.
On the downside, the Maker 3 is on the expensive side, so if you’re on a tight budget it would be better to go for another option instead.
Pros
- Versatile cutting capabilities
- Faster cutting speed
- User-friendly interface
Cons
- Expensive initial investment
- Occasional issues with material feed and cutting accuracy
- Consumables such as cutting mats and blades need replacement over time
Best Cricut Heat Press Machine Overall – Cricut EasyPress 2 (10 x 12 inches)
Selection Criteria:
- Type of Machine: Heat Press Machine
- Our score: 10/10
- Working Area: 10 inches by 12 inches
- Our score: 9/10
- Tools and Accessories: Heatpress Mat
- Our score: 8/10
- Price: $176.00
- Our score: 10/10
About the Cricut EasyPress 2 (10 x 12 inches)
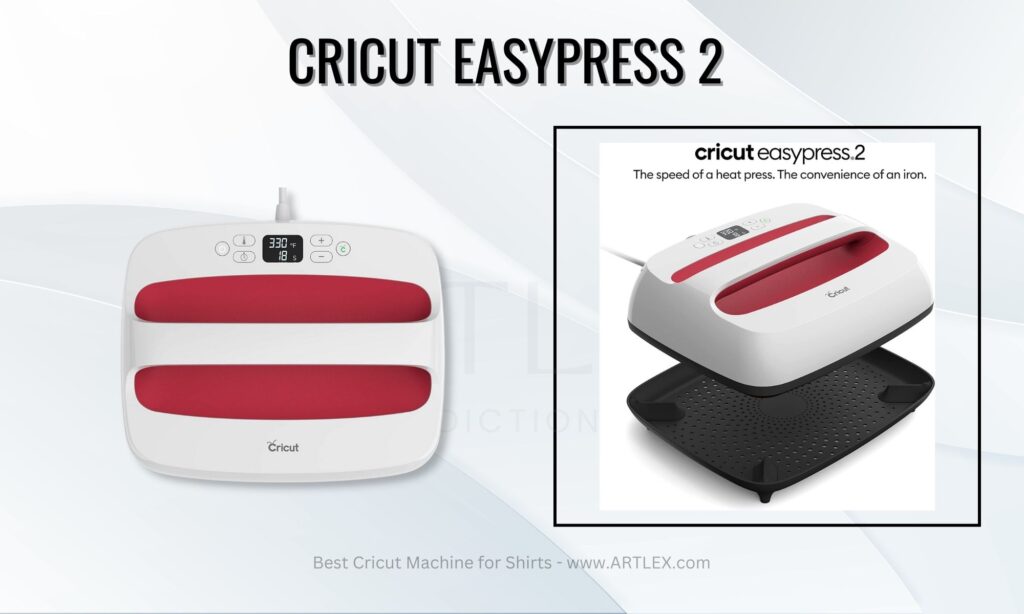 The Cricut EasyPress 2 is the perfect machine for pressing your HTV or Iron-on material. Although it’s not the latest nor the most advanced model, it offers great results for a fairly discounted price.
The Cricut EasyPress 2 and EasyPress 3 serve the same function but with one key difference: the EasyPress 3 can be controlled through an application. By using the application, you can select the material and it will provide the recommended time and temperature settings for pressing. However, this information can also be found in the Cricut materials guide. Essentially, the EasyPress 3 is a smart version of the EasyPress 2.
For many people, the price difference between the EasyPress 3 and EasyPress 2 is not justified by the relatively minor differences between the two machines. It’s important to note that these machines are not designed for mass production. Therefore, the best option for someone who wants to make t-shirts would be the one that offers the best results at the most affordable price.
Pros
- Precise and even heat distribution
- Portable and lightweight design
- Wide range of compatible materials
- Provides professional-quality results
Cons
- Not suitable for large-scale production
- Requires manual pressure application
- Limited availability of specialized accessories for advanced techniques
Best Cricut Bundle for Making Shirts – Smart Iron-on Bundle
Selection Criteria:
- Type of Machine: Cutting Machine and Heat Press Machine
- Our score: 10/10
- Working Area: 12 inches by 24 inches (with mat) and 12feet (with Smart Materials), 10 x 12 inches.
- Our score: 9/10
- Tools and Accessories (for Shirt Making): Fine-Point Blade, Deep-Point Blade, Cutting Mat, replacement Heat Press mat.
- Our score: 8/10
- Price: $681.00
- Our score: 10/10
About the Smart Iron-On Bundle
This Amazon bundle is perfect for starting your shirt-making and clothing customization projects. You can even use the first free month of the Cricut design space’s membership and grab a t-shirt design from the store for free to personalize your shirts, jackets, and hoodies.
This bundle includes ready-to-use Iron-on material, a Cricut Maker, a Cricut Easypress 2 (9 x 9 inches), an Easypress mat, and some Cricut tools for weeding, making it the perfect starting pack for beginners that can’t wait to start.
Pros
- Discounted price
- Great to start right away
- Accessories included
Cons
- High initial investment
Best Budget Cricut Cutting Machine for Shirts – Cricut Explore Air 2
Selection Criteria:
- Type of Machine: Cutting Machine
- Our score: 10/10
- Working Area: 12 inches by 24 inches (with mat)
- Our score: 9/10
- Tools and Accessories: (for Shirt Making): Fine-Point Blade, Cutting Mat.
- Our score: 7/10
- Price: $199.00
- Our score: 10/10
About the Cricut Explore Air 2
The Cricut Joy is indeed the smallest and most affordable machine in the Cricut line. However, we do not recommend it for making t-shirts due to its limited cutting area. Despite the advantage of infinite cutting with smart materials, the small size of the Cricut Joy complicates the vinyl application process, especially for smaller or more complex designs that require multiple layers or different sizes.
For individuals on a budget who are looking for a suitable option for making t-shirts, we suggest considering the Cricut Explore Air 2. This machine shares the same size as the Cricut Maker and is capable of cutting up to 100 different materials, including vinyl and heat transfer vinyl (HTV), without any issues.
It is important to note that the Cricut Explore Air 2 does have a limitation of 100 compatible materials, and it is not suitable for cutting thick materials such as balsa wood, leather, and chipboard. If your projects involve working with those materials, it would be better to explore other options like the Cricut Maker or similar machines capable of handling thicker materials.
Pros
- Affordable price
- Wireless connectivity
- User-friendly software
Cons
- Limited material thickness
- Dependence on Internet connectivity
- Noise during operation
- Limited accessory compatibility
Best Budget Heat Press Machine for Shirts – Cricut Easy Press Mini
Selection Criteria:
- Type of Machine: Heat Press Machine
- Our score: 10/10
- Working Area: 2 inches by 3 inches
- Our score: 6/10
- Tools and Accessories: Heat Press Mat.
- Our score: 8/10
- Price: $49.00
- Our score: 10/10
About the Cricut Easy Press Mini
The Cricut EasyPress Mini stands out as the smallest heat press offered by Cricut. While its work area may be limited in size, its specialized tip enables precise applications in areas that might be overlooked by larger machines.
One of the major advantages of this compact device is its affordability compared to other Cricut presses. However, it is important to note that using the Cricut Mini Press for sizes exceeding double its capacity is not advisable.
If you find yourself on a tight budget, this machine is an ideal choice. It provides an economical solution for your crafting needs. Nonetheless, it is essential to be aware of its limitations. Due to its compact design, the Cricut Mini Press is not intended for extensive projects or for mass production. Its functionality and performance are optimized for smaller jobs and shorter durations.
Pros
- Compact and portable
- Precise heat application
- Easy to use
Cons
- Limited heat plate size
- Not suitable for large-scale production
- Lack of temperature control
Best Cricut Heat Press for Business – Cricut AutoPress
Selection Criteria:
- Type of Machine: Cutting Machine
- Our score: 10/10
- Working Area: 15 inches by 12 inches
- Our score: 10/10
- Tools and Accessories: Heat Press Mat replacement.
- Our score: 8/10
- Price: $799.00
- Our score: 10/10
About the Cricut Auto Press
The Cricut Auto Press stands as the most expensive machine in the entire Cricut line, offering exceptional capabilities for mass production. Its larger size sets it apart from other presses, allowing for work on larger objects and seamless repetition of projects.
One notable advantage of the Cricut Auto Press is its automatic functionality. Once the hot pressing process is complete, the machine automatically shuts off, prioritizing safety and the protection of your materials. It eliminates the need for applying excessive pressure or manually pressing against the surface, as it effortlessly closes and applies the necessary pressure. This feature proves particularly beneficial for individuals with limited mobility or chronic pain in their hands, arms, and shoulders.
Designed to cater to mass production needs, the Cricut Auto Press is well-suited for both small and large-scale businesses. Its uniform heat distribution ensures consistent and high-quality results. Moreover, the automation feature enables work on multiple projects without the worry of potential accidents.
Pros
- Designed for mass production
- Large size for bigger objects
- Automation for repetitive projects
- Automatic shut-off for safety.
Cons
- High cost
- Limited mobility
- Large Footprint
- Learning curve
- Maintenance and servicing
How to make shirts and other clothing pieces with Cricut machines?
You can use a few techniques to make your own custom clothing items. Some are easier than others, some require more than one machine and some require some additional tools. The ones we’ll be learning about in this article are:
– HTV (Heat Transfer Vinyl)
– Infusible Ink
– Stencil Making for Prints
Using HTV or Iron-On
Heat transfer vinyl, also known as iron-on vinyl, allows you to cut designs from vinyl sheets and apply them to your clothing items. The design complexity will depend on the number of vinyl colors you have and on your layering skills. This process is good for a singe-color or a double-color design, great for text and
For this technique you’re going to need:
– Heat transfer vinyl or Iron-on Vinyl
– A Cricut Machine (Explore, Joy, Maker)
– A Cricut Heatpress (Easy Press 2, Easy Press 3, Mini Press)
– A lint roller
– A weeding tool
– A guide alignment tool (Optional)
Here are step-by-step instruction:
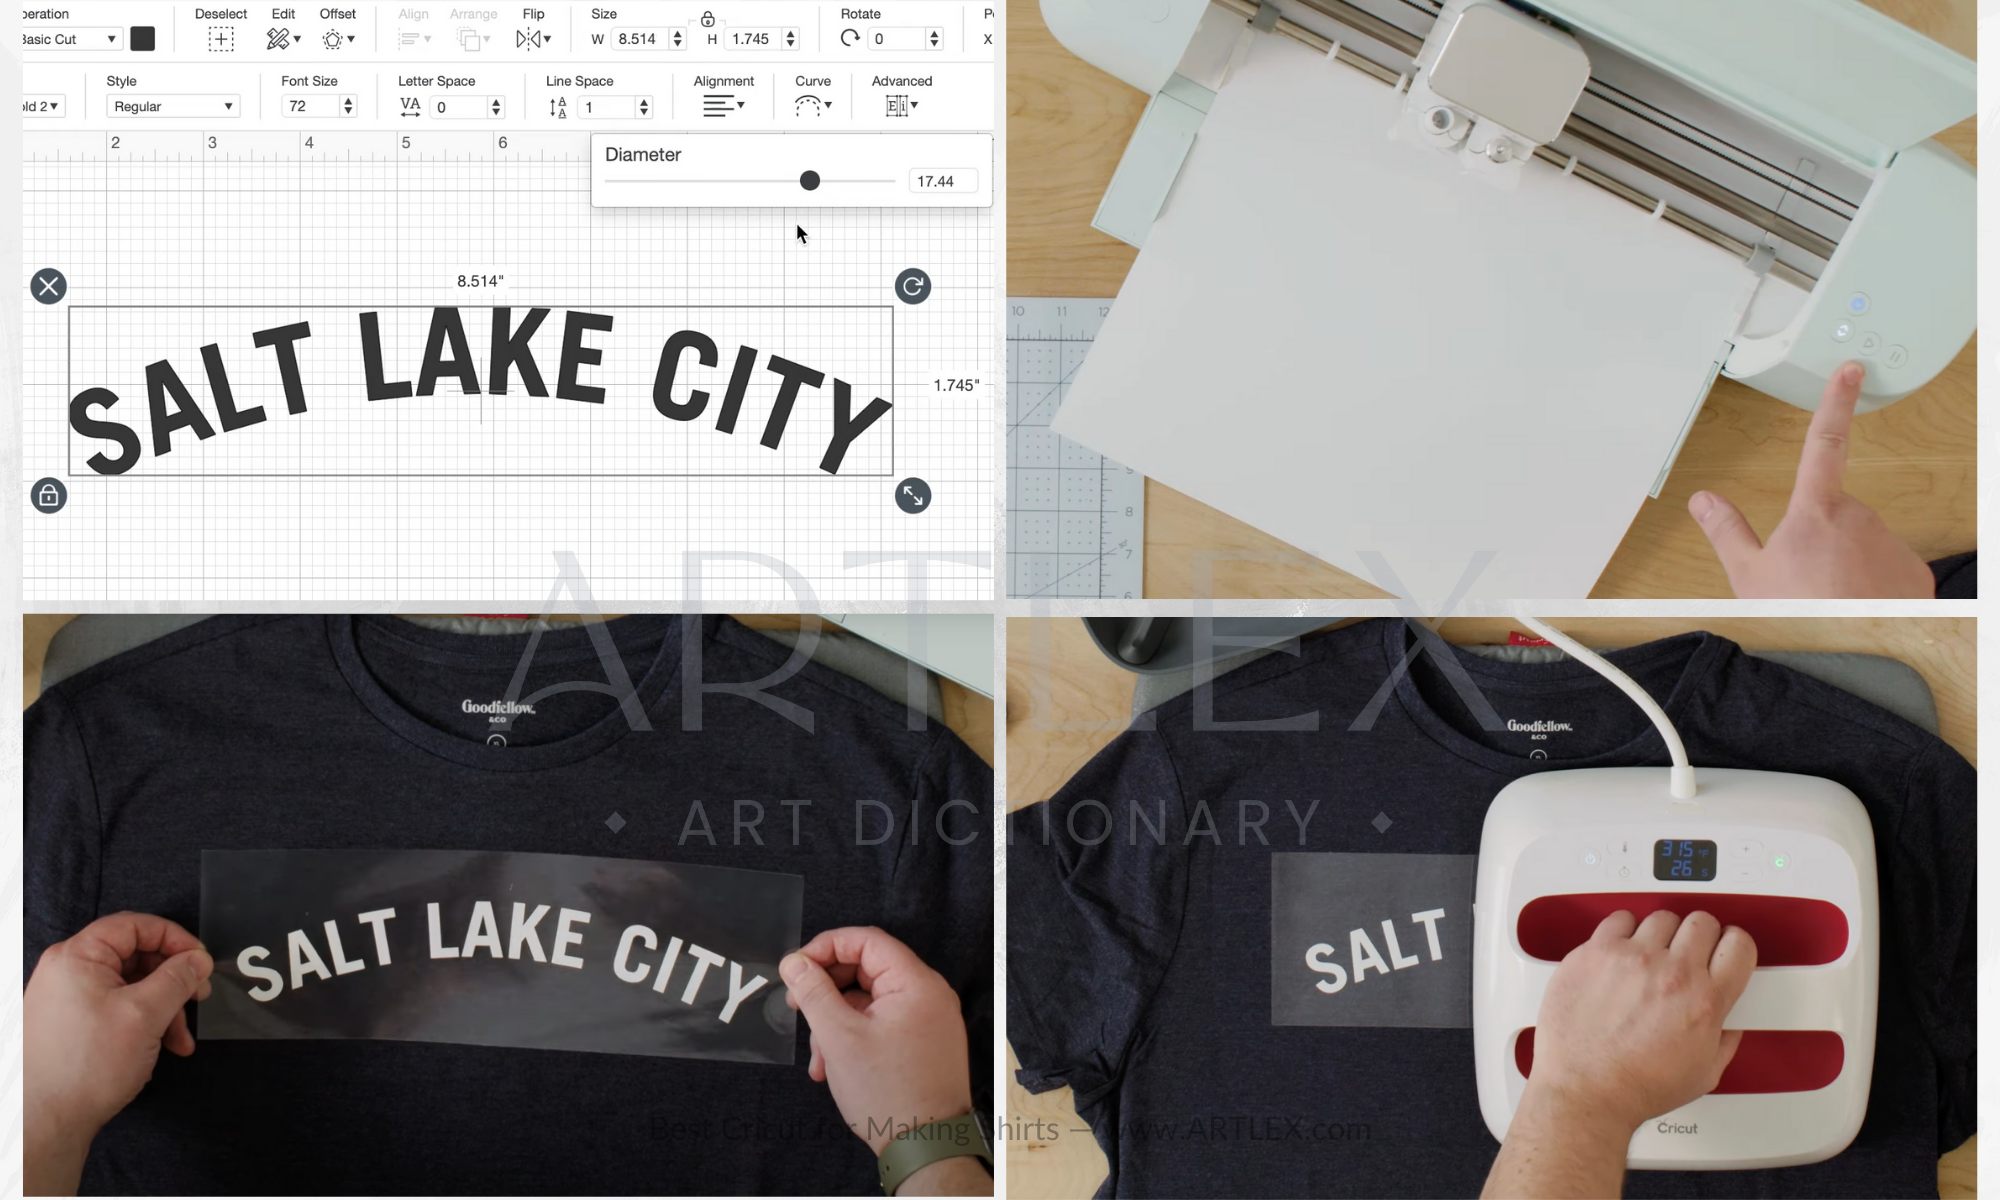
Step 1: Design Creation
Open Cricut Design Space or any compatible design software.
Create or import your design. Pick the clothing item you’re going to use for a size reference in the templates section. Adjust the size and orientation as needed.
Mirror your design horizontally.
Step 2: Cutting
Load your heat transfer vinyl sheet into your Cricut cutting machine with the glossy side down (or follow the specific instructions for your machine)
Select the appropriate settings in Cricut Design Space for the type of vinyl you’re using.
Cut your design using the Cricut machine.
Weed away the excess vinyl using weeding tools, leaving only your desired design on the carrier sheet.
Step 3: Heat Press Transfer
Preheat your heat press machine to the recommended temperature for the specific HTV material (usually around 305°F/150°C).
Prepare your clothing item by using the lint roller on top of the section where you’ll be applying the design.
Preheat your clothing item for a few seconds to remove moisture and wrinkles.
Position your cut HTV design on the clothing item, ensuring it is centered and in the desired location. Use your alignment tool if needed.
Cover the design with a heat-resistant protective sheet or Teflon sheet.
Press the design using your heat press machine for the recommended time (usually around 10-15 seconds) and pressure.
Carefully remove the protective sheet while the vinyl is still warm.
Allow the item to cool completely before handling or wearing it.
Using Infusible Ink
Infusible ink provides vibrant and permanent transfers onto compatible polyester or polyester-coated surfaces.
For this technique you’re going to need:
– Infusible Ink transfer sheets
– A Cricut Machine (Explore, Joy, Maker)
– A Cricut Heatpress (Easy Press 2, Easy Press 3, Mini Press)
– A lint roller
– A weeding tool
– A guide alignment tool (Optional)
Here’s a step-by-step project:
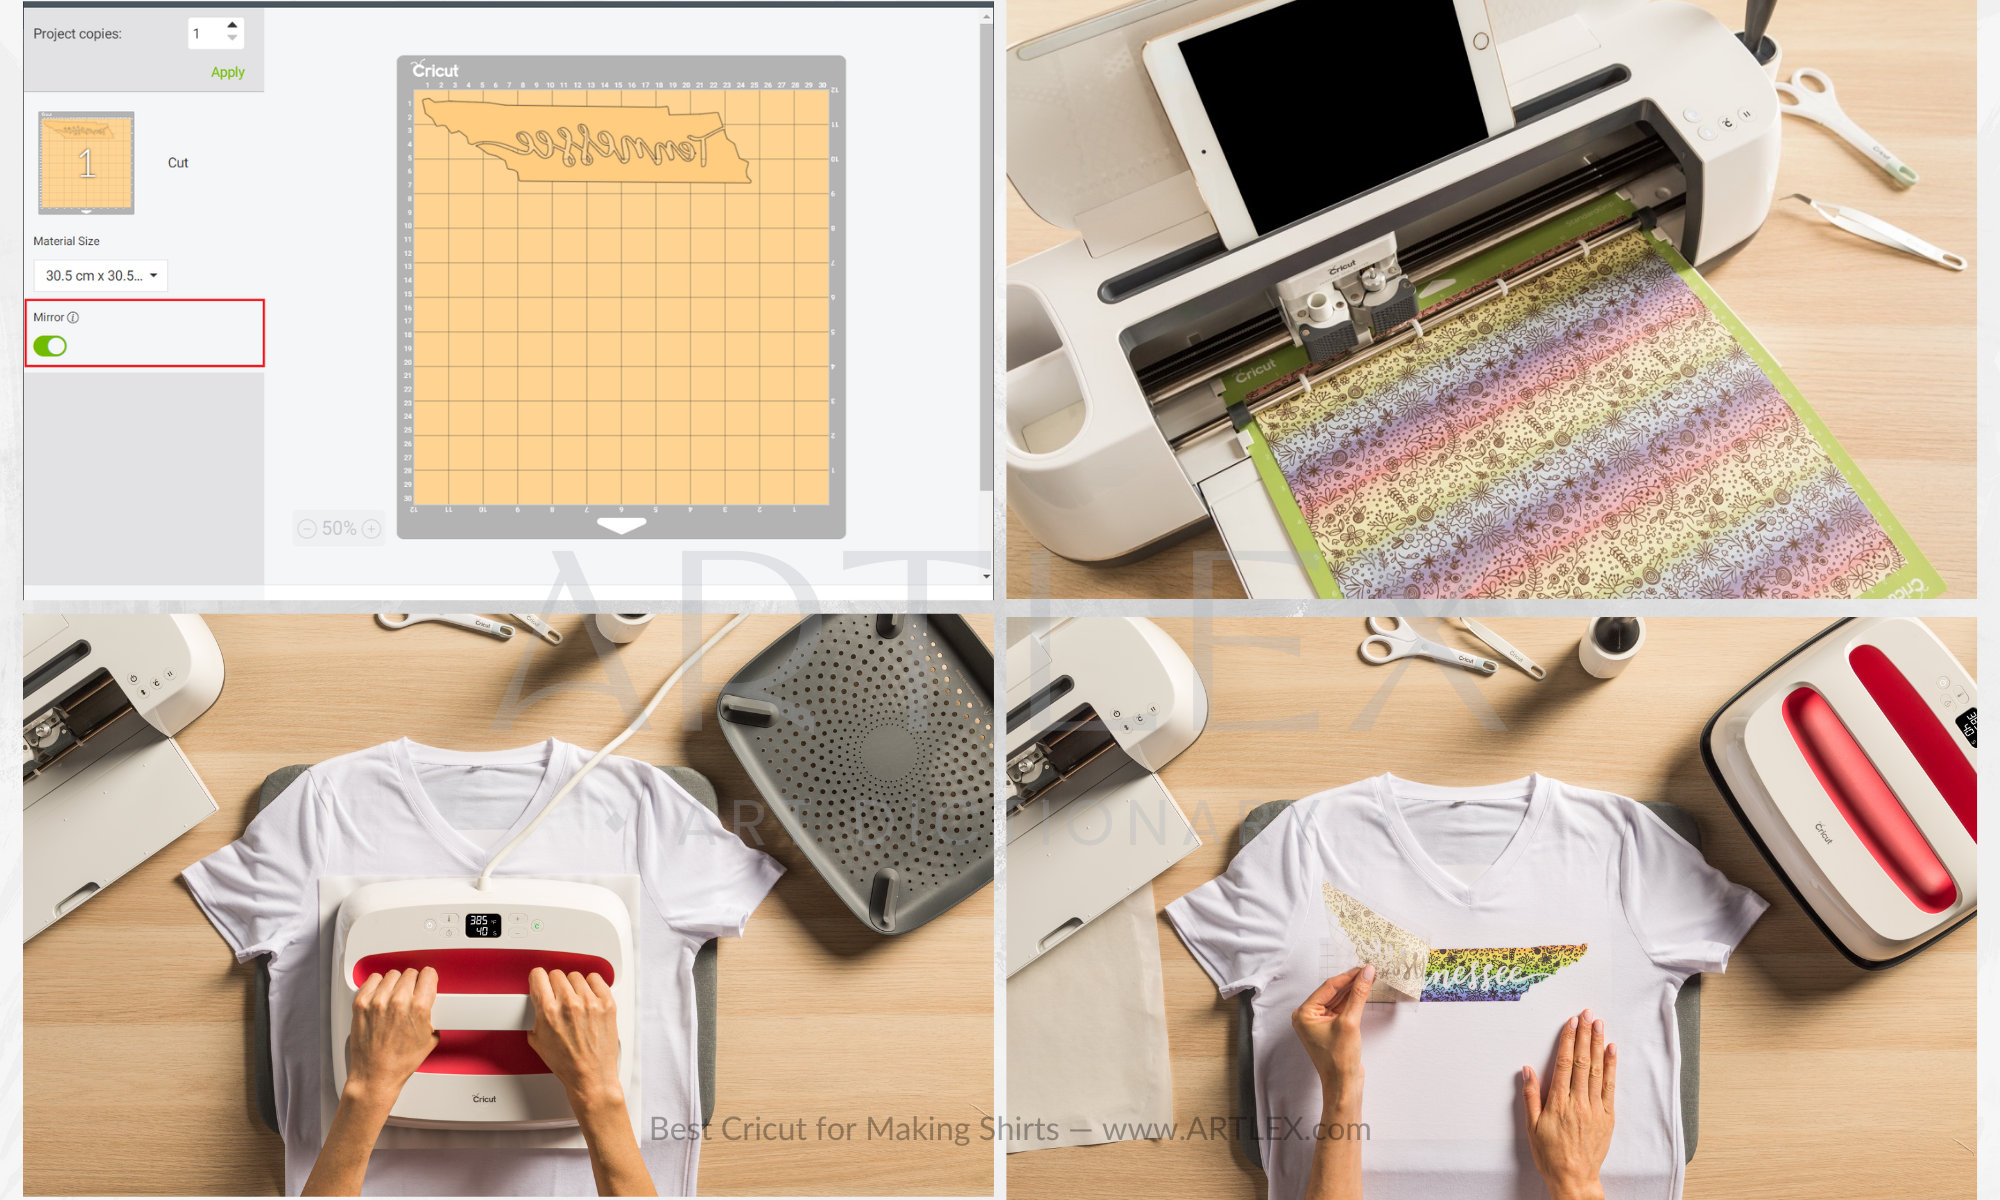
Step 1: Design Creation
- Open Cricut Design Space or any compatible design software.
- Create or import your design. Ensure it is the correct size and orientation by using a template from Cricut Design Space.
- Mirror your design horizontally.
Step 2: Cutting
- Load your infusible ink transfer sheet into your Cricut cutting machine, color side up.
- Choose the right material on Cricut Design Space to cut your design.
- Weed away the excess infusible ink transfer sheet using weeding tools.
Step 3: Heat Press Transfer
- Preheat your heat press machine to the recommended temperature for infusible ink transfers (usually around 385°F/196°C).
- Preheat your clothing item for a few seconds to remove moisture and wrinkles.
- Place a blank copy paper or butcher paper inside the clothing item to prevent ink bleed.
- Position your cut infusible ink design on the clothing item, ensuring it is centered and in the desired location.
- Secure the design in place with heat-resistant tape.
- Cover the design with a heat-resistant protective sheet or Teflon sheet.
- Press the design using your heat press machine for the recommended time (usually around 40-60 seconds) and pressure.
- Once the transfer is complete, carefully remove the protective sheet and let the item cool completely before handling or wearing it.
Stencil Making for Prints
Creating stencils allows you to apply paint or other mediums to your clothing items however you want, for this method you’ll only need a cutting machine and fabric paint!
For this technique you’re going to need:
– Fabric Paint of your preferred colors
– A Cricut Machine (Explore, Joy, Maker)
– A lint roller
– A weeding tool
– A guide alignment tool (Optional)
Here’s a step-by-step project:
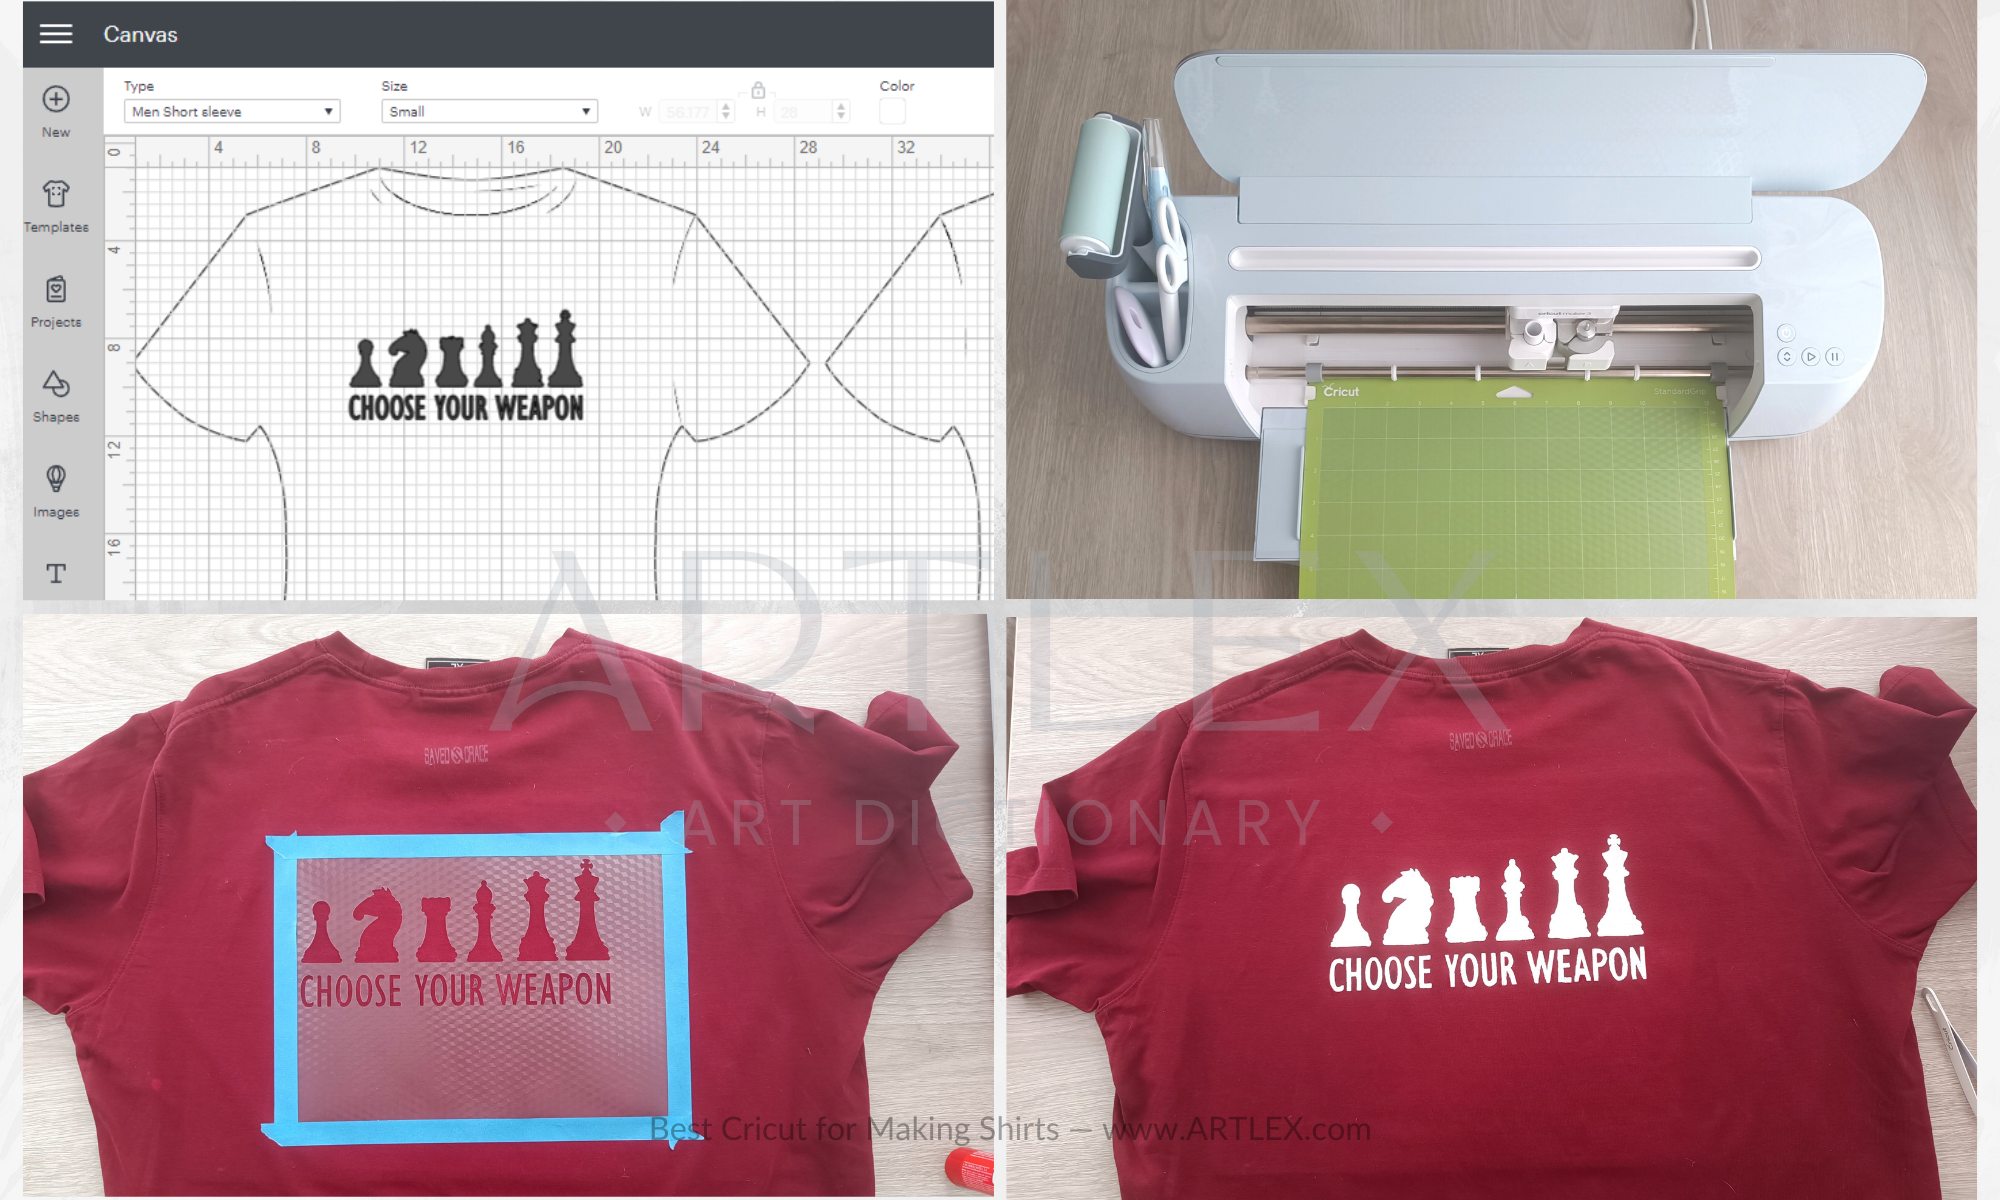
Step 1: Design Creation and Cutting
- Open Cricut Design Space or any compatible design software.
- Create or import your design.
- Adjust the size and orientation as needed.
- Load stencil material or stencil vinyl into your Cricut cutting machine.
- Cut your stencil design using the appropriate settings for stencil material.
Step 2: Stencil Preparation
- Weed away the excess stencil material, leaving only your desired design on the backing.
- Apply removable adhesive or stencil adhesive to the back of the stencil to ensure it adheres well to the clothing item.
- Pre-wash and dry your clothing item to remove any sizing or chemicals that could affect the paint adherence.
- Prepare your shirt or clothing item by passing a lint roller and ironing it beforehand.
Step 3: Stencil Application and Painting
- Position the stencil on the clothing item, ensuring it is centered and in the desired location.
- Use tape to secure the stencil in place.
- Apply fabric paint or other mediums using a brush, sponge, or spray bottle.
- Ensure even coverage and avoid applying excessive paint to prevent bleeding under the stencil.
- Let the paint dry according to the manufacturer’s instructions.
- Carefully remove the stencil, making sure not to smudge the paint.
- Follow any additional instructions provided with the paint, such as heat-setting or washing before wearing.