Digital art isn’t something new, however, it wasn’t always accessible to everybody. To make digital art back then you’d have to learn very complicated software, own really expensive graphic tablets and usually, you’d have to either study graphic design or work as a designer to even get to know the media.
Gatekeeping was the order of the day and knowledge wasn’t shared as much as it is right now.
With the years, it became more artist-oriented, graphic tablets weren’t that expensive anymore and tutorials started to appear on the internet on how to learn software such as Photoshop or Illustrator. But to be honest, it was really hard to learn it on your own.
Nowadays, it seems that digital art is everywhere on the internet, there is not a single person who hasn’t seen a digital art piece or even used digital assets in their daily life. And there’s an abundance of accessible courses and free tutorials or articles on everything you need to start with digital art.
Software such as procreate and Autodesk sketchbook don’t even need tutorials since their interfaces are so user-friendly, beside that, the opportunities for digital artists have also multiplied online since remote work became a possibility, and even with social media, artists now can have recognition and support of their purely digital works.
We’ve reached the point where everybody can make digital art even from their phones.
But still, there are many questions on how to start and what to do first, and that’s why this guide is for. Keep reading and by the end, you will for sure know how to start making digital art!
Questions to Ask Yourself Before Making Digital Art
Before jumping to your first digital piece, let’s answer some of the most usual questions about digital art.
- Do I need to know how to draw?
To put it simply, NO, you can start your art learning journey working digitally first. But if you do know to draw, then you’re already one step ahead.
- Do I need to learn or buy Photoshop?
Also NO, Photoshop is a more professional-oriented software, so if you’re just starting then I highly recommend other more beginner-friendly (and also less expensive or free) software. But if you’re planning on working professionally, then by all means go and learn Photoshop to its core.
- Do I need an iPad or a graphic tablet?
NO, you can start making digital art from your phone with your finger right now, but it is very recommendable to have a bigger work area so a cheap graphic tablet or an iPad mini will do if you’re on a tight budget.
If you do want to look for a iPad, you can see our guide on the Best iPad for Drawing.
- Do I need a Laptop?
As I’ve told you, you can start making digital art on your phone if you want to, however, it is very recommendable to have a laptop and a graphic tablet (or an iPad) in case you want to pursue digital art as a career.
- Do I need a stylus?
This is a tricky question. You can make art with your phone and your finger, and some people create amazing pieces just with that, however, a stylus is highly recommended for beginners, especially if you want to move to another interface like a graphic tablet where a stylus is the only tool you work with.
The Basics of Digital Art
In this article, we’re going to go for both touch interface and desktop + graphic tablet.
Tech stuff
Before creating our first digital piece, let’s get to know our hardware and software. It is important to know the operative system (Windows, Mac, Android, iOS, iPadOS, etc) of the device you’re going to use. Even though there is some software available on all the operative systems, if you’re using a graphic tablet, it is important to know because that’s the driver version you’re going to use.
But what are drivers and how do we get them?
Drivers are small software that allows proper communication between our graphic tablets and operative systems. A graphic tablet without the right driver is useless so make sure to download the right one at your manufacturer support page (usually their website). It should be an easy download and run operation and there are also user manuals available in case you don’t know how to install them and get your tablet to work.
Since there are many tablet models we’re not going to dwell into which driver or what tablet model you should use (you can refer to this [insert a link to best tablet for artists here] article in case you want to buy a graphic tablet and you’re feeling kind of lost) but I must say once everything is ready you won’t need to touch that driver for a very long time.
Digital Drawing Software
Let’s go now for the software options we have.
Adobe Photoshop:
The most famous (and expensive) of all the drawing software. It’s oriented to a more professional user base and I wouldn’t recommend it for beginners unless you’re willing to take your time and learn how to use it first.
Available on Windows, Mac, and iPadOS.
Clip Studio Paint
This is one of the most complete drawing software. The learning curve is not as difficult as Photoshop, however, it does have a learning curve. I must say though, it’s totally worth it.
It isn’t free, however, the prices go for half (or even less) than Photoshop. If you’re getting clip studio for windows or Mac, then it’s a one-time purchase but if you’re getting it for Android or iPad, then you can use their subscription plans.
Available on Windows, Mac, iPadOS, iOS (iPhone), and Android (Both tablets and phones)
Krita:
A professional-level free software that is available on most operative systems. Krita is a great free option, though its learning curve is something to take into consideration. Krita is also a very RAM-consuming software, so if your laptop or PC doesn’t have a lot of RAM, it will lag. A lot.
Paint Tool Sai:
This software is a well-known and loved software for the illustration community. Though it’s considered to be outdated, it’s still a great software to start your digital art journey. It has a quite fast learning curve and it’s very intuitive. It doesn’t have the many options as other software do, however, it’s the less RAM-consuming software. It is a paid software and the price is a little bit higher than the market standard.
Available for Windows only.
Medibang paint:
Another great drawing software, very intuitive and easy to use, with its own international community, completely FREE to use. It does have a paid version but just to unlock some special features, the premium price is quite cheap as well.
Medibang is a very intuitive software, with several interface options and it’s considered one of the most beginner-friendly digital drawing software.
Available on Windows, Mac, iPadOS, iOS (iPhone), and Android (Both tablets and phones)
Ibis Paint:
Moving on to the mobile-only drawing software as the most used one we have Ibis Paint, perfect for beginners and optimized for mobile devices, Ibis Paint is a strong software to start with digital art. It’s FREE to use and also has lots of brushes and features that most software doesn’t have. It has an export option that allows you to edit your files on Clip Studio Paint Since it doesn’t have a desktop version.
Available on Android, iOS, and iPadOS.
Sketchbook and Sketchbook Pro:
The drawing veteran software Sketchbook (before Autodesk Sketchbook) has become very popular these days. Its intuitive and beginner-friendly interface makes it a great option to start with digital art. Oriented for designers and professionals, the brushes and features the software offers make it a great option to start creating right away.
It’s free on mobile devices and has a very low cost on Windows and Mac that is an amazing deal for professional-level software.
Available on Windows, Mac, iPadOS, iOS (iPhone), and Android (Both tablets and phones)
Procreate:
This iOS-exclusive drawing app is a quite young, yet strong alternative software, with many useful features and the most beginner-friendly user interface, Procreate gained popularity during the pandemic while showing that digital art is something we all can do.
Even though it’s an iOS and iPadOS exclusive app, it has proved that it’s more than worth the price it is listed for. For some, it is even worth buying an iPad to use it.
Available only on iPadOS and iOS (iPhone)
Now that we’ve speedrun the options you have to start at digital art, let’s start with the tutorial.
First steps
Alright. Now that we’re finally here, let’s start with taking a look at the initial interface of most drawing software.
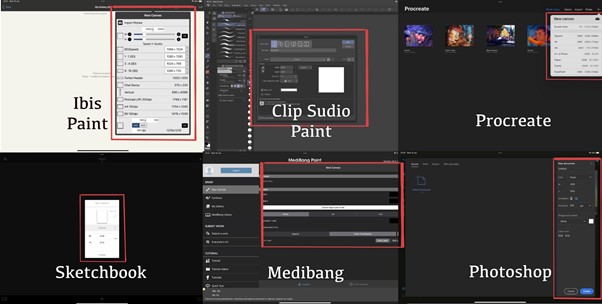
You’d notice that I’ve pointed to the “New Canvas” option. Many drawing software has options for different canvas sizes, but also specific kinds of works like illustrations, comics, webtoons, and animations.
We’re going to select the “New illustration option and choose a canvas size of 2000×2000 PX
Choosing the right canvas size is very important since that will make our illustrations look HD while not overworking our device.
Now for the resolution, you must know how resolution and quality work, however since you’re just starting, you’ll have to consider just one thing.
Are you going to print this work?
- If you are, then from 300dpi to 350dpi will be enough.
- If you’re going to post it online (or not post it at all) and nothing else, then 72dpi will do.
Click accept and congratulations! You’ve created your first canvas.
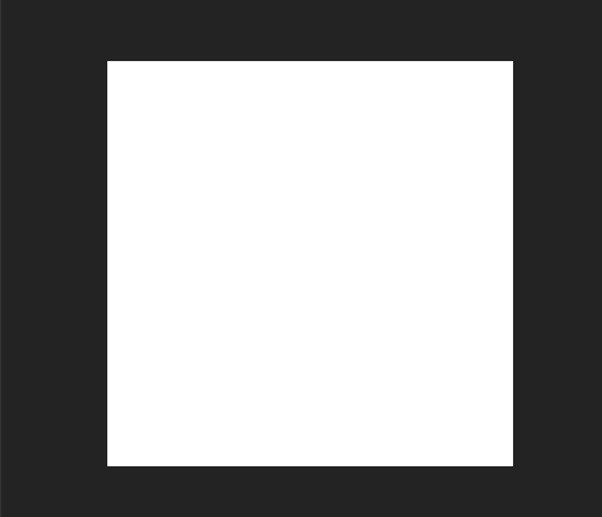
And yes. It’s blank. But that only means that you get to fill it however you like!
Let’s explore the basic tools to create digital art!
Every software is different, but these basic tools will be present on all of them.
The Brushes
Here you can see how most software displays their brushes, there are brushes for sketching, inking, painting, and airbrushing. There are even custom brushes that mimic traditional painting, it all depends on the software you’re using. You can adjust their sizes and opacities (as well as many other functions but let’s leave that for some other time).
Trace a couple of lines on your blank canvas to get comfortable with the brushes and stylus.
The eraser
Well, it’s basically a brush that paints in transparent pixels, taking away colors in many different and customizable shapes. Any brush can also be an eraser in most software, just make sure you’re not picking any color and it’s done!
The selection tool
With this tool, you can make selections and move them around cleanly around your canvas, along with the transformation tool it is a powerful design feature that allows you to correct mistakes and improves your workflow.
The eyedropper
With this tool, you will be able to select any color you’ve used on your canvas, be careful of the setting since many software has the option to select the colors from the whole painting or your working layer.
The color picker
It could be a circle, a square, or a triangle. It all depends on your preferred choice. The standard has a square or a triangle with a circle around it to select the hue while the middle part allows you to move around and choose the saturation and value of the color you’re going to use.
The fill tool
The name says it all, it’s a tool that allows you to fill with color any area you’ve selected or the whole canvas if that’s what you want. I can also fill areas inside closed figures.
The transform tool
This tool, combined with the selected one as I’ve told you earlier, is a powerful tool to fix mistakes, since it allows you to resize, rotate, flip horizontally and vertically, besides the tweak option for a more perspective-oriented transformation.
The blend/ fix tool
This tool might look different in each software, some have the blending and fix tool under the same icon, some under different ones, however, the functions are all the same. For blending, there’s usually a tool that doesn’t hold any color and it’s exclusively for blending colors. You can adjust the pressure and size to make details or to blend the colors in the whole canvas.
The fix tool is used to “fix” mistakes, by allowing you to either remove and fill (heal) parts of tour canvas or clone a part of your canvas with a brush for a more detailed fixing, this tool is used for final corrections and photo editing, so don’t be afraid to try it and if you don’t want to use it then that’s fine as well.
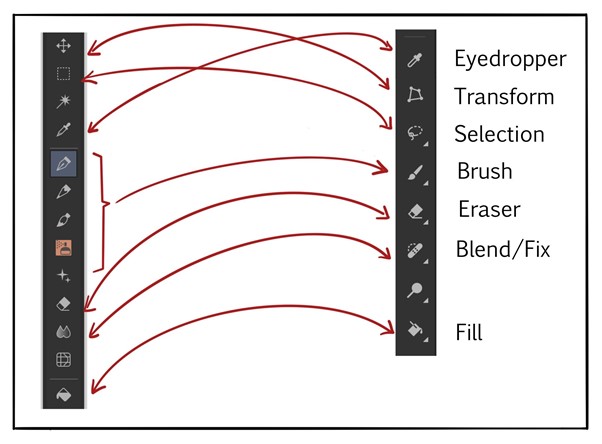
Here’s a small comparison of how tools look side by side in different software, the tools that have the same functions mirror each other, and it all depends on the layout you want to give them since the toolbar is highly customizable.
The Layers
For our last basic, let’s explore the layers. For beginners it is a bit hard to grasp the concept of layers, you can imagine them as pieces of glass that pile on top of each other, to create a beautiful painting as a whole. Layers give you the option to easily change and fix your illustrations as well as give some special effects to your art with the blending modes.
Painting a Digital Koi Fish
Now that we have our basics down, let’s start drawing!
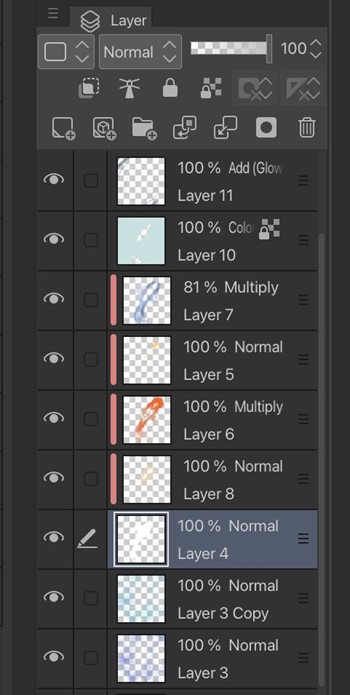
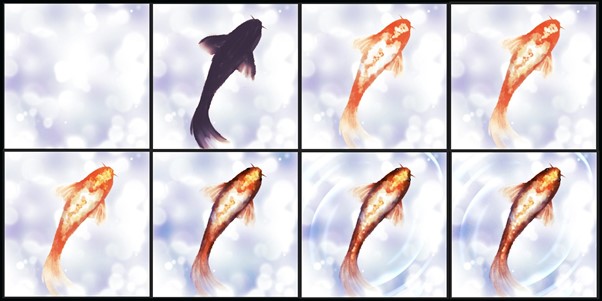
For this illustration, I’ve used Clip Studio Paint, you can see the layers I used above and separated them into steps:
- First I created a background by taking the blank canvas and filled it with a soft purple, then with a round soft brush, I painted with white and blue these bubble-like shapes to give the illusion of water.
- In a different layer, I drew the koi fish’s silhouette. I painted it a dark color here so it would be noticeable but the original color was white.
- On top of our silhouette, I created a new layer and started painting the spots of our koi fish. I used orange and yellow tones for his spots and a textured brush to give the illusion of scales.
- Then on a separate layer, on multiply mode, I used a muted blue to give its body volume. I also added the eyes with black.
- After that on a separate layer, on add mode, I put some highlights over its body and on top of the eyes. I also drew some curved lines around it and blended the inner part of them to give the illusion of soft water movement.
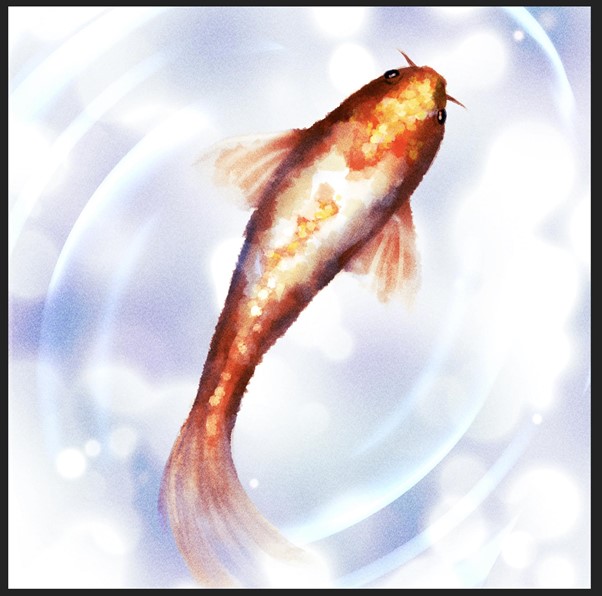
- Last, I created a new layer and applied a noise texture on top, to give it a granulated look, but that’s just a personal preference.
And that was it! There is still a lot more to talk about digital art but I hope this article helped you get the basics down and create your first digital illustration!
Digital art is a wonderful medium to create and learn and it also opens tons of possibilities for artists in the media, so if you’re hesitant then take this as your sign!
Thank you for reading this article! Until next time!