As an artist, we all have felt that instant fascination towards the eyes. And it’s not a mystery, because eyes are the most expressive and sometimes the most distinctive feature of someone’s face.
Somehow also, when we want to draw them we find ourselves in a pit of despair since eyes are not only hard to miss but also hard to draw.
To fully master the art of drawing eyes, there are several elements that we have to learn, however in this article I’ll do my very best to help you understand the mysteries behind the eyes basics and I’ll also guide you through the easiest way to draw eyes without suffering too much.
What You’ll Learn in this Tutorial
- The basic structure of the eye
- The eyes in the face as a whole
- Types of eyes
- How to draw realistic eyes step by step
Materials Needed for this Guide
- A piece of paper
- Graphite pencils from the gradation 2H, 4B, and 8B
- A compass
- A ruler
- A blending tool
- An eraser
- A white gel pen/fine liner
Video Tutorial
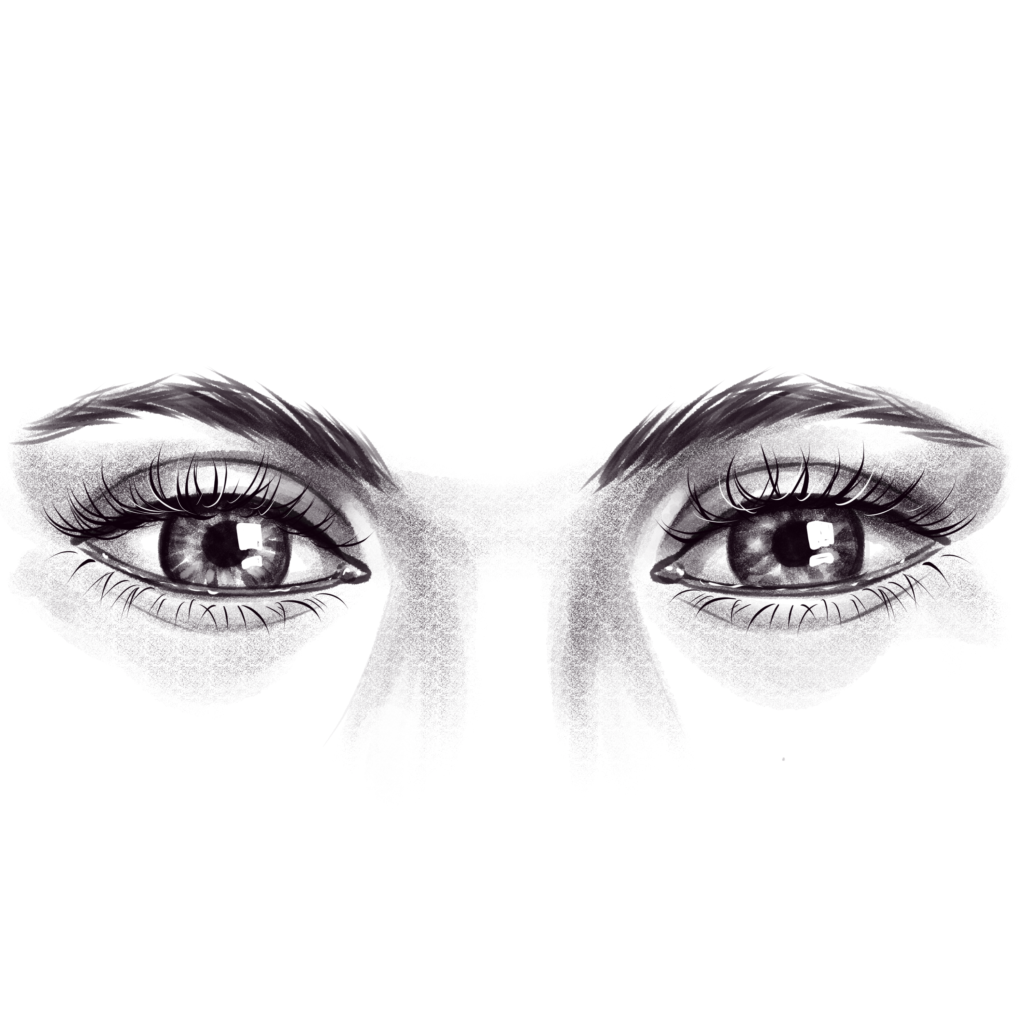
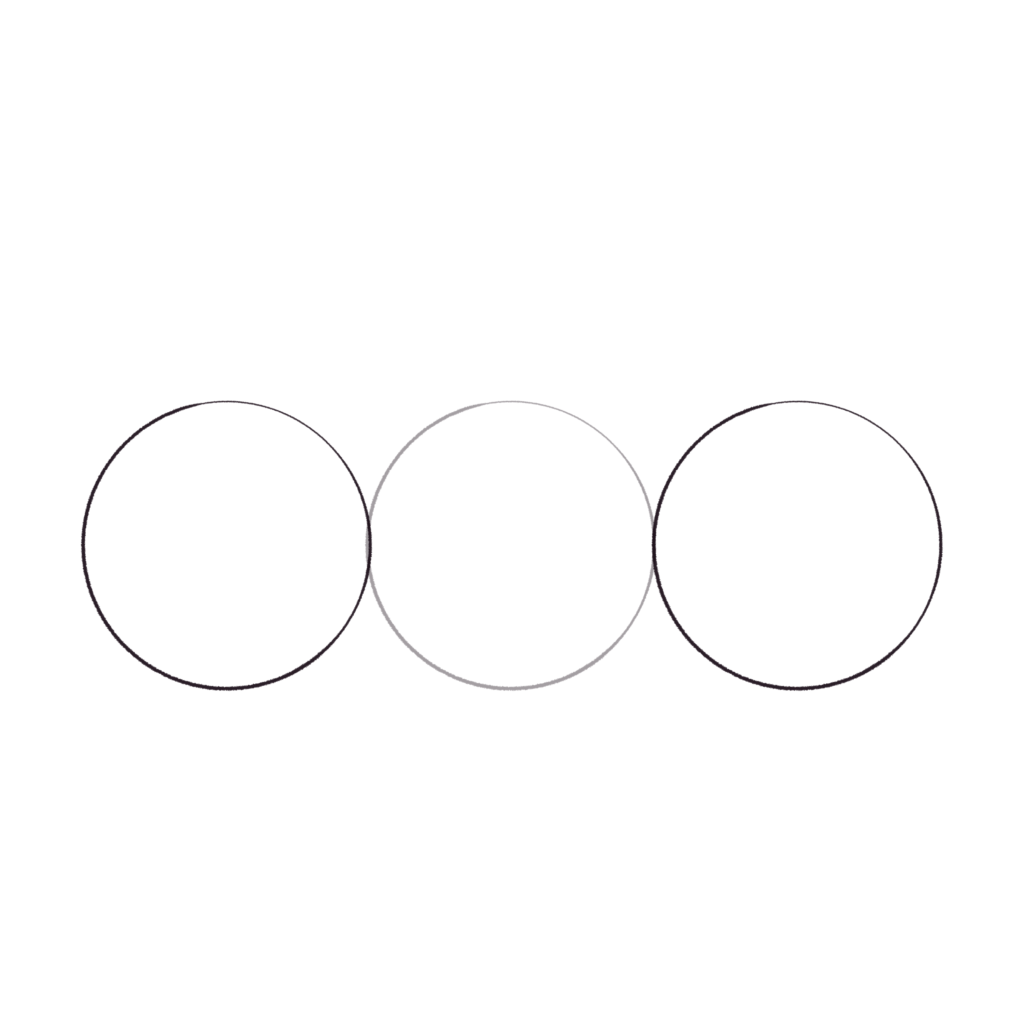
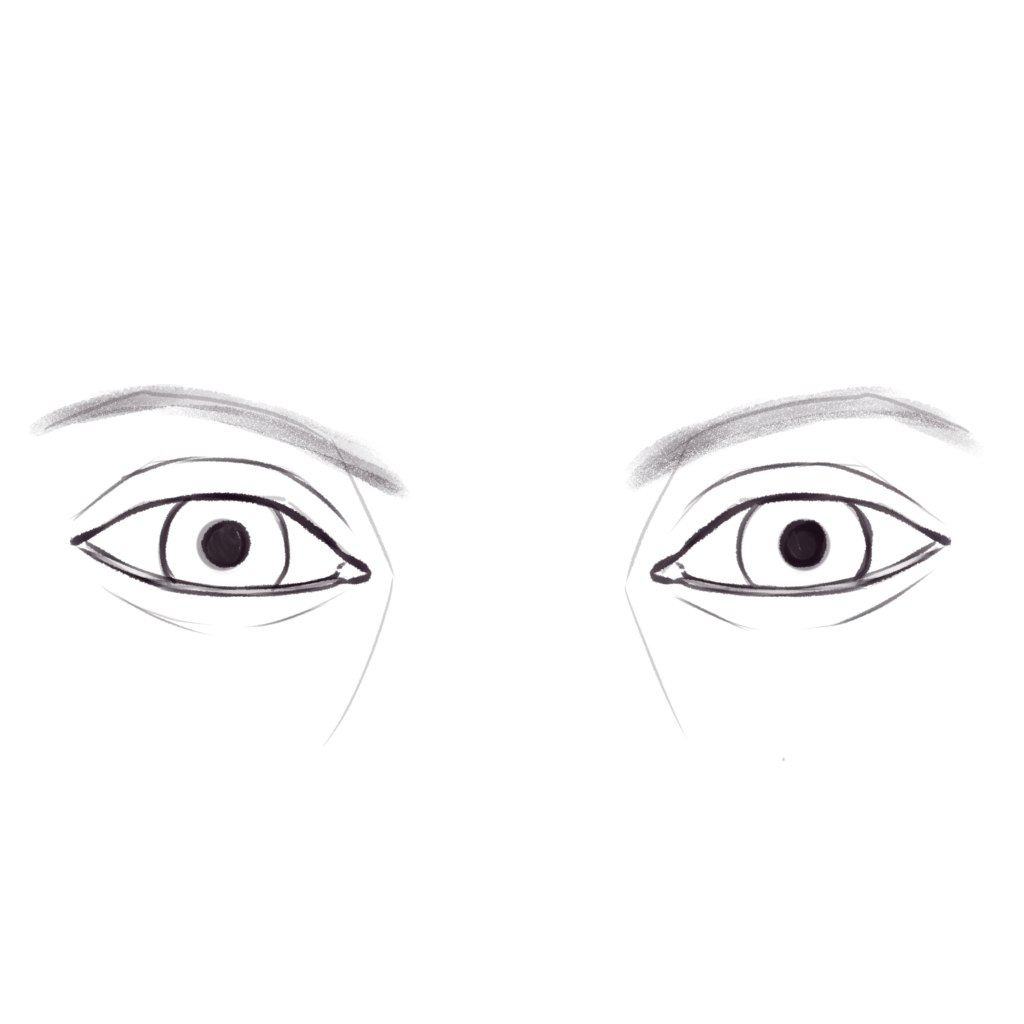
The eyes you’re going to draw:
And these are all the steps we’ll walk you through!
Section 1: Basic Structure of the Eye
Let’s get some basic theory here, if you have a piece of paper by hand I recommend you to draw along with me.
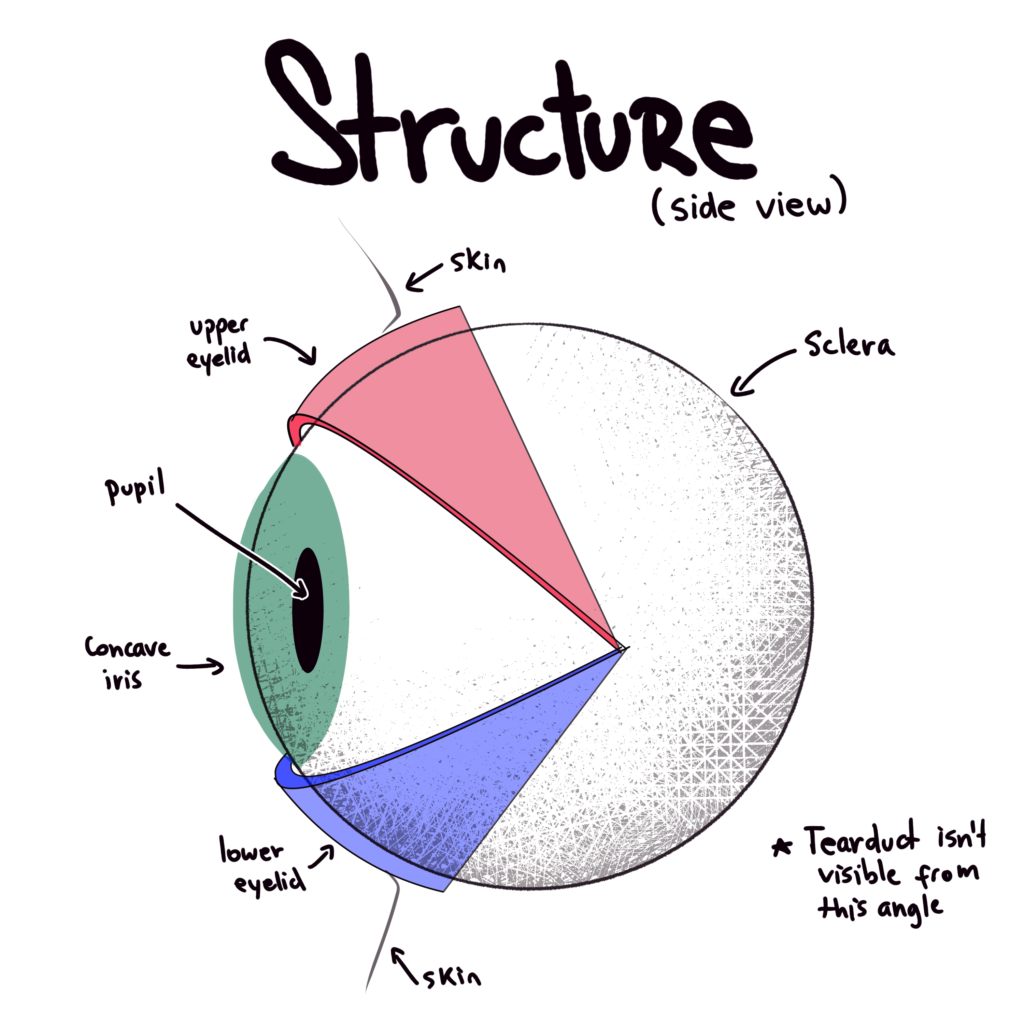
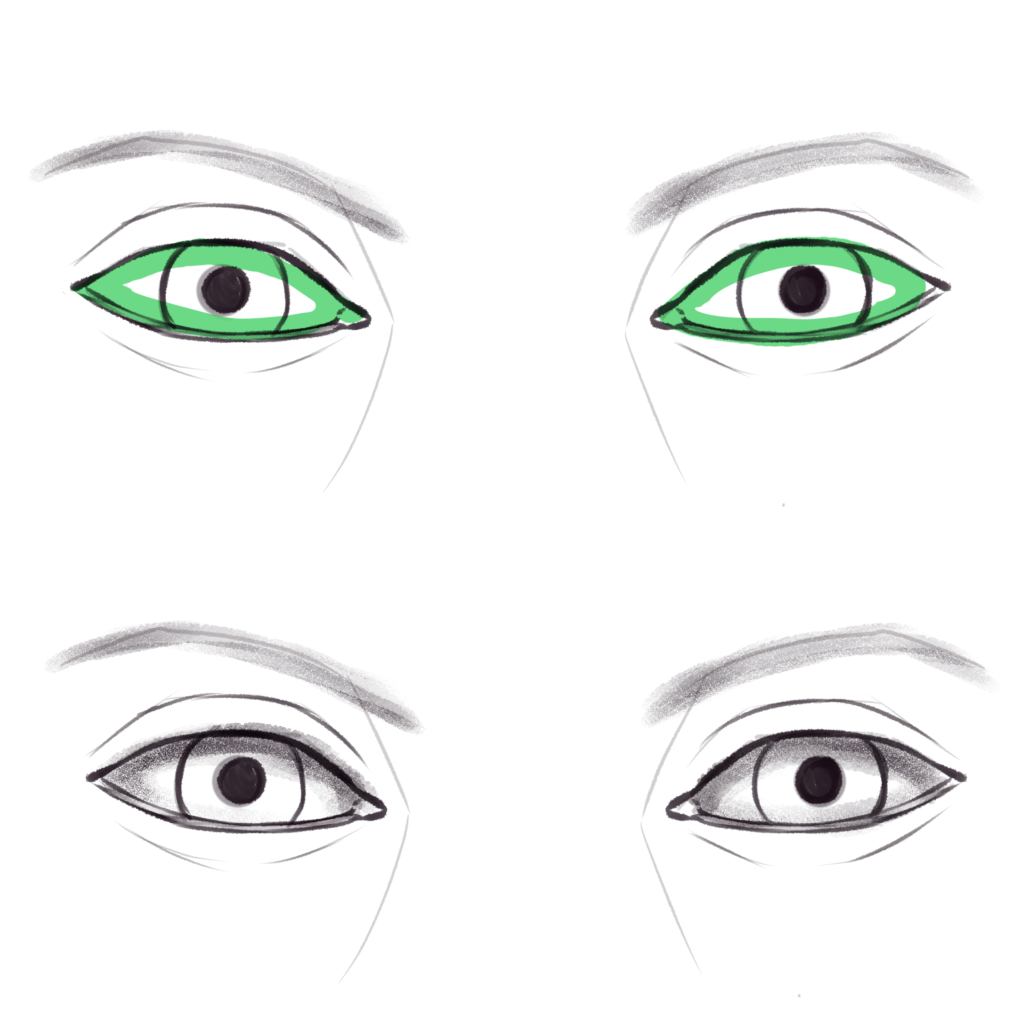
1. The Sclera

The sclera is the white of our eyes, it covers it all and protects it. It’s not always white though, the colors go from light blues to greens and purples and grays. Here we are representing it by a shaded circle (a sphere).
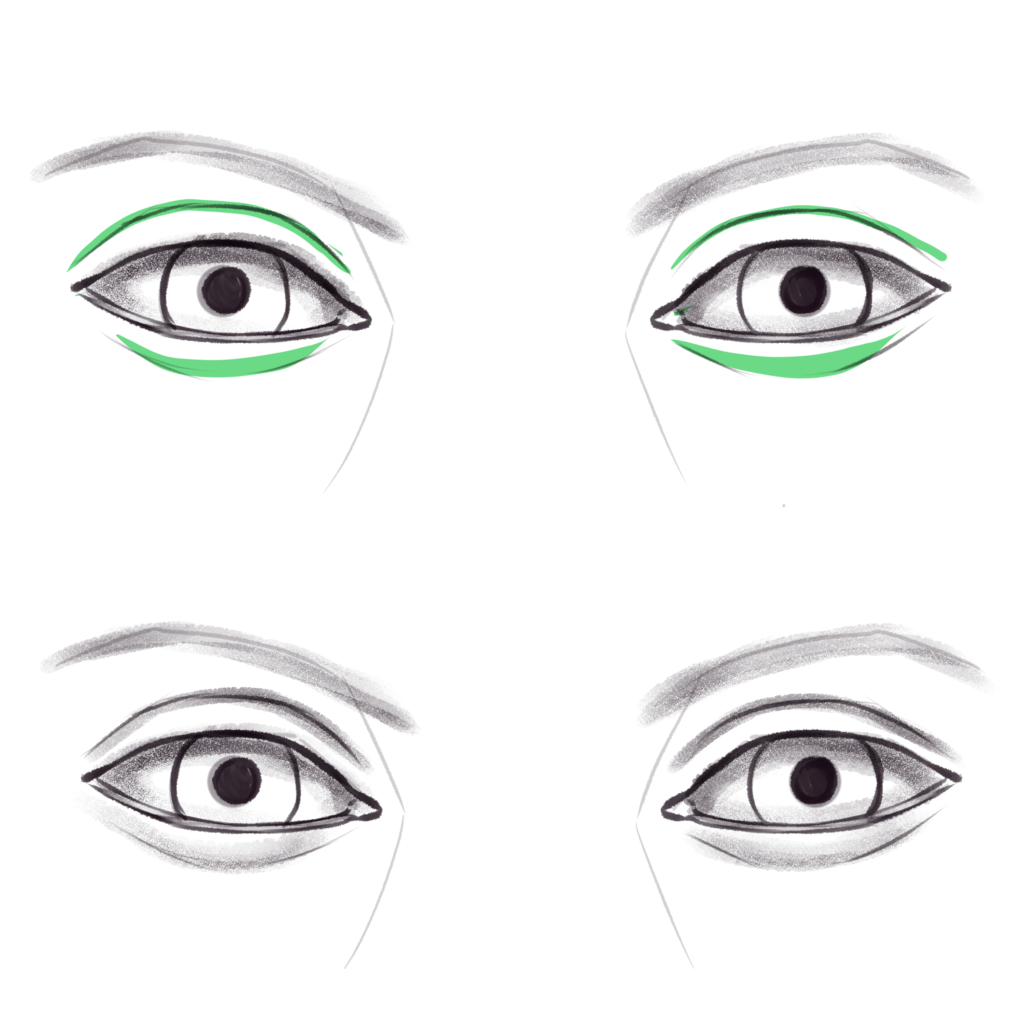
2. The Upper Eyelid
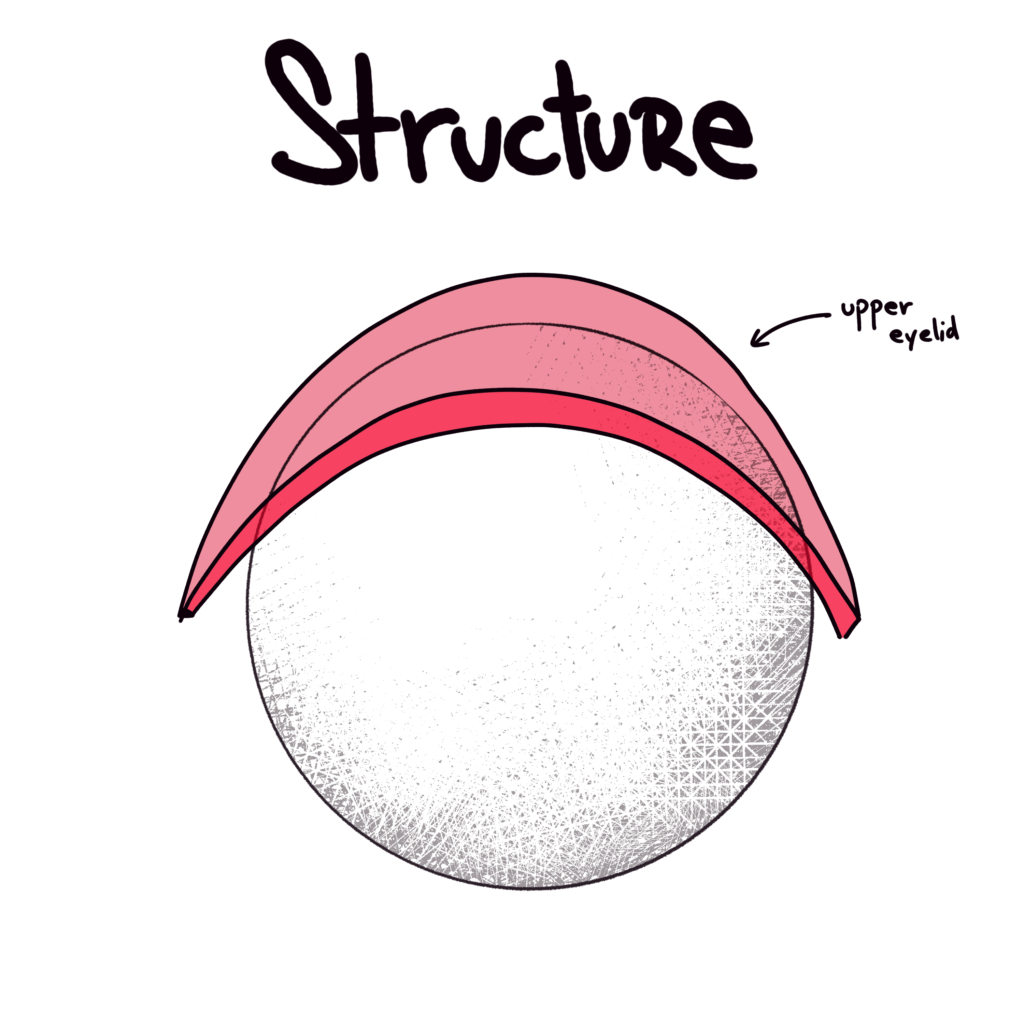
It’s a complex set of tissues and muscles that protect the eye from the outside. As artist, we represent it by a cover-like shape that goes on top of our eyeballs. Since it’s connected to our skin and muscles, it doesn’t go fully around the eyeball but has small gaps on the sides.
3. The Lower Eyelid

Same as the upper eyelid, we represent it by a cover-like shape that connects to the upper eyelid and covers our eyeball.
4. The Iris
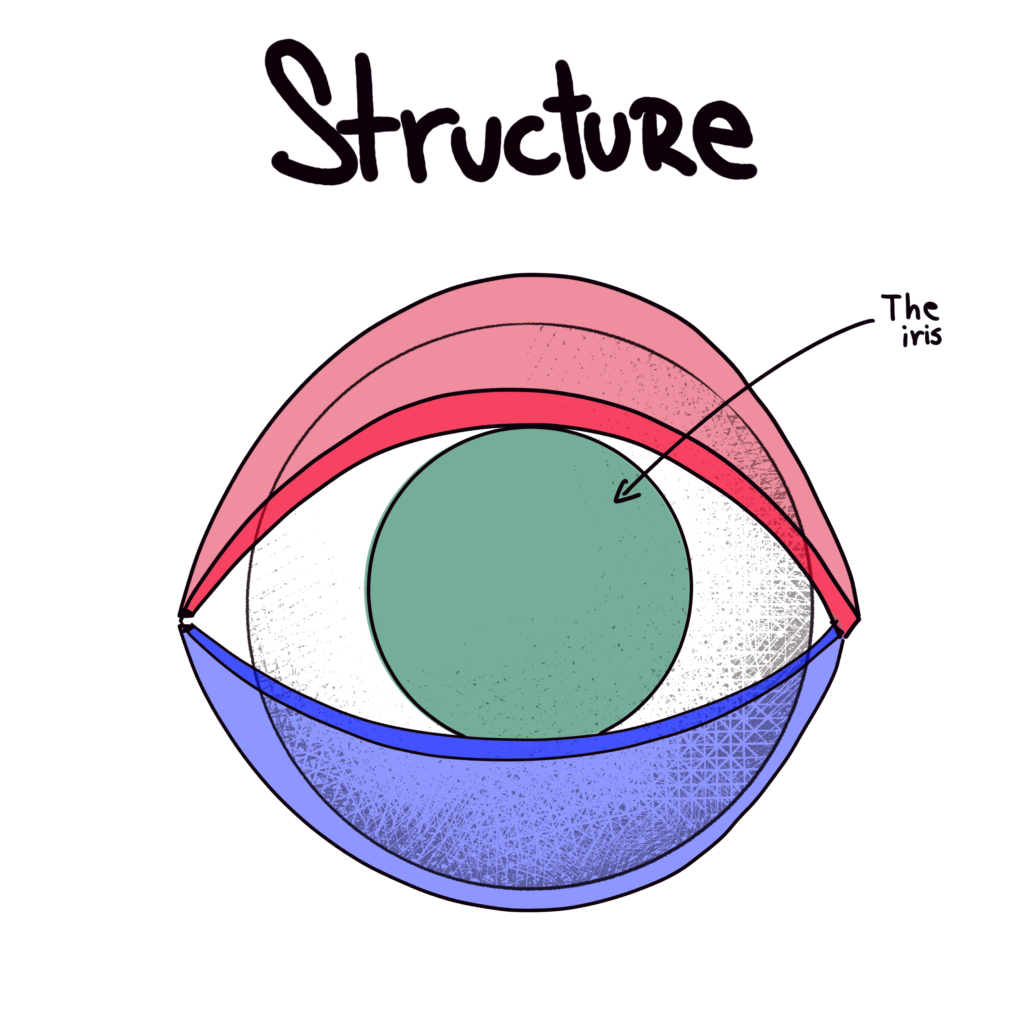
A perfectly round circle (when viewed from the front since perspective alters its shape when looked at from other angles) that goes in the exact middle of our eyeball.
5. The Pupil
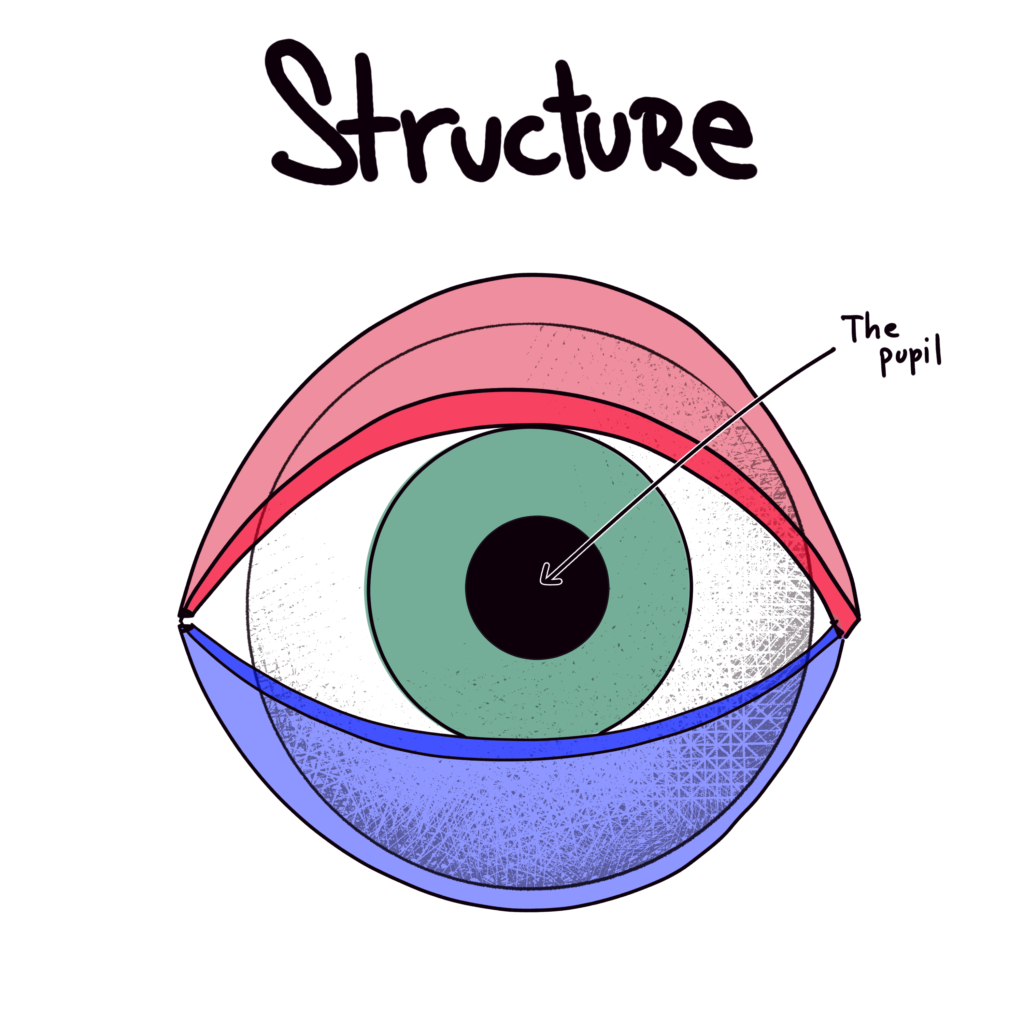
Another perfectly round circle (when viewed from the front since perspective alters its shape when looked at from other angles), that goes in the exact middle of the iris.
Always remember that the pupil lets in the light, so it also alters its shape when the ambiance changes. It dilates when hit by light and expands when in the shadows.
6. From Basic shapes to Organic form
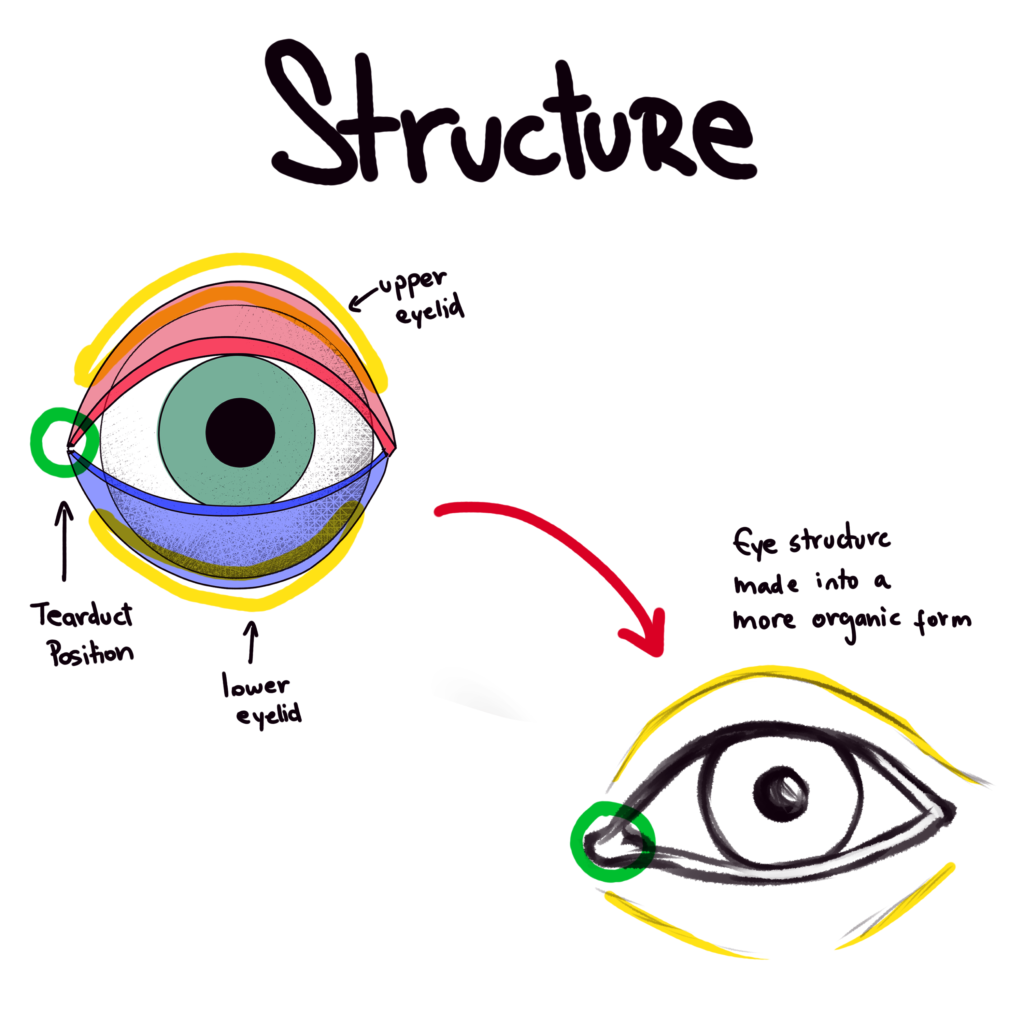
Now that we’re all clear in the very basic anatomy lesson let’s translate our basic eyeball shape into an actual eye (a simplified version).
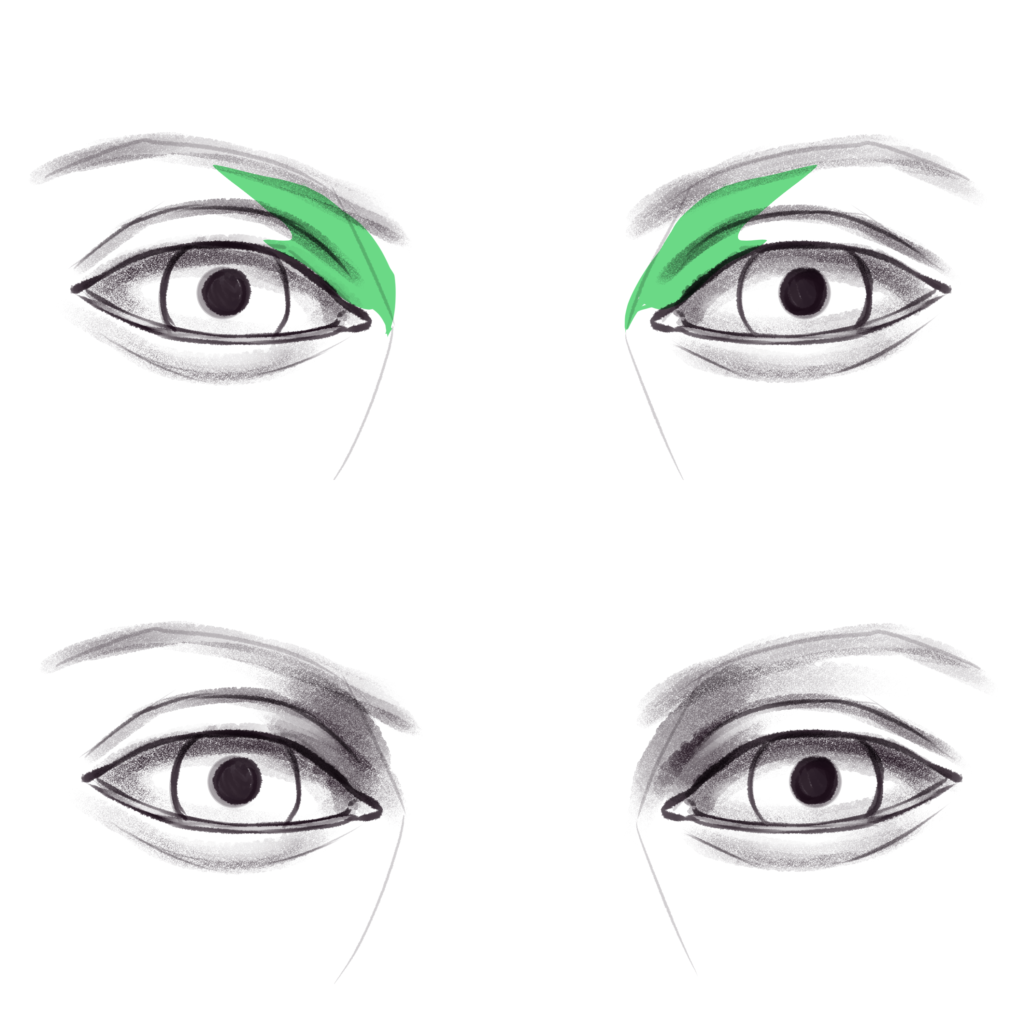
Notice how the base of the upper eyelid is hidden by the lashes line? It’s mostly because of the angle of view, but also because of the gravity that makes our skin go down and covers it a bit.
However, the lower eyelid top (waterline) is always visible (usually a reddish tissue). That’s important to remember because it’s one of the eyes’ less noticeable features for the inexperienced eye yet one of the most important parts when trying to bring our eyes to life.
Now, that small green circle marks the tear duct area, since the skin is pulling the eyelids joint it might or might not be completely visible but it’s also an important part of the eye that we artists shouldn’t forget. The folds of skin that our upper and lower eyelid cause are simplified into lines, and due to the protuberant structure of our frontal bone and hollow structure of the eye socket, the most noticeable one is the upper eyelid.
7. From Organic Forms to Realistic Eyes
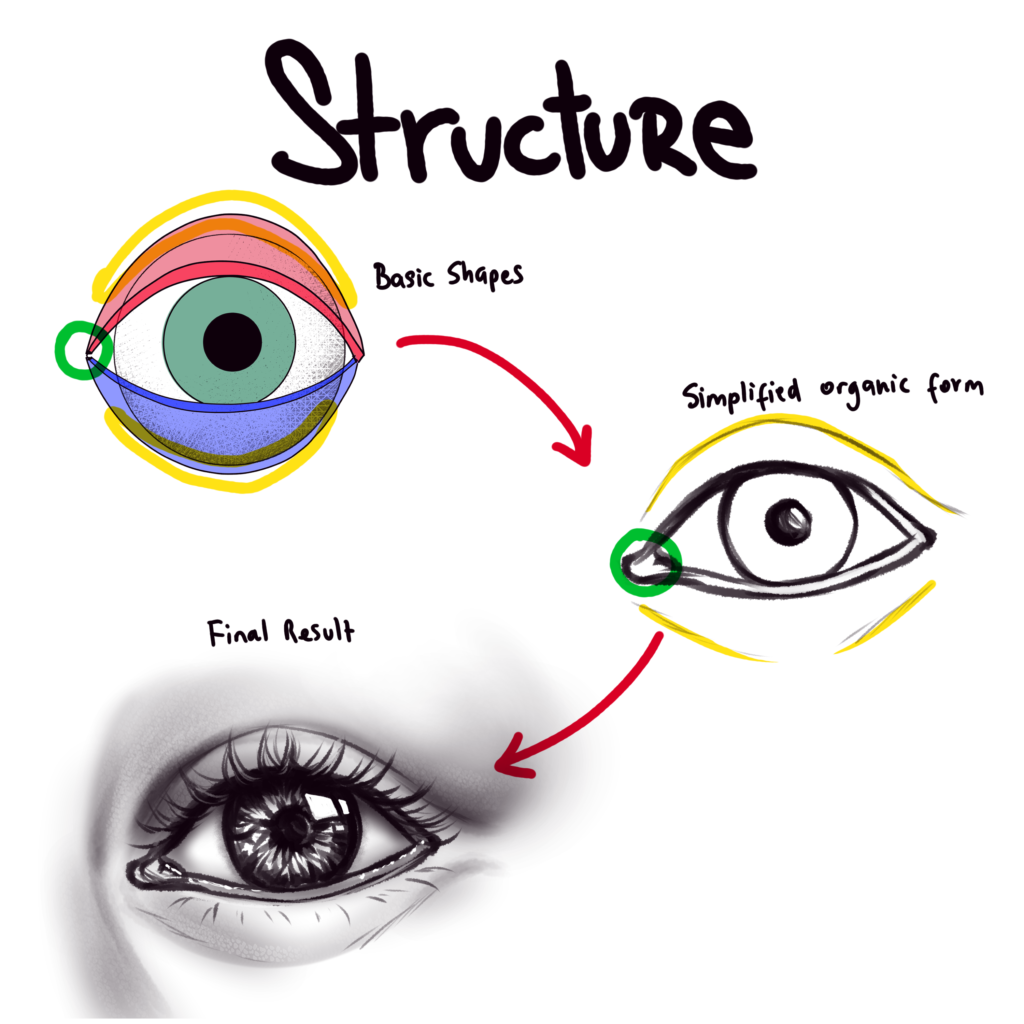
Well now that we know how to translate the basic shapes into organic forms, let’s see how our eye looks after applying some shadows and details.
Seems like a big step going from lines to a fully rendered eye, however it’s not that hard. Keep reading and I’m going to guide you through the process.
8. The Side View
I know you already want to draw an eye but wait a bit more because this is very important. The eye, when seen from the side, presents the very same structure as in the front view, however, our viewer angle might alter the shapes that we perceive and make it a bit difficult to draw eyes from different angles.
For example: The tear duct has vanished here. The iris is now a thin oval that looks like it’s coming out of the eyeball, what a surprise! same as with the pupil that seems to be a little too shy and hiding behind the iris.
Let’s remember that on top of the iris is a clear tissue called the cornea, that makes our eye look like it’s not quite the perfect sphere.
Also the pupil, it’s not some random circle in our eye but a hole that lets in the light. Since it’s a hole, it isn’t on top or in the middle of the cornea but way behind the iris, we represent it by a black oval shape, close to the iris base, giving that illusion of depth.
9. From Basic Shapes to Organic Forms
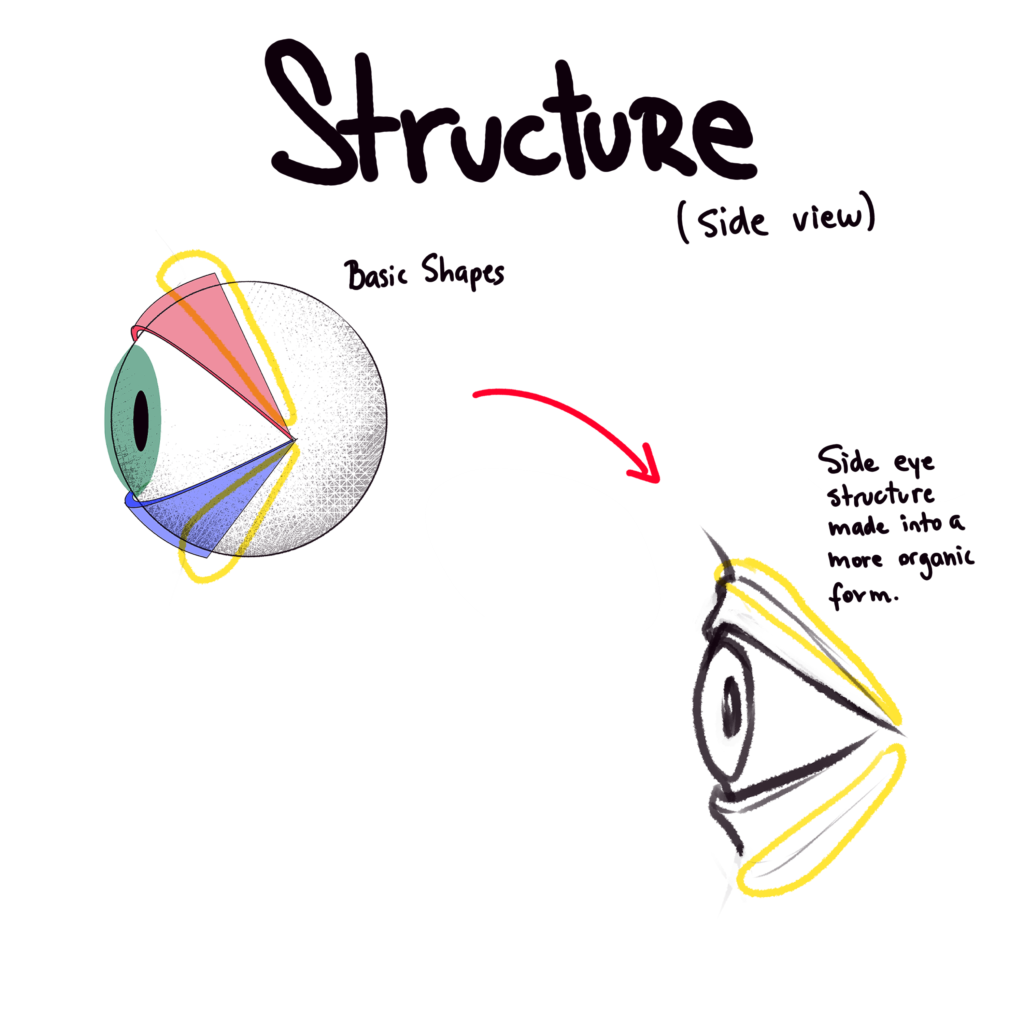
Now it looks like an eye. Using soft lines and mimicking the skin folds, we’ve now turner our ugly eyeball shape into a more organic-looking eye. The upper eyelid is way more defined than the lower one since it’s also responsible for blinking and the one that moves the most. The lower eyelid is also being pulled by the cheeks skin and muscles so it’s not that noticeable sometimes. A simple line to represent it should be enough.
10. From organic Forms to Realism
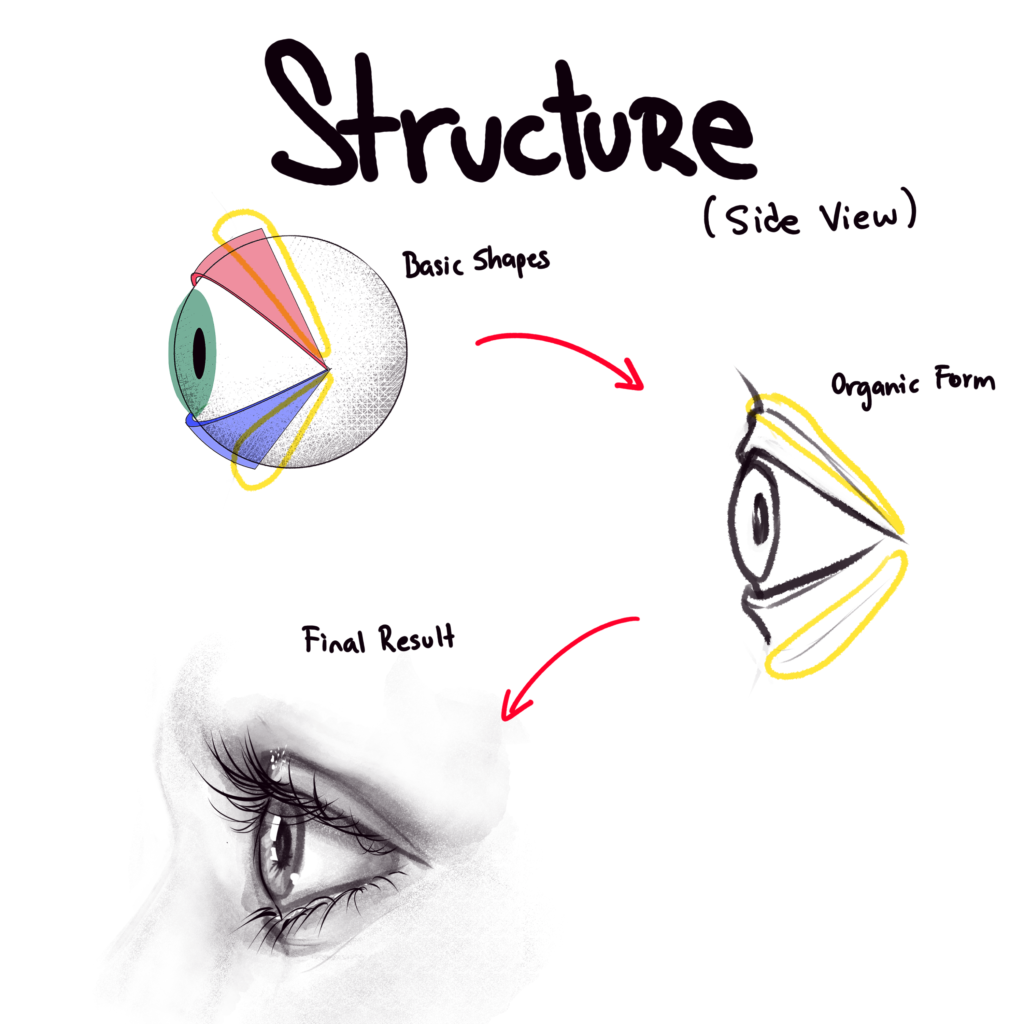
The eyes make more sense when seen with skin, eyelashes and texture on them. It’s not hard to know how to go from one step to the other if you’ve learned about structure at least once.
Section 2 – The Eyes in the Face as a Whole
1. Facial Structure
Please be patient I promise it’s worth it! Or you can skip this section and learn this by yourself all over again because I repeat: Structure is important!
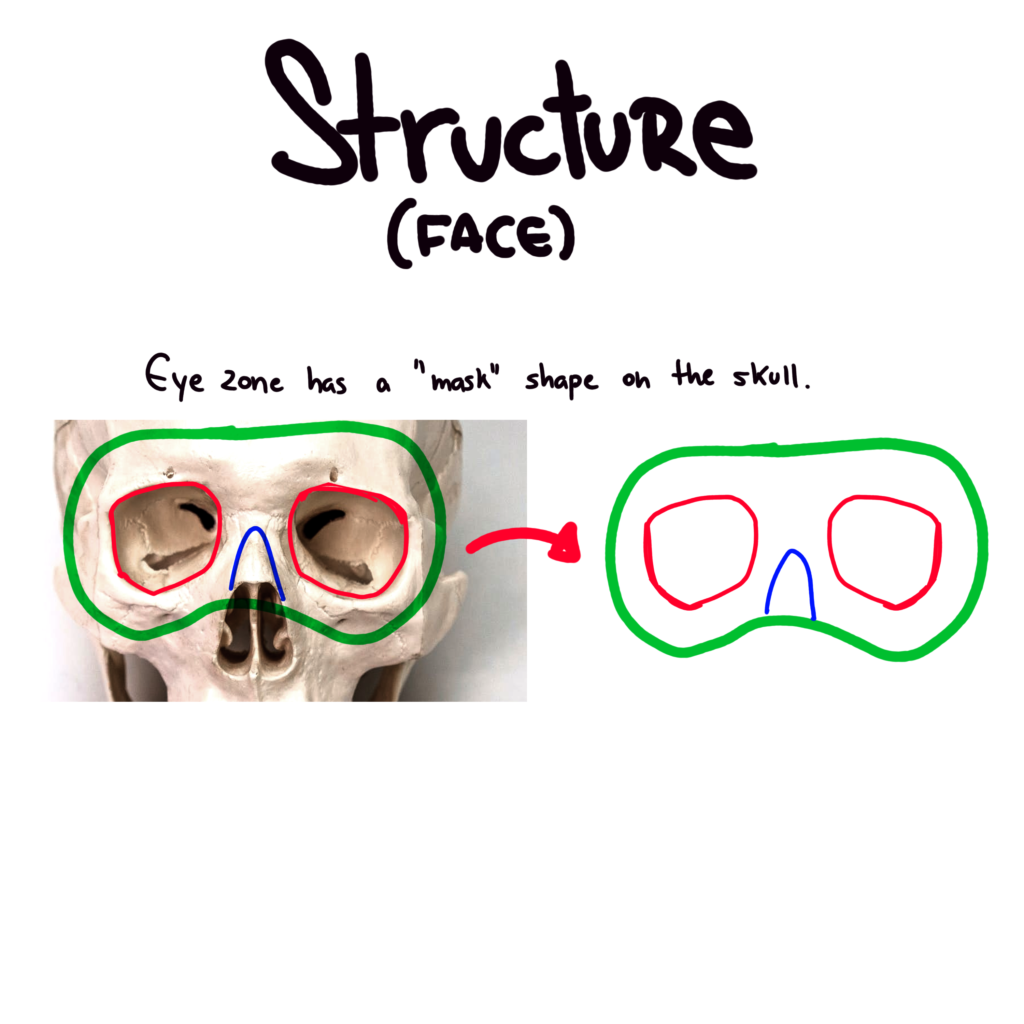
We’re now seeing a skull. Yeah, not that pretty, but quite useful and somehow easy to remember.
Let’s not go into deep skull anatomy and focus on the eye zone, notice how I highlighted a “eye mask kind of shape” there? Looks a bit funny now but believe me when I tell you this shape changed my life.
It might be hard to believe but yes, that shape helps me every time I want to draw eyes, from any angle and expression, the basic structure always matters, and unless you want to picture a skull every time you draw eyes, I suggest you to keep reading.
That eye mask shape mimics the eye sockets and nose bridge, making it easier to incorporate eyes into the face. All we have to do is insert the eyeballs, place the eyelids on top, add details, and voilà. Basic eye shape is done!
2. Some Volume Will Help
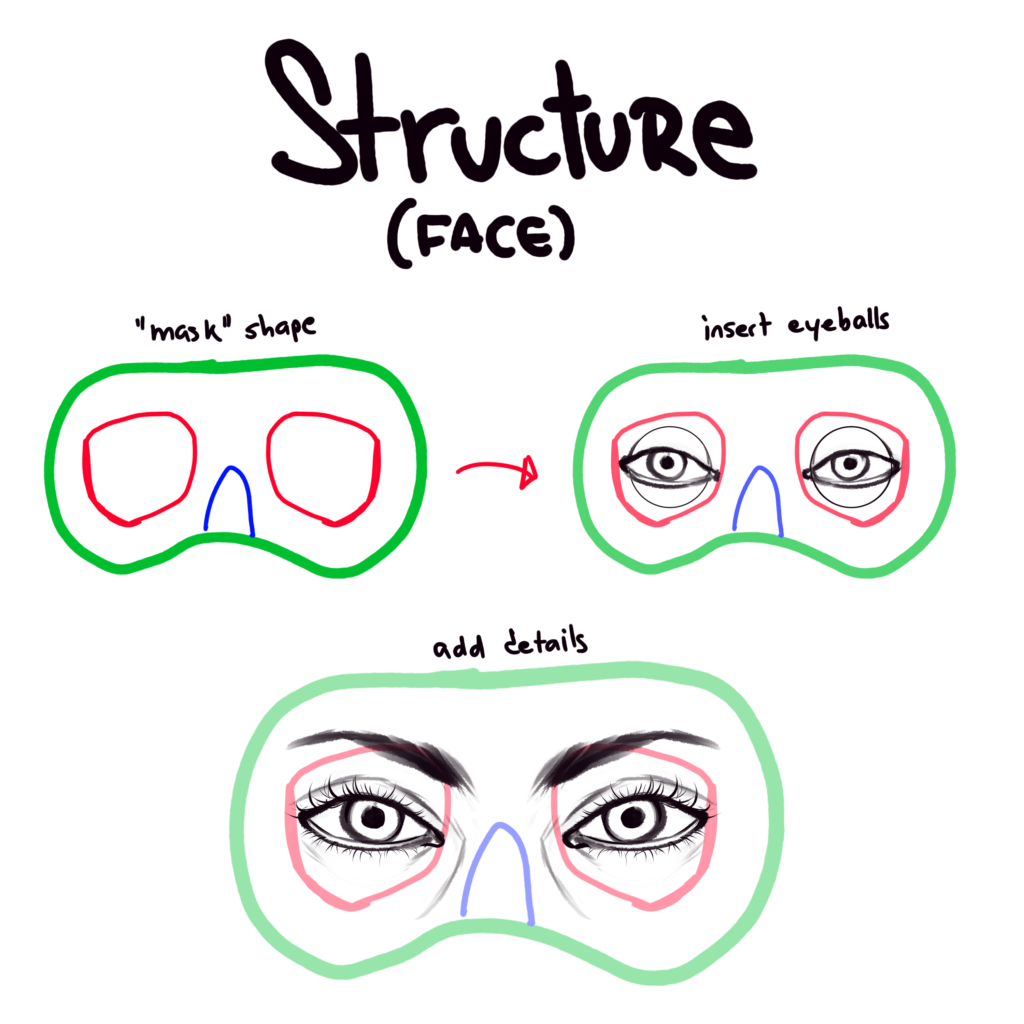
Since the red areas represent the hollow eye sockets, the eyebrows we drew on top of them should give us a hint. The small area between the outer eyebrow and eye socket will be highlighted when hit by the light because the frontal bone has a significant protuberance on that area. The darkest area will be right between the inner eyebrow and the upper eyelid since that’s the hollowest part of the eye zone.
The blue curvy shape represents the nose, being an elevated volume, the light will hit right on top, leaving the sides a bit more on the shadows.
And since skin pulls from our eyelid to the forehead and to the cheek, the light will hit right in the middle of those areas.
Section 3 – Types of Eyes
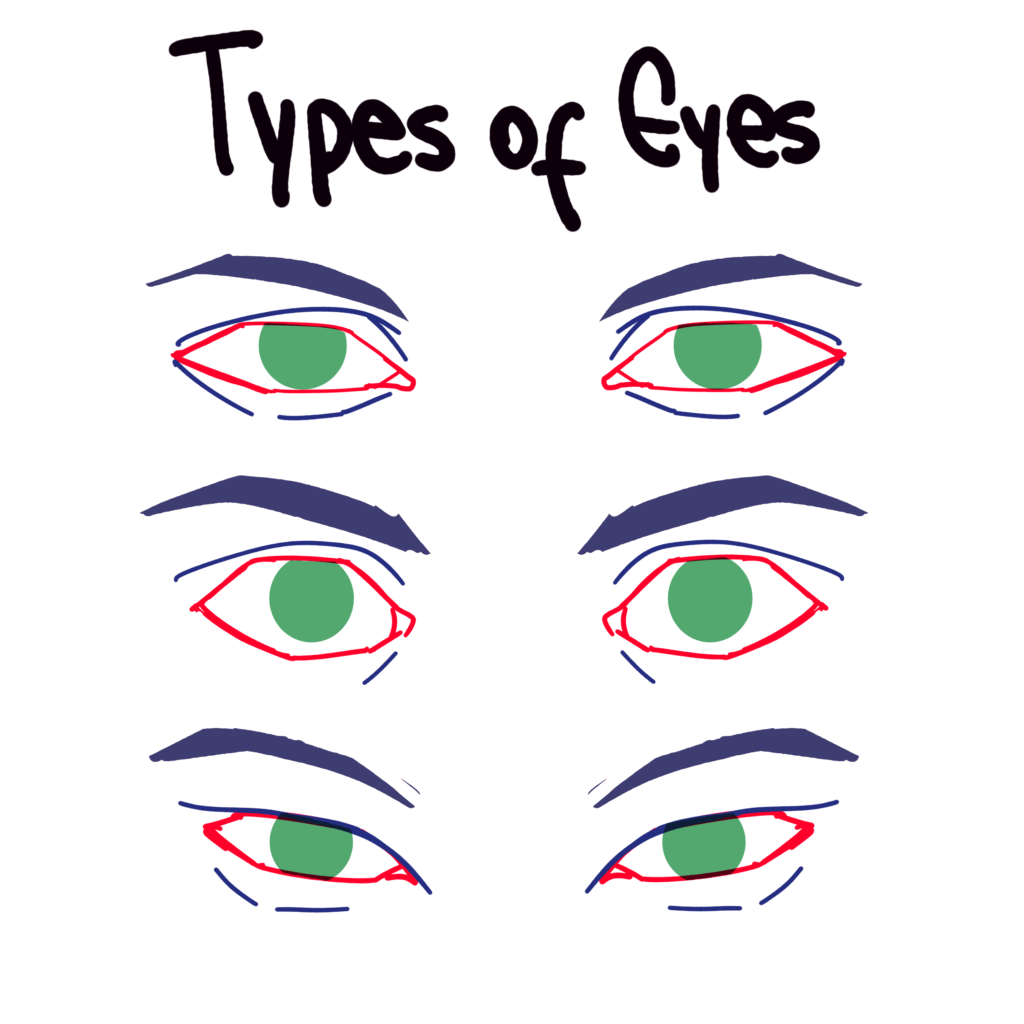
1. Basic Shapes of Eyes

Even though there are many types of eyes. The structure/shapes can almost always be broken down into the same irregular shapes.
These red, irregular hexagon shapes, represent some of the many types of eyes that are out there, however, all of them can be represented with the same hexagonal-like shape, changing the angles and lengths of the lines just a little bit can make a completely different eye.
However, not only that defines the many types of eyes. It’s also important to notice how the skin around the eyes works. Sometimes the skin makes the eye hooded, sometimes slanted, sometimes sunken, sometimes protuberant. It’s important to look at references and identify the structure behind the eyes, but also the unique features that age, weight, race and health give to the eyes.
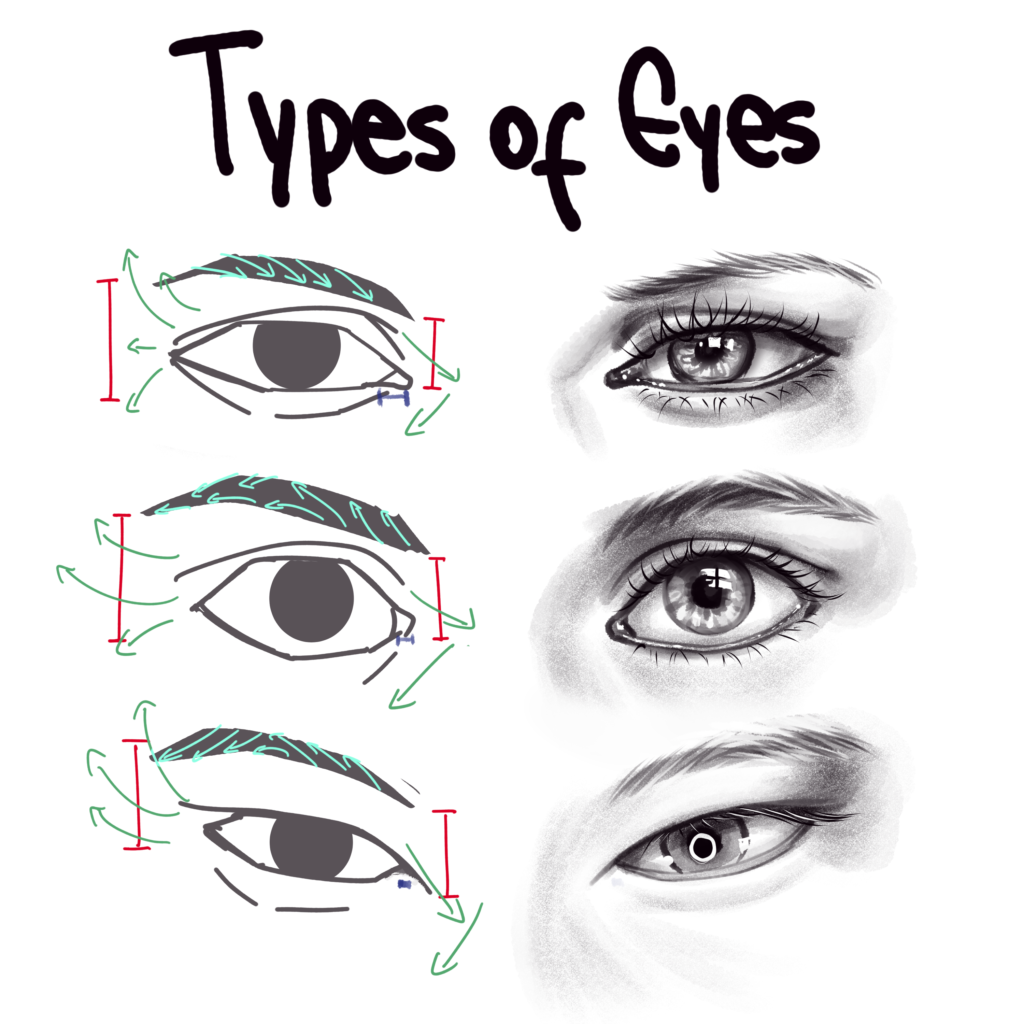
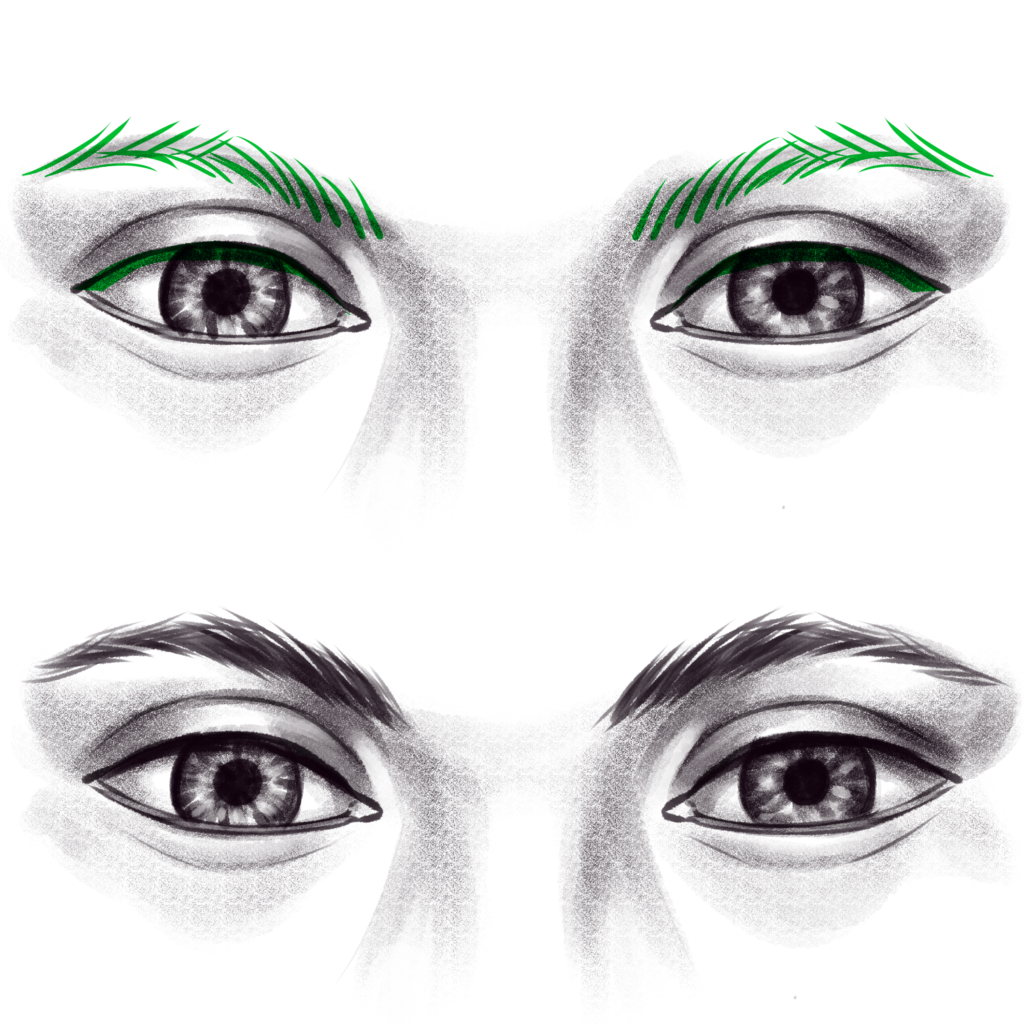
2. Adding Eyebrows
Once the eyes are done, we can’t help but notice that something is missing, and yes, of course, it has to be the eyebrows!
The eyebrows give great definition to the eyes, express lots of emotions and make us look complete (google eyebrowless people if you don’t believe me) so adding eyebrows to our eyes is a great step into making them make sense. There are also lots of eyebrows shapes, different densities, different positions. I could talk about this all day, that’s why looking at references is important, however, when drawing eyes from the front, the only thing that matters is to make them look symmetrical.
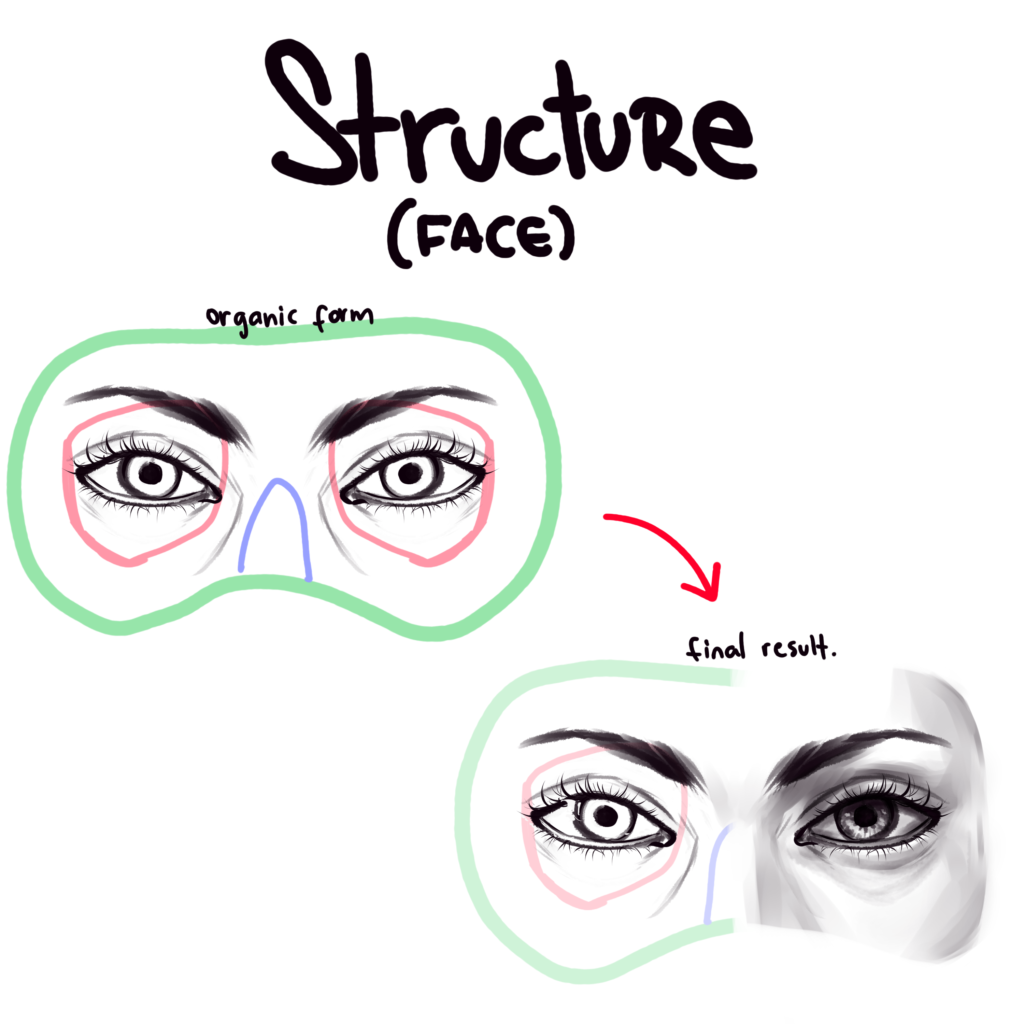
3. Realistic look
When looking at this image, you’ll notice that those realistic-looking eyes were drawn from the very same structure on the right.
I highlighted some important elements there.
For example. Notice how the inner eyebrow is closer to the eye? Those red marks will help you see that.
The green lines represent how skin pulls around the eyes.
And the cyan lines represent how the brow hair was done, the direction of the strands, and more or less how eyebrow hair works as well.
But enough of that. You’re here to learn how to draw an eye so that’s what we’re going to do!
How to Draw Realistic Eyes Step by Step
Yes. Realistic. Not hyper-realistic or anything like that. Because if you’re a beginner, hyperrealism will hurt you and you won’t even notice!
So let’s go a bit slow and learn how to draw a nice-looking pair of eyes while also knowing what’s behind and how things work.
Unless you skipped the structure part. Then you’ll probably come back later.
Everyone does.
For these steps, you’re going to need your graphite pencils, your kneadable eraser, your normal eraser, your ruler, your compass, your bending tool, and your white pen/maker.
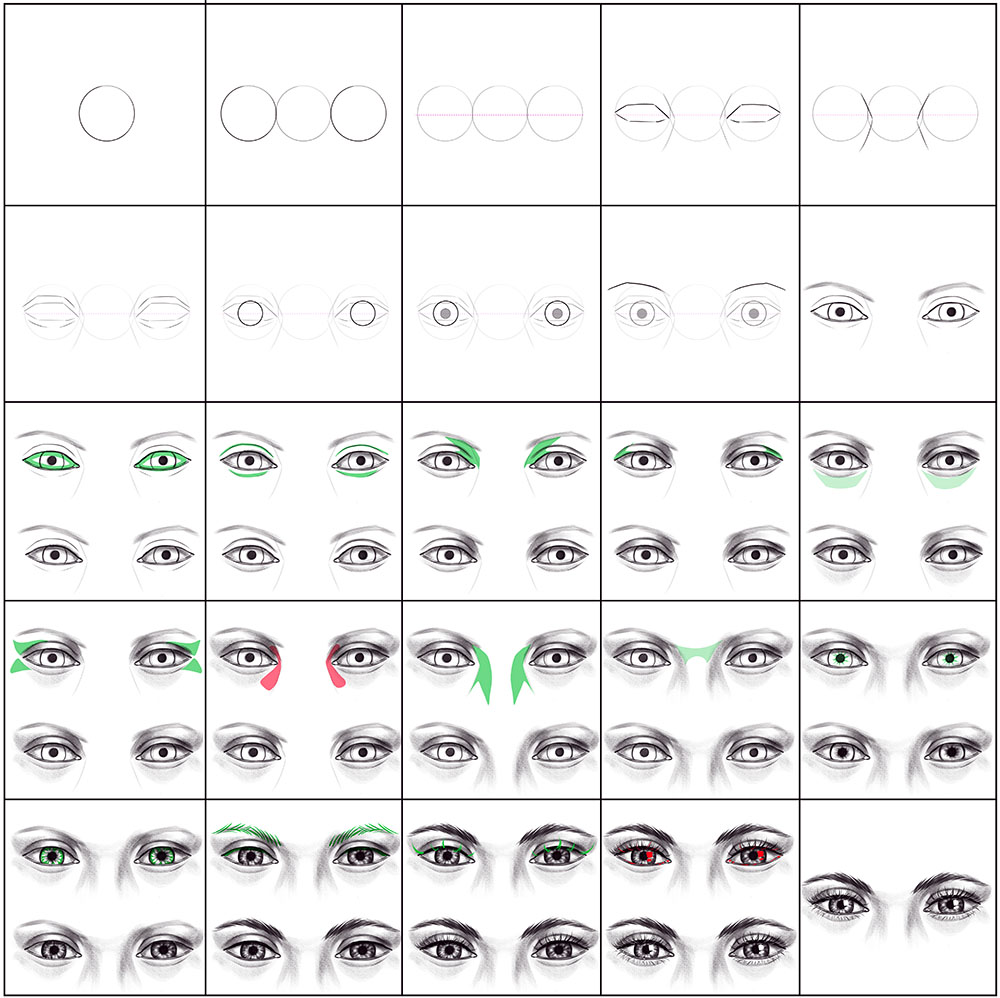
Step 1: Draw a Circle

Yes! A circle, easy right? Make it not so big but not so small either. Measure your canvas and make sure you can fit another 2 of them horizontally and still have some room on the sides.
Step 2: Draw two more circles
Told ya to leave some room for more, the facial proportions tell us that the distance between eyes is another eye (Lil bit more, Lil bit less) so the same principle applies for eyeballs.
Step 3: Cut those circles in half
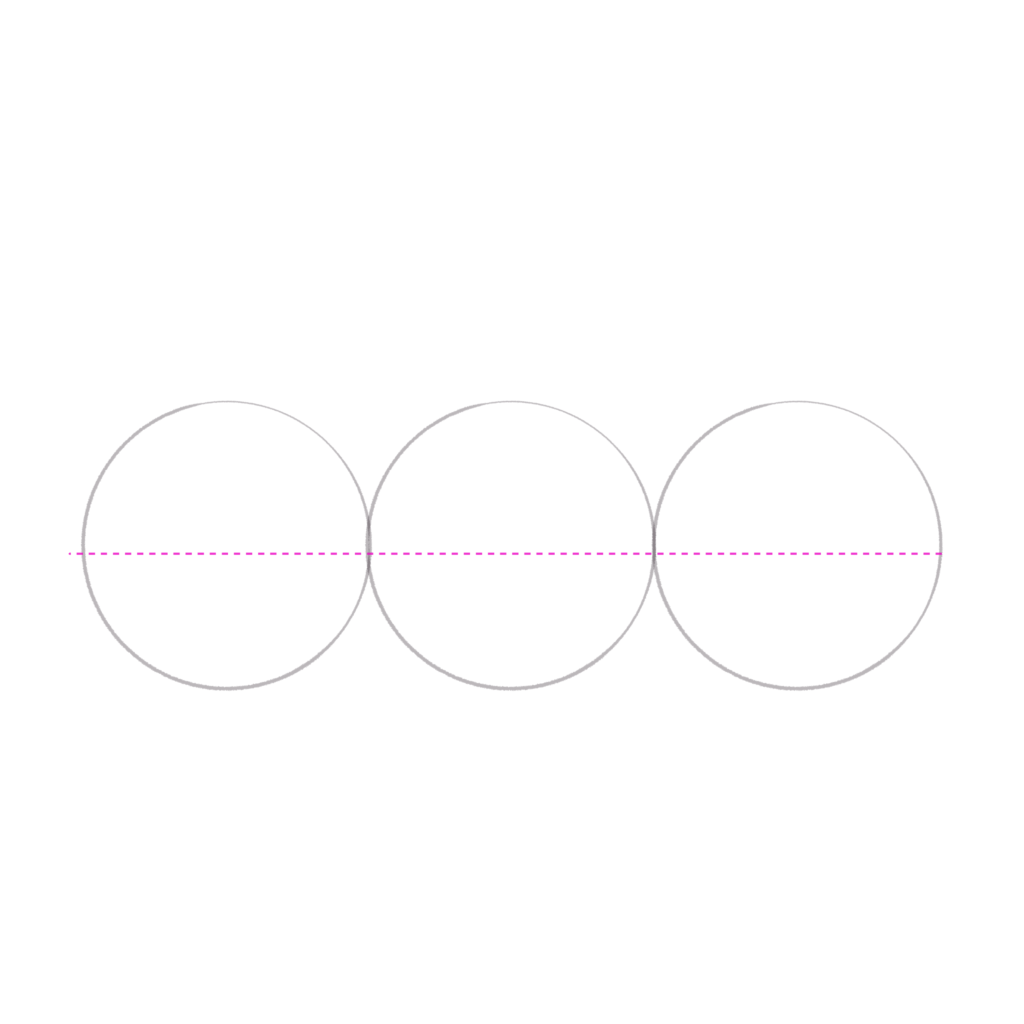
Draw a soft line cutting the three circles in half.
Step 4: Draw two angled lines
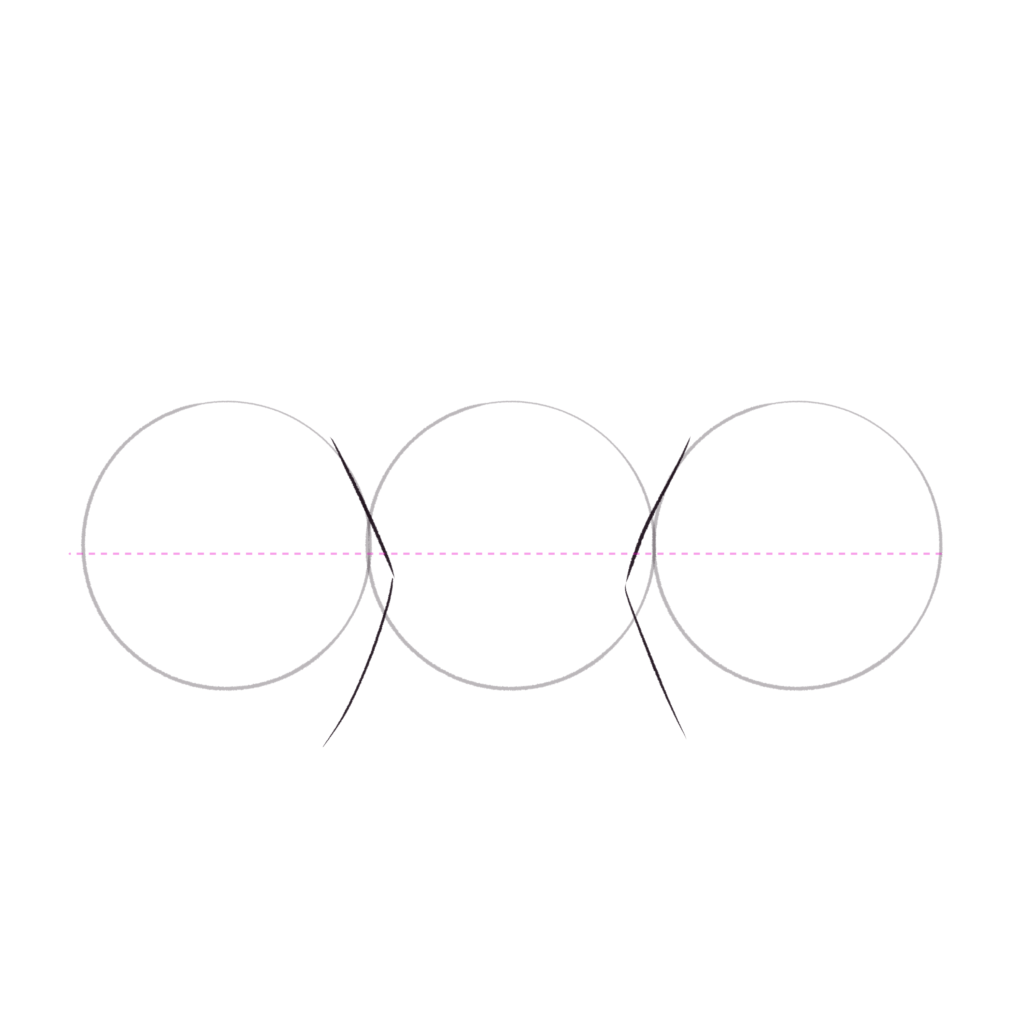
From the top inner side of each eyeball (the eyeballs, not the circle in the middle, that’s not an eyeball, just a representation of space), pull two angled curves, making sure the breaking point is slightly under the middle line.
Step 5: Draw Two Hexagon Irregular Shapes
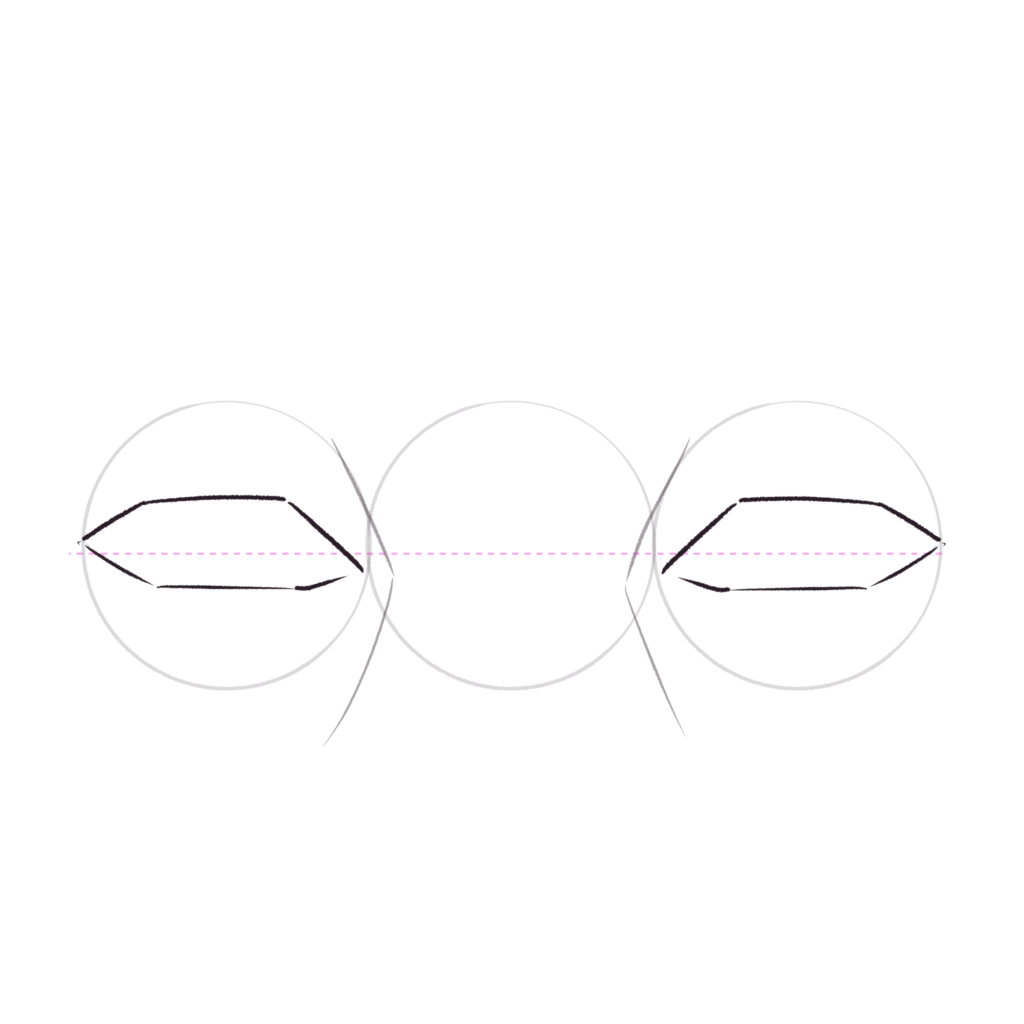
Now the moment of truth, form the eye shape with that irregular hexagon, right on top of the eyballs but not getting out of them.
Step 6: Draw the Upper and Lower Eyelids
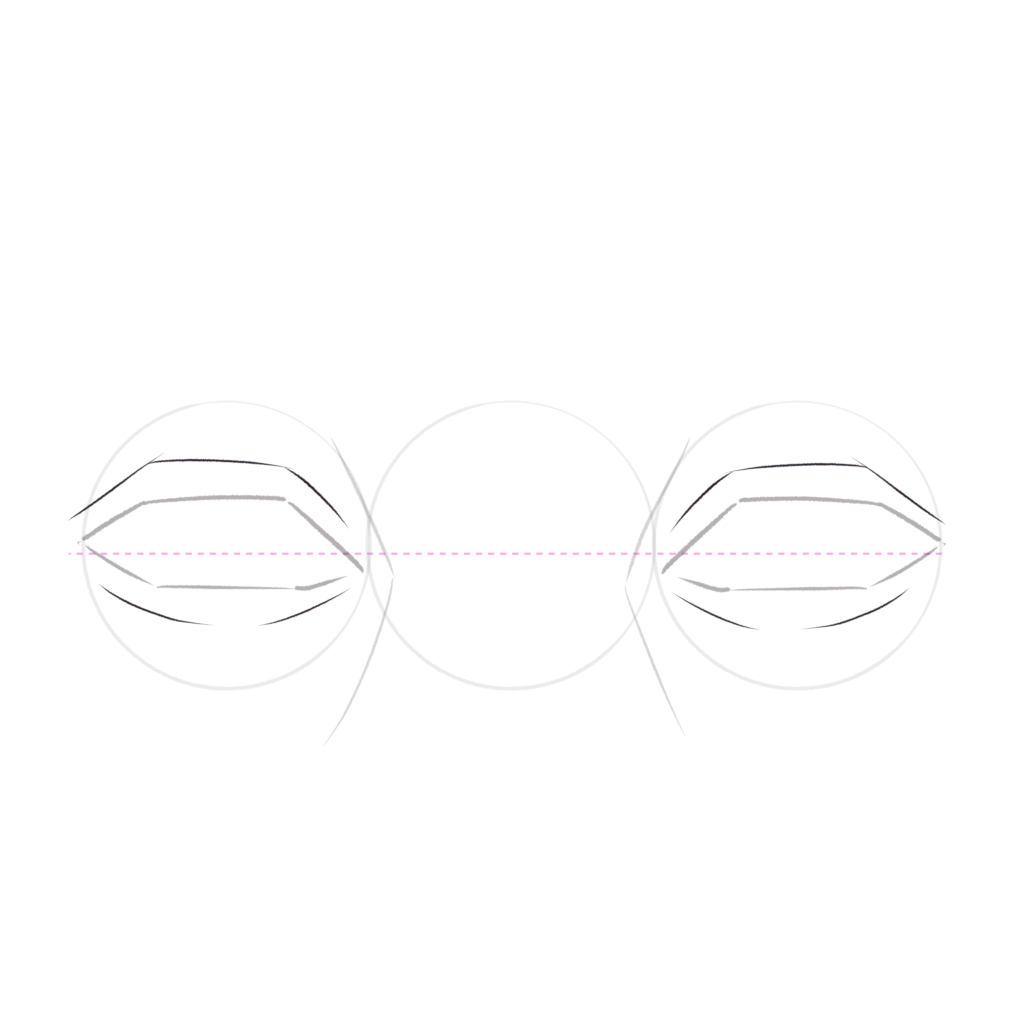
You know the drill (unless you missed the structure part of the article), draw the eyelids according to your preference and to the eye shape you want.
Step 7: Draw the Iris
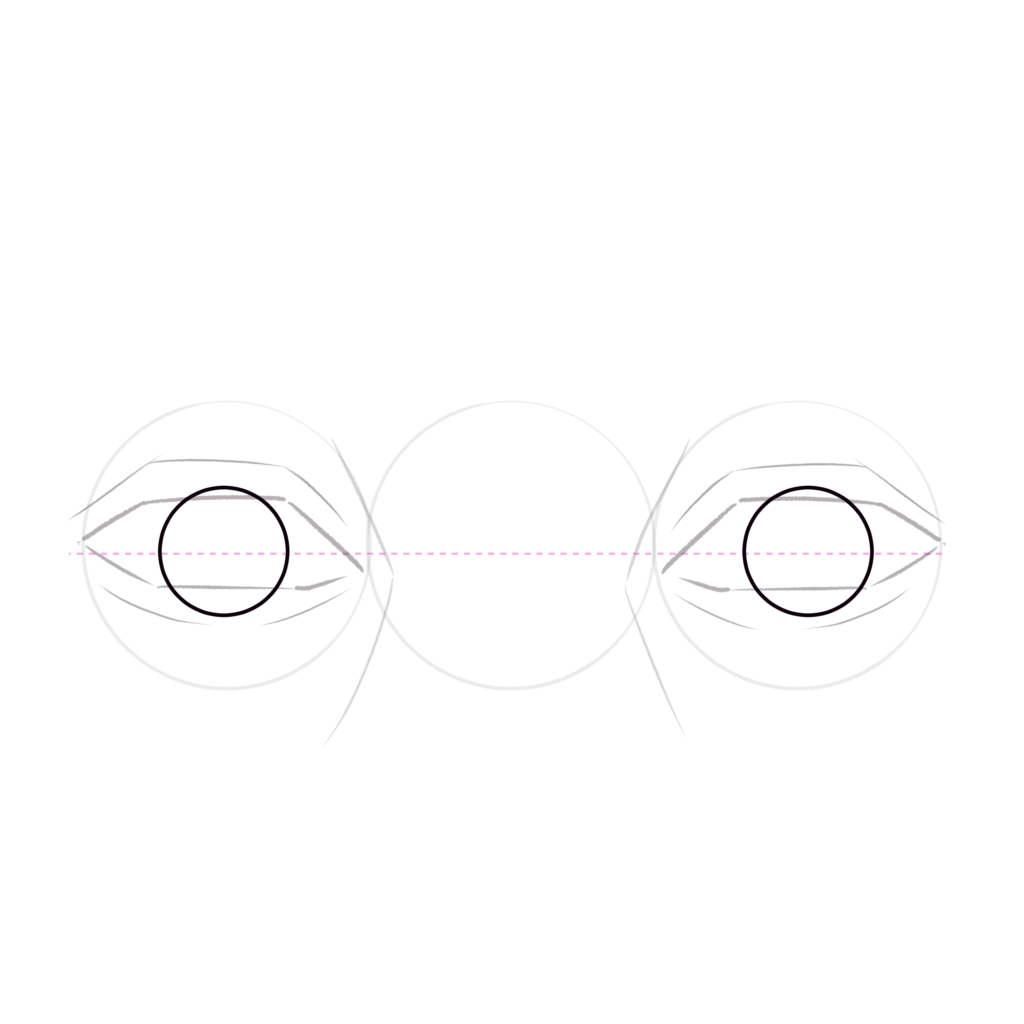
In the exact middle of the line, draw the iris (also in the middle of our eyeball), one at the time, making sure they’re not too close to each other or to far from each other.
Step 8: Draw the Pupils
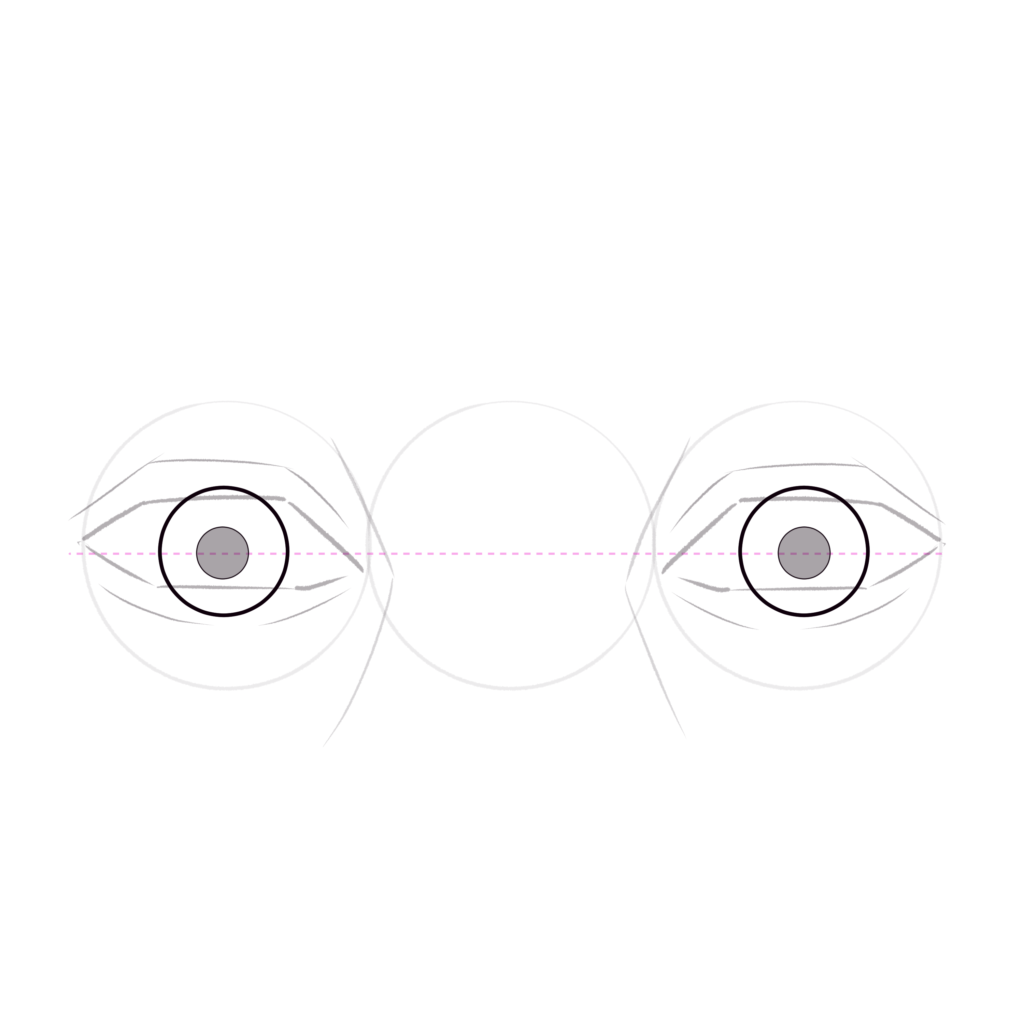
Since we’re drawing the eyes from the front, draw the pupil exactly in the middle of the iris and shade it just a little bit.
Step 9: Hint the Eyebrows
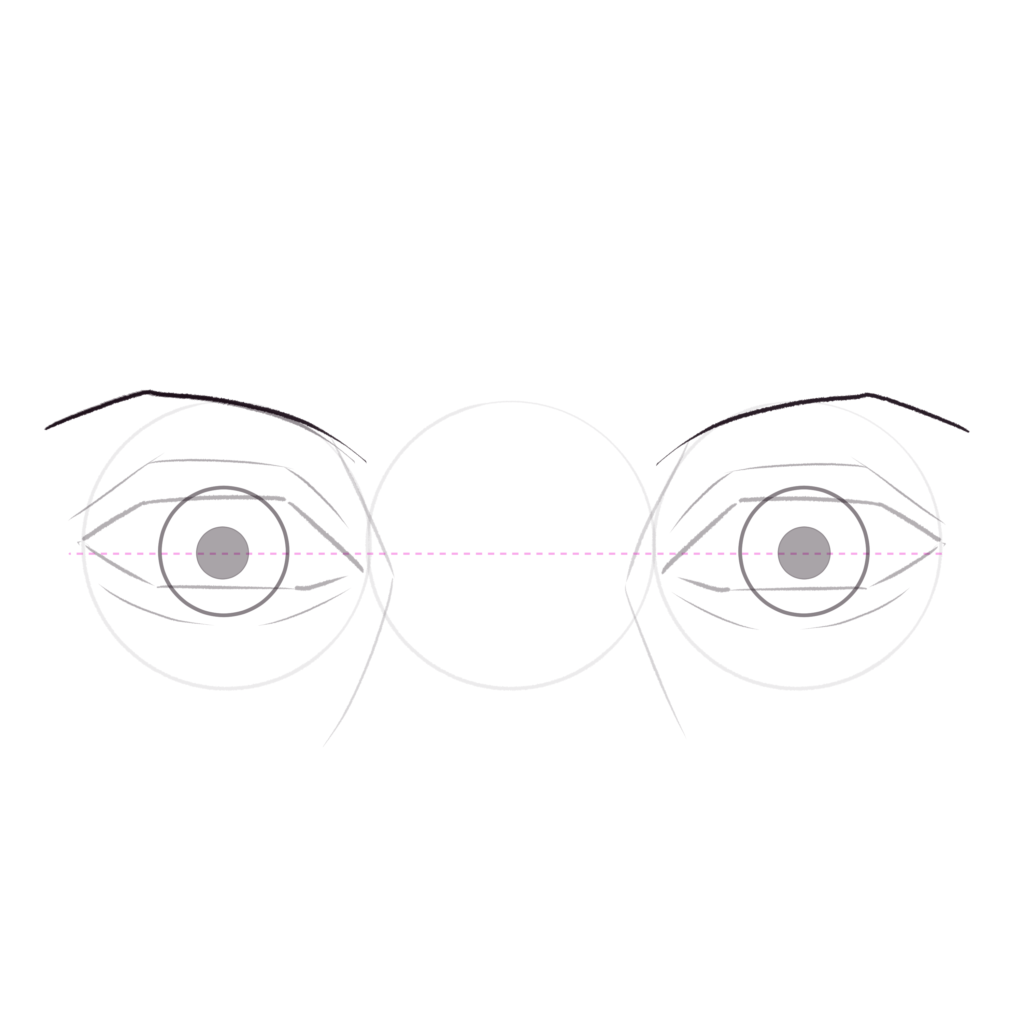
Pull two lines from the top of the eyeballs (remembering the protuberant area of the frontal bone) to the top of our eyeball’s inner side, do the same for the other one, and done!
Step 10: Organic Forms
Turn the structure into organic forms, erasing the guidelines and shading slightly where the eyebrows shape was hinted.
Step 11: Shade the eyeball
The eyeball is… well… a ball, so shade it like you’d shade a sphere that’s being hit from the light from the front, but it’s also hidden inside the eyelids and facial bone structure.
Too hard? I know, but I need you to remember the structure while applying all that we learned.
You can also follow the green areas and put some soft shading over those.
Step 12: The Eyelids
Now shade the eyelids, starting by the skin fold on the upper eyelid, where you’re going to apply a thin yet strong layer of shading to the lower eyelid where you’re going to very softly shade as shown.
Step 13: Under the Inner Eyebrow
Go back to the structure part if you don’t know why this area has one of the strongest shadows or shades in the areas shown below.
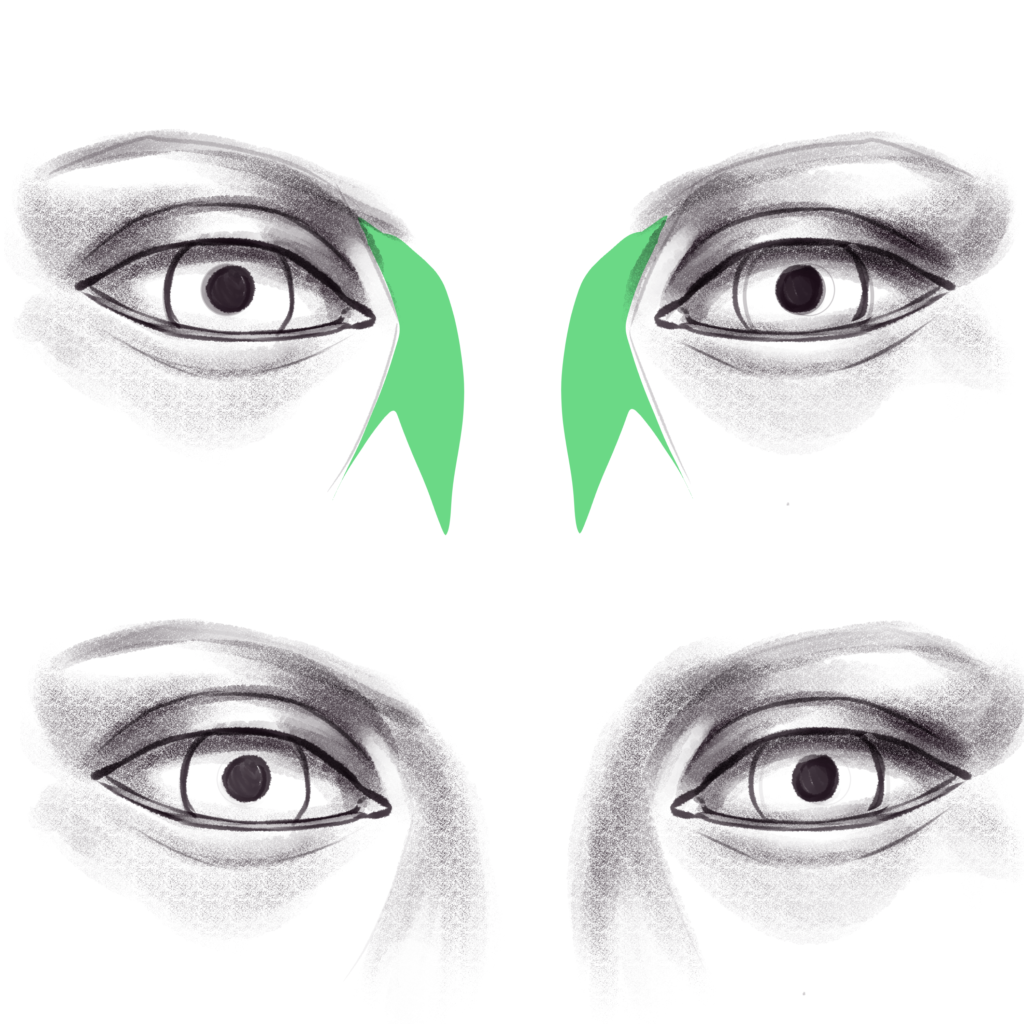
Step 14: The Outer Eyelid
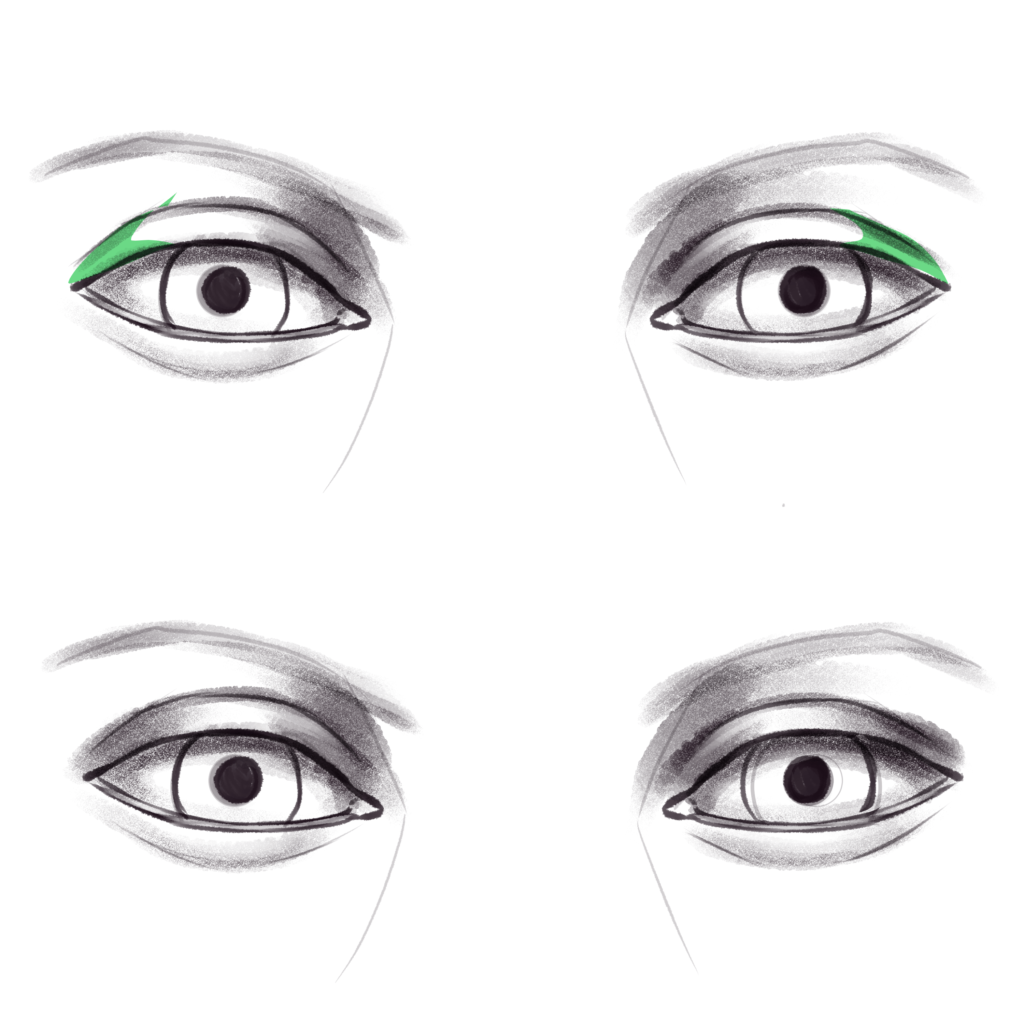
Hint the shadows in this area strongly, giving that way the illusion of volume.
Step 15: The Eye Bag
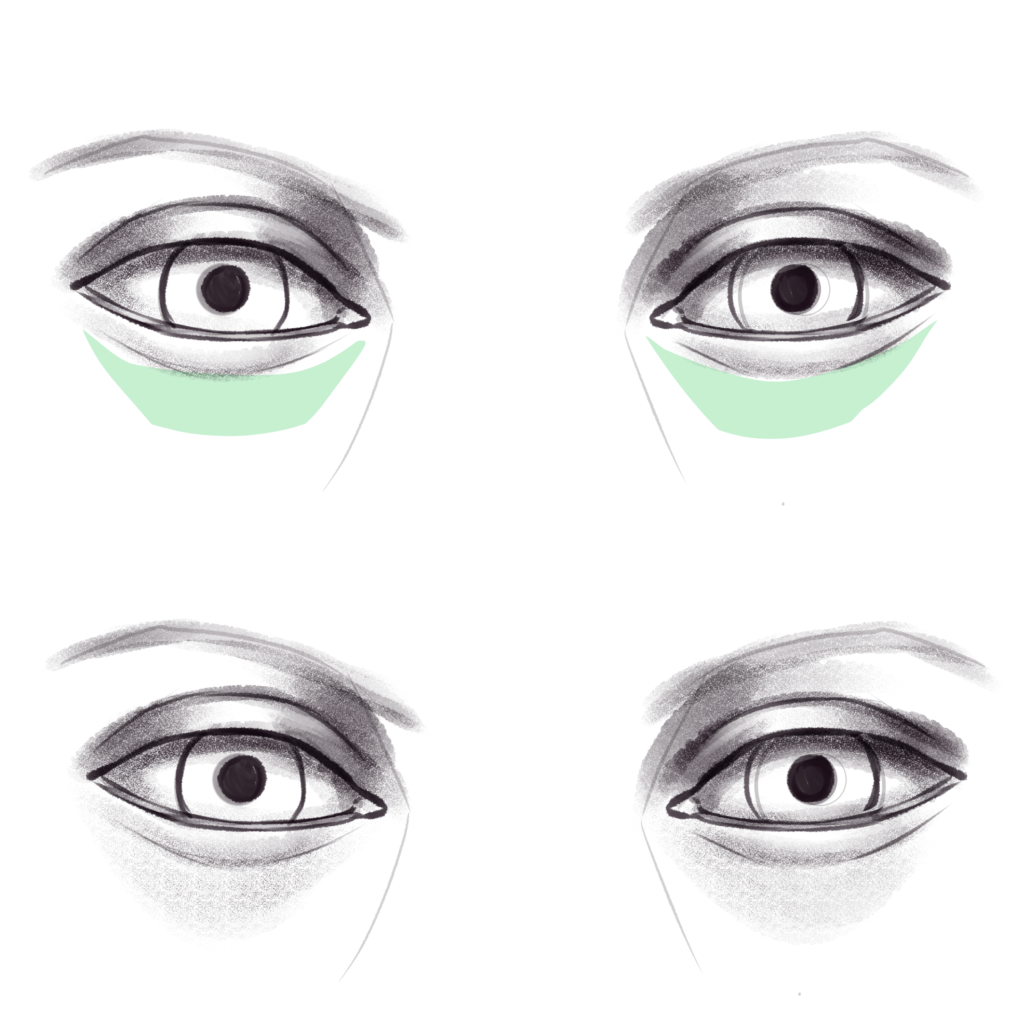
This area is located between the eye muscles and the eye sockets and the skin there is very thin so in some people, this area is heavily sunk or almost unnoticeable. For these eyes we’re going to just put some very soft shadows in the green areas so we don’t forget those exist.
Step 16: Outer Upper Eyelid and Lower Eyelid
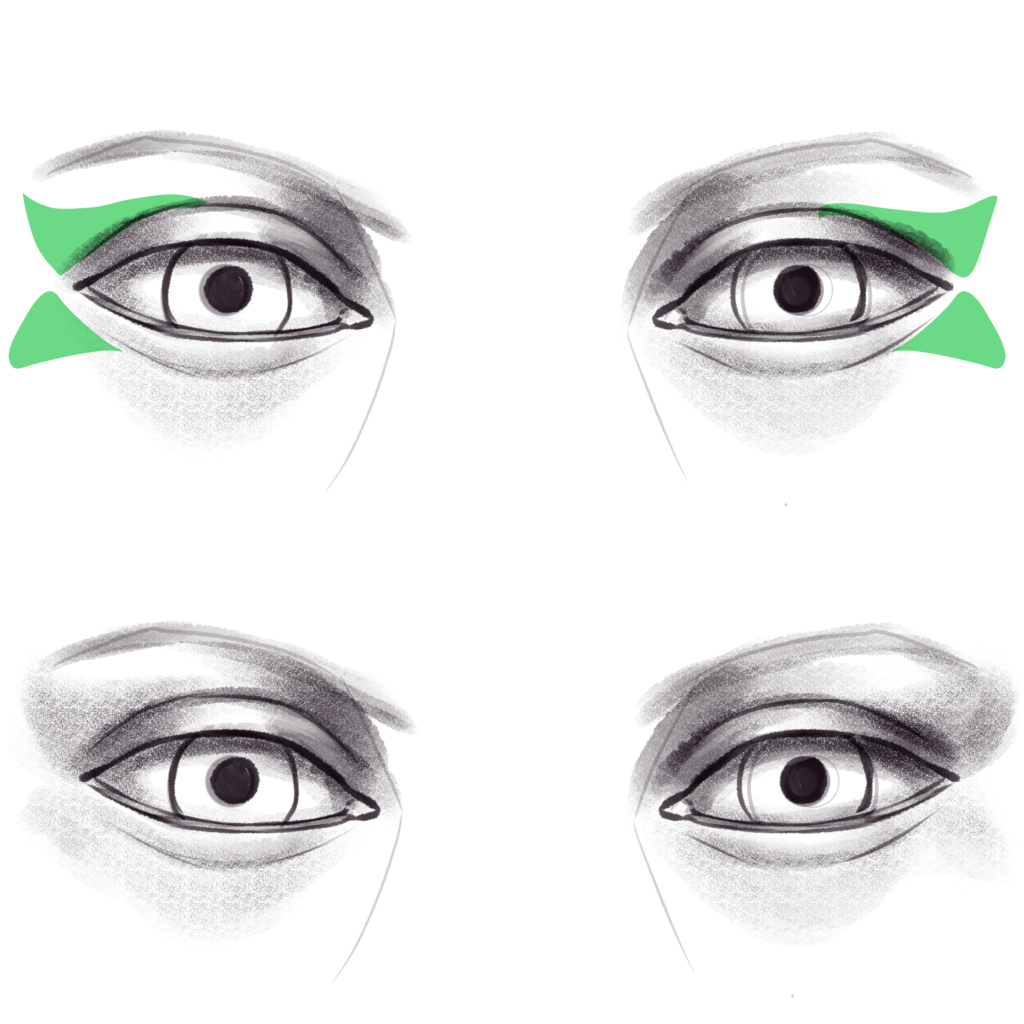
Let’s now get to the good part. These shaded areas hint at two important parts of the structure, the border of the eye socket and the beginning of the cheekbone. Shade softly in those areas to give a more extended illusion of facial volume.
Step 17: The Inner Border of the Eye
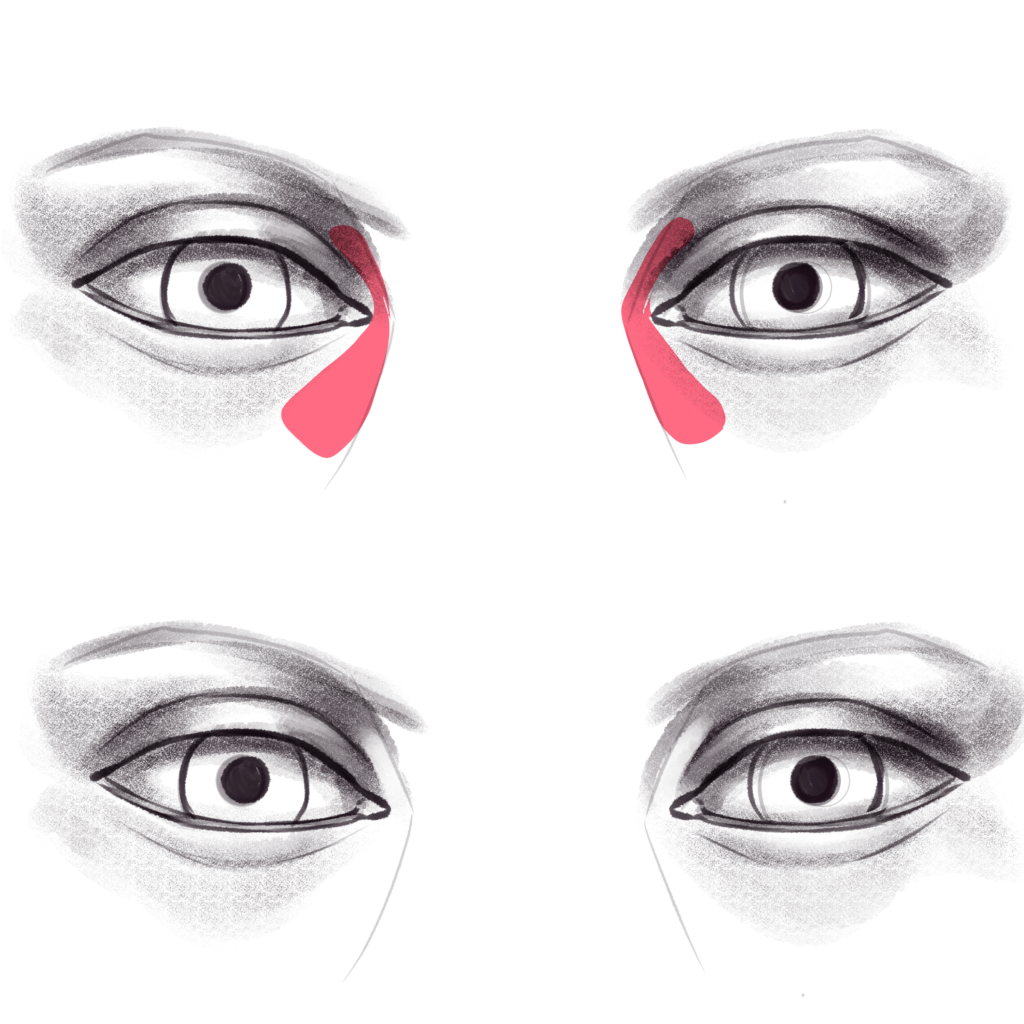
This part of the eye zone is where the skin is being pulled the most by the cheeks, so usually, the light hits there strongly. Take some color away from that zone with your eraser and you’re done!
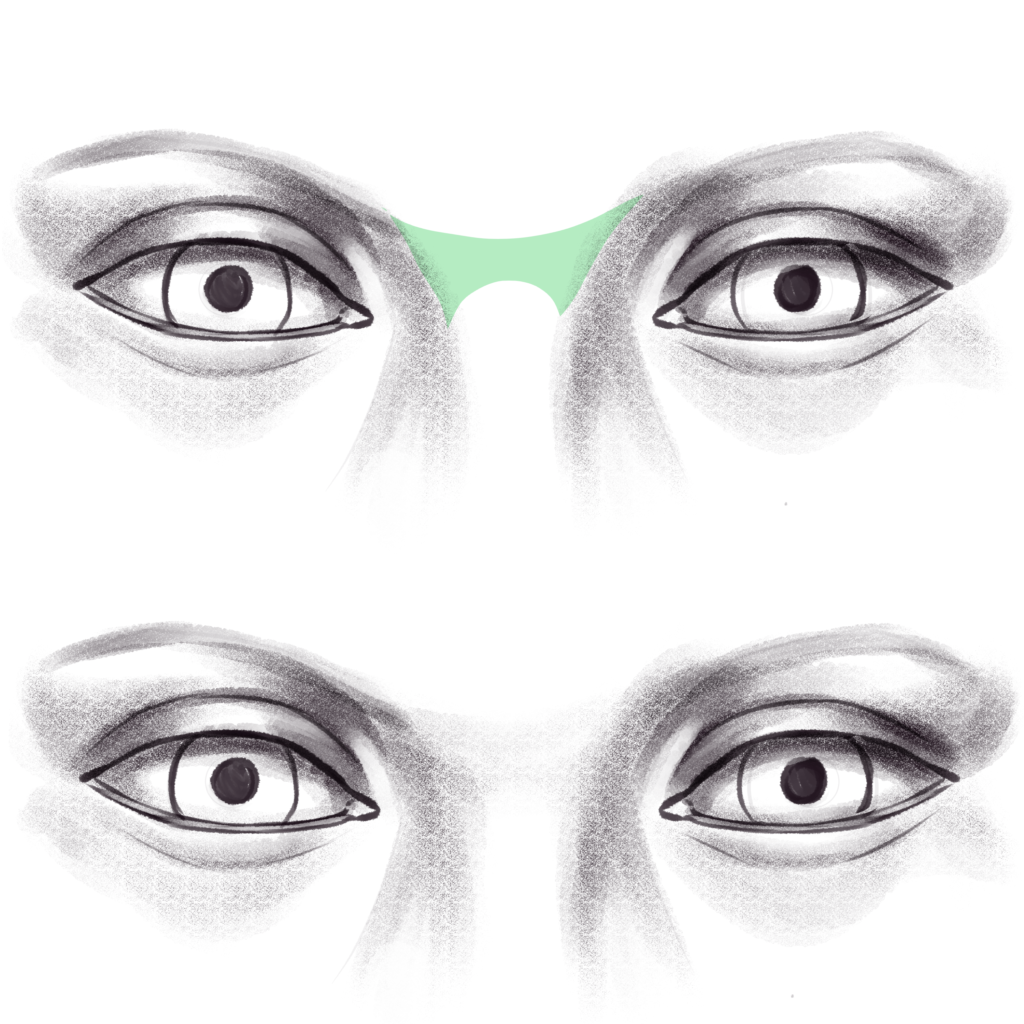
Step 18: The Nose
We can’t really draw the eyes without at least hinting at the nose a little bit. the nose bridge needs another whole article for itself so by now just shade on top of those green areas I highlighted for you. make sure to follow that shape and don’t doubt on using your eraser/kneaded eraser to achieve this look.
Step 19: The Nose Part 2
On top of the nose bridge, right between the eyes, in most people, there’s a slight protuberance coming from the frontal bone, that makes the area very slightly shaded.
Step 20: The iris
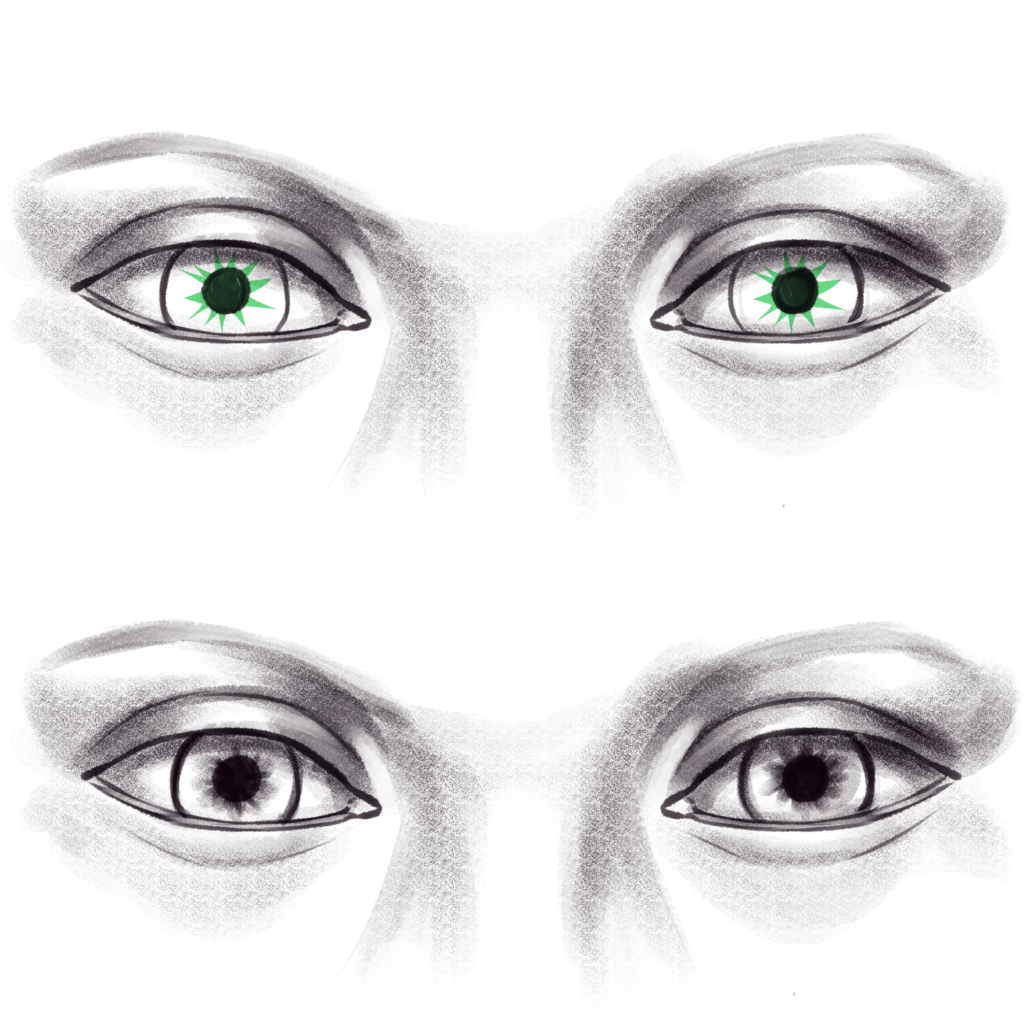
Now for the iris, pull some thick and thin lines from the pupil as shown, and make sure to shade around them as well, you can do that by softly drawing on top of them or use a blending tool.
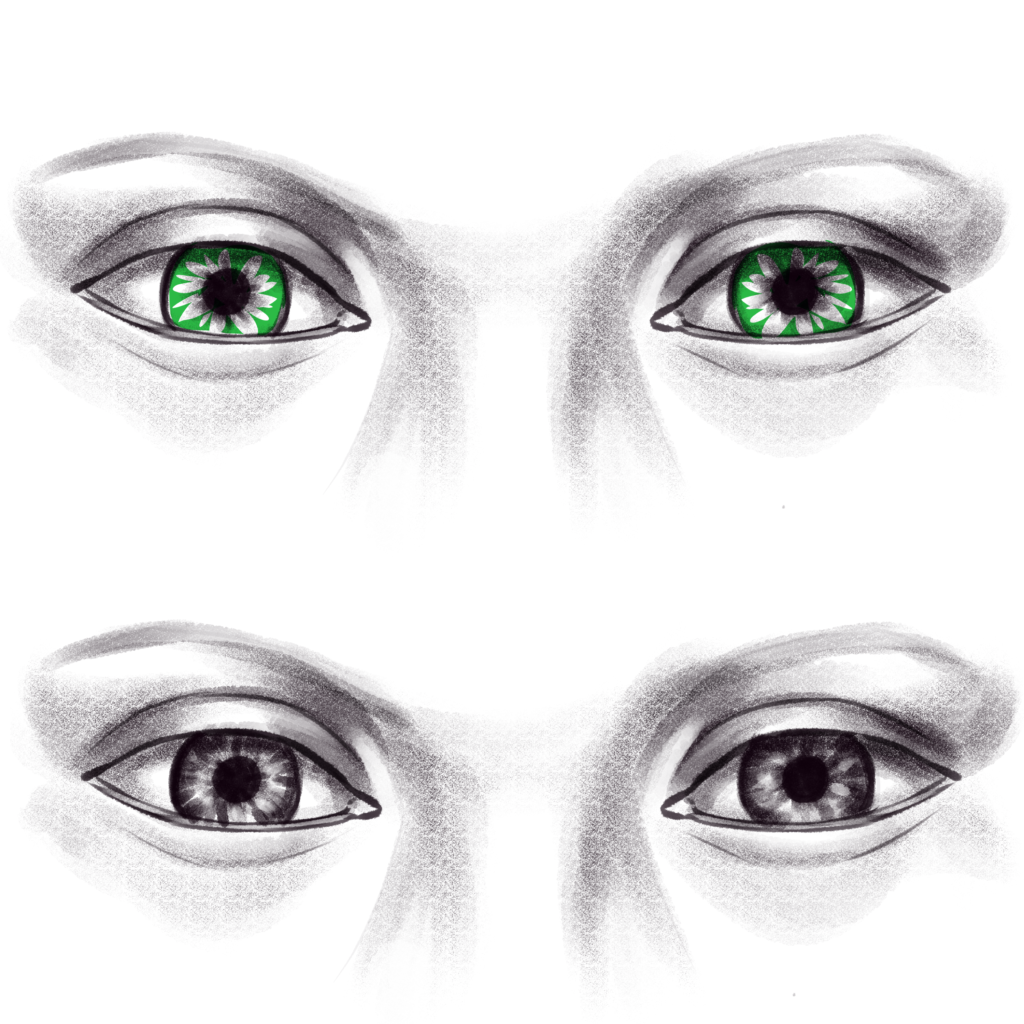
Step 21: The Iris Part 2
Now, for the border of the iris, do somewhat the same, pulling triangular-like shapers from there to the pupil, put and take color with your kneadable eraser or with the sharpest part of your normal eraser if you don’t have one.
Step 22: The Eyebrows and Lashline
Following the lines I highlighted for you, draw some thin and som thick lines mimicking the eyebrows hair, then also, trace a thicker line on top of the eye to hint the lash line.
Step 23: The Eyelashes

Start with only a few curve lines as shown below, and then keep adding more in between them, making tent-like figures with them and placing them randomly. Remember, the eyelashes appear longer on the outer side of the eye and smaller on the inner side.
Step 24 – Final Step: Highlights
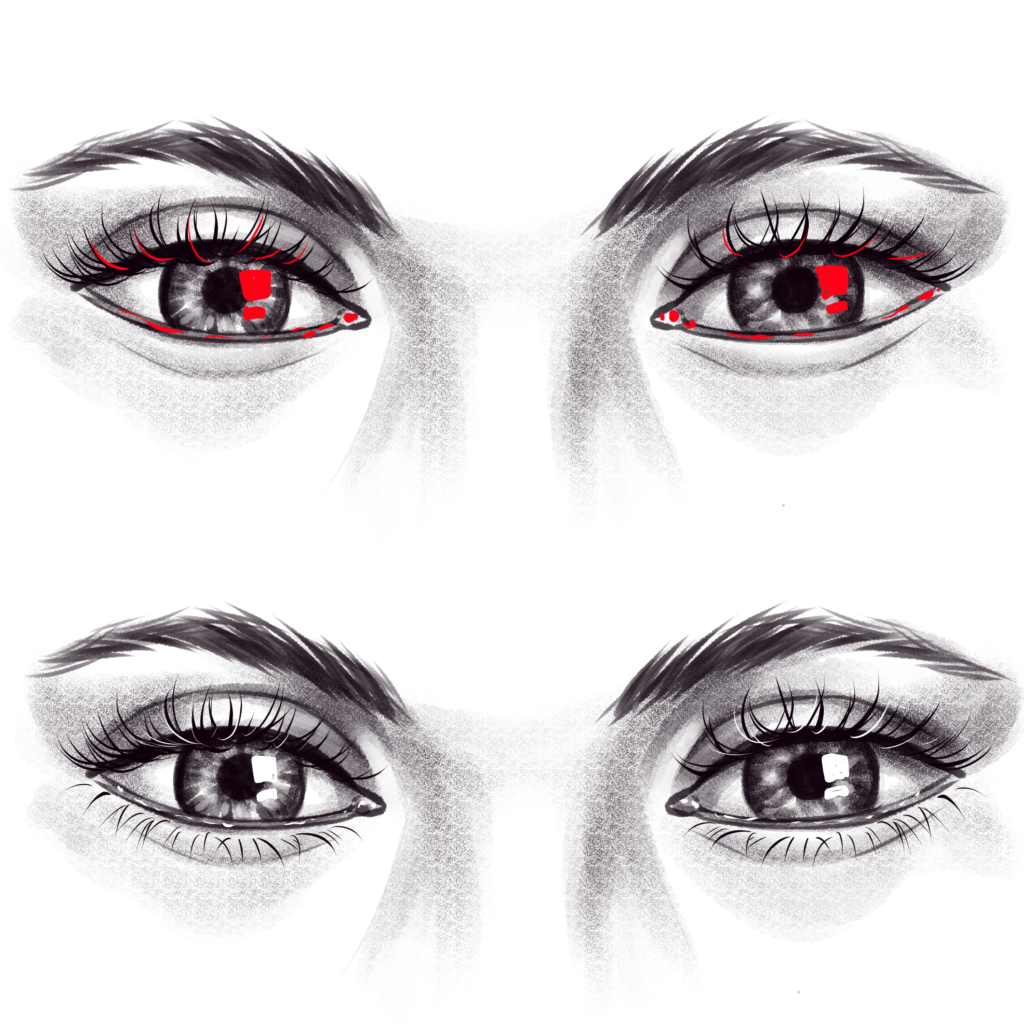
Wow, this has been a trip. but you’re almost done! hint some highlights with your white pen/marker under some eyelashes, on top of the waterline, tear duct, and on the eyeball, you can do that one as you feel it should be, according to where are those eyes in regard to the light. put two small squares to represent a window but I curved them since the window is reflecting on top of a spheric surface.
And you’re done! I hope this article helped you better understand eyes and I also hope you had fun! Thank you for reading!